[TypeScript] TypeScript를 위한 프로젝트 초기 Workflow
Angular2 구현 언어는 TypeScript이다. TypeScript를 배우기 위한 준비과정을 알아본다.
Transpiler
ES2015(EcmaScript 6) 스펙은 모던 브라우저에서 완벽히 구현되어 있지 않기 때문에 최소한 ES5기준에 맞춰서 사용을 해야 한다. TypeScript는 ES2015를 포함해 정적 타입 시스템과 ES7에서 나오는 데코레이터 @을 지원하는 슈퍼셋이다. 따라서 Babel로 ES2015를 ES5로 트랜스파일(Transpile) 하지 않고 TypeScript만의 트랜스파일러를 사용해야 한다.
$ sudo npm install -g typescript
TypeScript 파일의 확장자는 .ts파일로 한다. 그리고 자바스크립 파일로 트랜스파일하기 위해 tsc 명령을 사용한다. 결과물로 동일 명칭의 .js 파일이 생성된다.
$ tsc <fileName>.ts
Editor
Microsoft에서 mac에서도 사용할 수 있는 전용 Code Editor(Visual Studio Code)를 내놓았다. 설치 후 어느 위치에서든 code . 하면 현재 폴더의 파일 구조를 가지고 에디터가 열린다. 그리고 .ts 파일에 대한 스마트 위저드 헬퍼가 자동으로 뜨기 때문에 MS Visual Studio에서 코딩하는 착각을 불러 일으킨다. 필자는 최근 Sublime 3에서 Atom으로 코딩 툴을 옮겼는데 참 흥미롭게 사용중이다. 큰 파일의 경우 약간의 성능저하를 견딜 수 있다면 사용해 보길 권한다.
Atom을 사용한다면 atom-typescript 패키지 설치를 통해 Visual Studio Code에서의 .ts 에 대한 스마트한 기능(Auto Complete, Type Info on hover...)을 그대로 사용할 수 있다. 설치후 F6를 클릭하면 tsc <fileName>.ts 명령을 수행하고 결과를 Notify UI 창으로 성공 실패여부를 알려준다.
tsconfig.json
tsconfig.json 파일은 TypeScript를 위한 프로젝트 단위 환경 파일이다. Exclude 하고 싶은 폴더나 파일, Compile 옵션, File 옵션등을 설정 할 수 있다. TypeScript의 컴파일러인 tsc 명령 수행시 참조한다. tsconfig.json의 전체 스키마를 참조한다. 또는 TypeScript Deep Dive 깃북의 설명을 참조한다.
{
"exclude": [
"node_modules",
"bower_components"
],
"compilerOptions": {
"target": "es5",
"sourceMap": true,
"module": "commonjs",
"declaration": false,
"noImplicitAny": false,
"removeComments": true,
"noLib": false
}
}
TypeScript 배우기
TypeScript를 배우기 위해 ES2015의 문법을 먼저 익히는게 좋다.
- ES2015-features 사이트에서 새로운 기능들이 ES5 스펙과 어떤 차이가 있는지 눈여겨 보자.
- 동영상 강좌를 본다. 필자는 egghead.io의 동영상을 먼저 참조한다. (Pro는 유료이다)
공식홈페이지는 http://www.typescriptlang.org/ 이고, TypeScript 구현체 자체도 오픈소스로 깃헙에 공개되어 있다.
- 공식홈페이지에서 제공하는 TypeScript 스펙 배우기
TSD
TypeScript Definition Manager의 약어이다. 이미 나와있는 프레임워크(angular), 라이브러리(jquery) 같은 것을 사용하면서 애플리케이션을 TypeScript로 작성할 때 이들 구현체의 정의 내역을 미리 알고 코드에서 가이드를 주기위한 파일이다. 확장자는 angular.d.ts 또는 jquery.d.ts처럼 <name>.d.ts 가 붙는다. 예로 $('.awesome').show(); 라고 하면 타입스크립트는 $를 알지 못 한다. 먼저 declare var $:any; 라고 해주어야 사용할 수 있다.
$ npm install -g tsd
tsd를 설치하고 tsd install <name> 으로 설치하면 수행위치에 typings 폴더 밑으로 파일을 다운로드한다.
$ tsd init
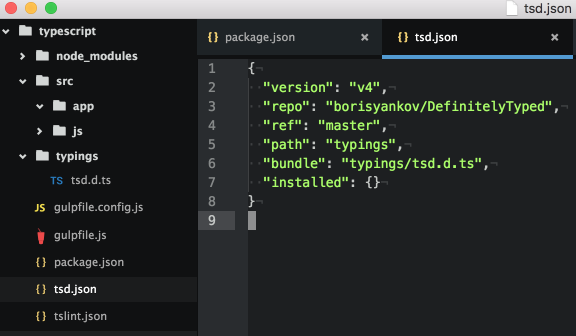
// tsd.json 파일
{
"version": "v4",
"repo": "borisyankov/DefinitelyTyped",
"ref": "master",
"path": "typings",
"bundle": "typings/tsd.d.ts",
"installed": {
"jquery/jquery.d.ts": {
"commit": "efd40e67ff323f7147651bdbef03c03ead7b1675"
},
"angularjs/angular.d.ts": {
"commit": "efd40e67ff323f7147651bdbef03c03ead7b1675"
}
}
}
$ tsd install jquery
$ tsd install angular
이미 만들어져 있는 d.ts 파일을 이곳에서 http://definitelytyped.org/tsd/ 찾아 볼 수 있다. DefinitelyTyped 공식 홈페이지를 참조하자.
WorkFlow
Atom 에디터와 기본 툴을 설치했으니, 프로젝트를 위한 워크플로우를 만들어 보자.
- 프로젝트 폴더 만들기
- "npm install gulp -g" 설치
- npm 초기화 및 develop dependencies 설정
$ npm init
// package.json 첨부
"devDependencies": {
"gulp": "^3.8.11",
"gulp-debug": "^2.0.1",
"gulp-inject": "^1.2.0",
"gulp-sourcemaps": "^1.5.1",
"gulp-tslint": "^1.4.4",
"gulp-typescript": "^2.5.0",
"gulp-rimraf": "^0.1.1",
"del": *,
"superstatic": *,
"browser-sync": *
}
// 의존 라이브러리 설치
$ npm install
- tsd 설치하고, init 초기화 명령으로 tsd.json 파일과 typings 폴더에 tsd.d.ts 파일을 자동 생성한다.
$ npm install -g tsd
$ tsd init
- angular 의 TypeScript Definition 파일을 설치해 보자. 더 많은 라이브러리는 이곳에서 http://definitelytyped.org/tsd/ 에서 찾을 수 있다.
$ tsd install angular --save
- angularjs / angular
-> jquery > jquery
>> running install..
>> written 2 files:
- angularjs/angular.d.ts
- jquery/jquery.d.ts
$ tsd install jquery --save
- jquery / jquery
>> running install..
>> written 1 file:
- jquery/jquery.d.ts
- gulpfile.config.js와 gulpfile.js를 https://github.com/DanWahlin/AngularIn20TypeScript 에서 복사해서 만든다. Gulp Task 설명
- ts 파일 lint를 위해 tslint.json파일 만든다.
{
"rules": {
"class-name": true,
"curly": true,
"eofline": false,
"forin": true,
"indent": [true, 4],
"label-position": true,
"label-undefined": true,
"max-line-length": [true, 140],
"no-arg": true,
"no-bitwise": true,
"no-console": [true,
"debug",
"info",
"time",
"timeEnd",
"trace"
],
"no-construct": true,
"no-debugger": true,
"no-duplicate-key": true,
"no-duplicate-variable": true,
"no-empty": true,
"no-eval": true,
"no-imports": true,
"no-string-literal": false,
"no-trailing-comma": true,
"no-trailing-whitespace": true,
"no-unused-variable": false,
"no-unreachable": true,
"no-use-before-declare": true,
"one-line": [true,
"check-open-brace",
"check-catch",
"check-else",
"check-whitespace"
],
"quotemark": [true, "single"],
"radix": true,
"semicolon": true,
"triple-equals": [true, "allow-null-check"],
"variable-name": false,
"whitespace": [true,
"check-branch",
"check-decl",
"check-operator",
"check-separator"
]
}
}
- Atom에서 atom-typescript를 설치해서 사용한다면 tsconfig.json도 만든다. 아래와 같이 설정값을 입력한다. 설정 값이 있어야 atom-typescript 기능을 사용할 수 있다. 보다 자세한 tsconfig.json 작성 문법을 참조한다.
{
"compilerOptions": {
"target": "es5",
"module": "commonjs",
"declaration": false,
"noImplicitAny": false,
"removeComments": true,
"noLib": false
},
"filesGlob": [
"./**/*.ts",
"!./node_modules/**/*.ts"
],
"files": [
"./globals.ts",
"./linter.ts",
"./main/atom/atomUtils.ts",
"./main/atom/autoCompleteProvider.ts",
"./worker/messages.ts",
"./worker/parent.ts"
]
}
- gulp 명령을 수행하면 .js 파일과 .js.map 파일이 생성된다.
- TypeScript 소개 영상과 소스를 확인해 보자.
Start Kit
yeoman의 generator 처럼 TypeScript프로젝트 관련한 스타트 깃을 사용해 보자. 물론 angular2 기반으로 프로젝트를 가정한다.
- AngularClass에서 제공하는 angular2-webpack-starter
- AngularClass에서 제공하는 Angular2의 Server Rendering을 접목한 Universal Starter
참조
- TypeScript Workflow with Gulp
- TypeScript in Awesome Angular2
- Atom TypeScript 패키지 : atom-typescript


