

React로 Login 화면을 개발한다.
Gateway의 api server와 web dev server의 연결
Gateway를 개발환경에서 api server를 구동하고, web 화면 테스트를 위하여 web dev server가 구동하면 web dev server의 요청이 api server로 proxy 되어야 한다.
- apps/gateway/web/proxy.conf.json 파일을 생성한다.
- apps/gateway/web/project.json에 "proxyConfig" 위치와 "port"는 7000 번으로 설정한다.
// project.json 일부분

"serve": {
      "executor": "@nrwl/web:dev-server",
      "options": {
        "buildTarget": "gateway-web:build",
        "hmr": true,
        "proxyConfig": "apps/gateway/web/proxy.conf.json", <== 요기
        "port": 7000  <== 요기
      },
      ...
}
proxy.conf.json 내역
{
  "/gateway/*": {
    "target": "http://localhost:8000",
    "secure": false,
    "changeOrigin": true,
    "ws": true
  },
  "/api/gateway/*": {
    "target": "http://localhost:8000",
    "secure": false,
    "changeOrigin": true,
    "ws": true
  },
  "/api/auth/login": {
    "target": "http://localhost:8000",
    "secure": false,
    "changeOrigin": true,
    "ws": true
  },
  "/dashboard/*": {
    "target": "http://localhost:8000",
    "secure": false,
    "changeOrigin": true,
    "ws": true
  },
  "/dashboard/api/*": {
    "target": "http://localhost:8000",
    "secure": false,
    "changeOrigin": true,
    "ws": true
  },
  "/configuration/*": {
    "target": "http://localhost:8000",
    "secure": false,
    "changeOrigin": true,
    "ws": true
  },
  "/configuration/api/*": {
    "target": "http://localhost:8000",
    "secure": false,
    "changeOrigin": true,
    "ws": true
  },
  "/back-office/*": {
    "target": "http://localhost:8000",
    "secure": false,
    "changeOrigin": true,
    "ws": true
  },
  "/back-office/api/*": {
    "target": "http://localhost:8000",
    "secure": false,
    "changeOrigin": true,
    "ws": true
  }
}
Web 패키지들 설치
rnn-stack의 글을 참조한다.
- antd components 패키지 설치: "yarn add antd @ant-design/icons"
- React Router 설치: "yarn add react-router react-router-dom"
- Axios 설치: "yarn add axios"
VSCode의 디버깅 실행 환경파일인 launch.json파일에 Web Dev Server를 수행할 수 있도록 설정한다. VSCode에서 실행보다는 별도 terminal 에서 수행하는 것을 권장하고, 옵션으로 사용한다.
// launch.json 일부 내역
    {
      "type": "node",
      "request": "launch",
      "name": "Gateway API",
      "program": "${workspaceFolder}/apps/gateway/api/src/main.ts",
      "preLaunchTask": "build:gateway-api",
      "outFiles": ["${workspaceFolder}/dist/apps/gateway/api/**/*.js"]
    },
    // 하기 내역
    {
      "type": "node",
      "request": "launch",
      "name": "Gatewy Web",
      "runtimeExecutable": "npm",
      "runtimeArgs": ["run", "start:gateway-web"],
      "outFiles": ["${workspaceFolder}/dist/apps/gateway/web/**/*.js"]
    },
npm의 script로 "start:gateway-web"을 설정한다.
// package.json 일부

  "scripts": {
    "build:gateway-api": "nx build gateway-api",
    "start:gateway-api": "nx serve gateway-api",
    "build:gateway-web": "nx build gateway-web",
    "start:gateway-web": "nx serve gateway-web",
    ....
  },
이제 VS Code에서 Gateway web을 실행하고, http://localhost:7000/ 호출한다.
Login 화면 저작
nx 명령을 이용해 login 컴포넌트를 생성한다.
$> nx g @nrwl/react:component login --project=gateway-web
login.tsx 내역
// login.tsx
import { Row, Col, Form, Input, Button } from 'antd';
import { httpService } from '@rnm/ui';
import { LoginDto } from '@rnm/model';
import styles from './login.module.scss';

export function Login() {
  const onFinish = (user: LoginDto) => {
    httpService.post<LoginDto>('/api/auth/login', user).subscribe((result: LoginDto) => {
      console.log('Success:', result);
      // redirect dashboard
      location.href = '/dashboard';
    });
  };

  const onFinishFailed = (errorInfo: any) => {
    console.log('Failed:', errorInfo);
  };

  return (
    <div className={styles.login_container}>
      <div className={styles.center_bg}>
        <Row justify="center" align="middle" className={styles.form_container}>
          <Col span={16} offset={6}>
            <Form
              name="basic"
              layout="vertical"
              labelCol={{ span: 16 }}
              wrapperCol={{ span: 16 }}
              initialValues={{ remember: true }}
              onFinish={onFinish}
              onFinishFailed={onFinishFailed}
              autoComplete="off"
            >
              <Form.Item
                label="Username"
                name="username"
                rules={[{ required: true, message: 'Please input your username!' }]}
              >
                <Input />
              </Form.Item>

              <Form.Item
                label="Password"
                name="password"
                rules={[{ required: true, message: 'Please input your password!' }]}
              >
                <Input.Password />
              </Form.Item>

              <Form.Item wrapperCol={{ span: 16 }}>
                <Button type="primary" htmlType="submit" block>
                  Submit
                </Button>
              </Form.Item>
            </Form>
          </Col>
        </Row>
      </div>
    </div>
  );
}

export default Login;
Gateway API 서버 호출하기
Web 에서 사용할 라이브러리는 분리하고, API와 Web이 공용하는 부분은 Model에만 국한한다. 따라서 @rnm/model 패키지를 생성한다.
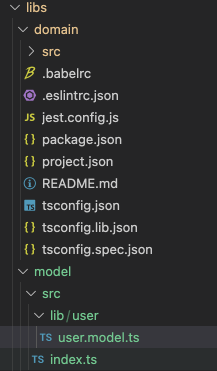
$> nx g @nrwl/react:lib model --publishable --importPath=@rnm/modeldomain/entities/user/user.model.ts 을 libs/model/src/lib/user/user.model.ts 로 copy하고, domain에서는 삭제한다. 그리고 user.model사용하는 클래스를 일괄 수정한다.
// user.model.ts
export interface User {
  id?: number;
  username: string;
  password?: string;
  email?: string;
  firstName?: string;
  lastName?: string;
  role?: string;
  sub?: string | number;
  currentHashedRefreshToken?: string;
}
export type LoginDto = Pick<User, 'username' | 'password'>;
export type TokenPayload = Omit<User, 'password'>;

export enum UserRole {
  ADMIN = 'ADMIN',
  MANAGER = 'MANAGER',
  CUSTOMER = 'CUSTOMER',
  GUEST = 'GUEST',
}
다음으로 libs/ui/src/lib/ajax/http.service.ts 파일을 생성하고, http.service.ts 코드에, error처리 notification을 추가한다.
// http.service.ts 일부
  import { notification } from 'antd';

  ...
  private executeRequest<T>(args: RequestArgs): Observable<T> {
    const { method, url, queryParams, payload } = args;
    let request: AxiosPromise<T>;
    switch (method) {
      case HttpMethod.GET:
        request = this.httpClient.get<T>(url, { params: queryParams });
        break;
      case HttpMethod.POST:
        request = this.httpClient.post<T>(url, payload);
        break;
      case HttpMethod.PUT:
        request = this.httpClient.put<T>(url, payload);
        break;
      case HttpMethod.PATCH:
        request = this.httpClient.patch<T>(url, payload);
        break;
      case HttpMethod.DELETE:
        request = this.httpClient.delete<T>(url);
        break;
    }

    return new Observable<T>((observer: Observer<T>) => {
      request
        .then((response: AxiosResponse) => {
          observer.next(response.data);
        })
        .catch((error: AxiosError | Error) => {
          this.abort(true);
          if (axios.isAxiosError(error)) {
            if (error.response) {
              // NestJS의 global-exception.filter.ts의 포멧
              const data: any = error.response?.data || {};
              this.showNotification(`[${data.statusCode}] ${data.error}`, data.message);
              console.log(`[${data.statusCode}] ${data.error}: ${data.message}`);
            }
          } else {
            this.showNotification('Unknow Error', error.message);
            console.log(error.message);
          }
        })
        .finally(() => {
          this.completed = true;
          observer.complete();
        });
      return () => this.abort();
    });
  }

  private showNotification(message: string, description: string): void {
    notification.error({
      message,
      description
    });
  }
}
에러처리는 libs/shared/src/lib/filter/global-exception.filter.ts 의 에러 포멧을 따른다.
import { Request, Response } from 'express';
import { ArgumentsHost, Catch, ExceptionFilter, HttpException, HttpStatus, Logger } from '@nestjs/common';

@Catch()
export class GlobalExceptionFilter implements ExceptionFilter {
  catch(exception: any, host: ArgumentsHost) {
    const ctx = host.switchToHttp();
    const response = ctx.getResponse<Response>();
    const request = ctx.getRequest<Request>();
    const message = (exception as any).message;

    Logger.error(message, (exception as any).stack, `${request.method} ${request.url}`);

    const name = exception?.constructor?.name || 'HttpException';
    let status = HttpStatus.INTERNAL_SERVER_ERROR;
    switch (name) {
      case 'HttpException':
        status = (exception as HttpException).getStatus();
        break;
      case 'UnauthorizedException':
        status = HttpStatus.UNAUTHORIZED;
        break;
      case 'ForbiddenException':
        status = HttpStatus.FORBIDDEN;
        break;
      case 'QueryFailedError':  // this is a TypeOrm error
        status = HttpStatus.UNPROCESSABLE_ENTITY;
        break;
      case 'EntityNotFoundError':  // this is another TypeOrm error
        status = HttpStatus.UNPROCESSABLE_ENTITY;
        break;
      case 'CannotCreateEntityIdMapError': // and another
        status = HttpStatus.UNPROCESSABLE_ENTITY;
        break;
      default:
        status = HttpStatus.INTERNAL_SERVER_ERROR;
    }

	// 에러 리턴 포멧
    response.status(status).json(
      {
        statusCode: status,
        error: name,
        message,
        method: request.method,
        path: request.url,
        timestamp: new Date().toISOString()
      }
    );
  }
}
테스트 진행시 UI가 Nest쪽 패키지를 사용하면 번들링 오류가 발생할 수 있다. 따라서 libs 하위의 패키지들은 향후 API용, WEB용 구분하여 사용하고, model 패키지만 공용으로 사용한다. API용, WEB용을 구분한다면 하기와 같이 별도 폴더로 묶어 관리하는게 좋아 보인다.
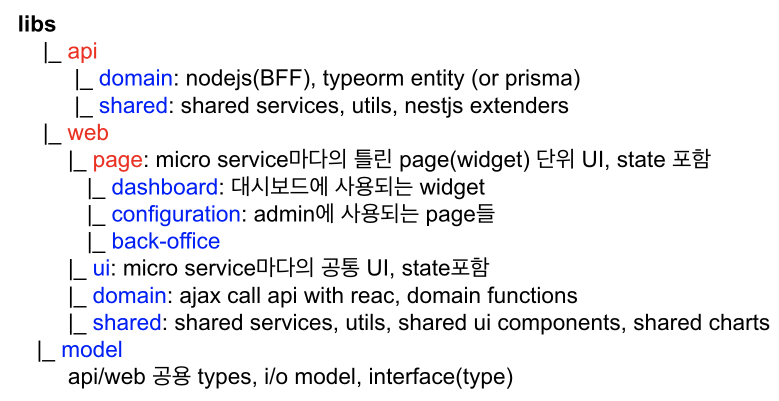
Nx 기반 library 생성 명령은 다음과 같다.
// api library
$>  nx g @nrwl/nest:lib api/shared --publishable --importPath=@rnm/api-shared
$>  nx g @nrwl/nest:lib api/domain --publishable --importPath=@rnm/api-domain

// web library
$> nx g @nrwl/react:lib web/shared --publishable --importPath=@gv/web-shared
$> nx g @nrwl/react:lib web/domain --publishable --importPath=@gv/web-domain
$> nx g @nrwl/react:lib web/ui --publishable --importPath=@gv/web-ui

// model library
$> nx g @nrwl/nest:lib model --publishable --importPath=@gv/model
소스: https://github.com/ysyun/rnm-stack/releases/tag/ms-9
Release ms-9 · ysyun/rnm-stack
[ms-9] added login component and enhanced ajax error notification
github.com
<참조>
- React 라이브러리 환경 구성
https://mobicon.tistory.com/580
[React HH-3] 라이브러리 설정 - Axios, RxJS
React 외에 애플리케이션 개발을 위한 라이브러리를 설치한다. UI Components PrimeReact, EUI, MaterialUI, AntD 검토후 소스레벨 최신으로 반영하고 있고, 다양한 비즈니스 UX 대응 가능한 AntD를 선택한다. //..
mobicon.tistory.com
- location.href와 location.replace 차이점
https://opentutorials.org/module/2919/22904
location.href 와 location.replace 차이점 - JavaScript Tips
[출처] [자바스크립트] location.href 와 location.replace 의 차이점.|작성자 왕따짱 location.href location.replace 기능 새로운 페이지로 이동된다. 기존페이지를 새로운 페이지로 변경시킨다. 형태 속
opentutorials.org
'React > Architecture' 카테고리의 다른 글
| [MS-11] i18n 외부파일 위치 변경 및 Web Dev Server 연결 (0) | 2021.10.07 |
|---|---|
| [MS-10] API/Web i18n 적용 및 리팩토링 (0) | 2021.10.02 |
| [MS-8] NestJS Auth/Role 기능 Gateway에 추가하기 (0) | 2021.09.30 |
| [MS-7] Refresh Token 설정 (0) | 2021.09.30 |
| [MS-6] NestJS의 JWT 기반 Auth Server 환경구축 (0) | 2021.09.27 |