

AngularJS를 사용할 때 가장 햇갈리는 부분이면서 중급으로 가기위하여 반드시 알고 넘어가야 하는 부분이 Scope 오브젝트에서 제공하는 $watch, $apply, $digest 메소드이다. 이들에 대해서 알아보자

1. Event-Loop와 Angular Way
- 브라우져는 사용자의 동작에 반응(이벤트)하기 위하여 이벤트 루프를 돌며 이벤트에 반응한다
- Angular는 "angular context"라는 것을 만들어서 이벤트 루프를 확장한다
2. $watch 목록
- UI와 무언가를 바인딩하게 되면 반드시 $watch list(목록)에 $watch를 넣는다
- $watch는 모델(model)에 변경이 있는지를 항시 감시하는 역할을 한다
- user와 pass에 대한 model 변경을 감시하기 위하여 두개의 $watch가 만들어져서 $watch list에 첨부된다
Password: <input type="password" ng-model="pass" />
- $scope에 모델을 두개 만들고, html에서 한개의 model만 사용할 경우는 $watch가 한개만 만들어져서 $watch list에 첨부된다
// script
app.controller('MainCtrl', function($scope) { $scope.foo = "Foo"; $scope.world = "World"; });
// html
Hello, {{world}}
- 배열일 경우 객체의 멤버를 각각 {{}}로 사용했으므로, name 1개, age 1개의 $watch가 만들어 진다. 예로 people 배열이 10개면
10 (배열) * 2 (name, age) + 1 (ng-repeat자체) = 총 21개의 $watch가 만들어져서 $watch list에 첨부된다
// script
app.controller('MainCtrl', function($scope) { $scope.people = [...]; });
// html
<ul>
<li ng-repeat="person in people"> {{person.name}} - {{person.age}} </li> </ul>- Directives 만들 때도 바인딩이 있으면 당연히 $watch가 생성된다. 그럼 언제일까? template이 로딩될때 즉, linking 절차일때 필요한 $watcher가 생성된다
3. $digest loop
- 브라우져가 "angular context"에 의하여 관리되어 질 수 있는 이벤트를 받게 될 때, $digest loop 가 작동되어 진다
- $digest loop은 두개의 작은 루프로 만들어진다. 하나는 $evalAsync queue를 처리하고, 다른 하나는 $watch list를 처리한다
- 처리되어지는 것은 무엇일까?
$digest는 $watch list를 루핑돌면서 model 변경을 체크하고, $watch에 등록된 listener handler를 수행한다
- 이때 dirty-checking이 이루어지는데, 하나가 변경되면 모든 $watch를 루핑돌고 다시 체크해 보고 변화가 없을 때가지 루핑을 돈다
그러나 무한 루프를 방지하기 위하여 기본적으로 최대 10번의 루핑을 돈다.
그리고 나서 $digest loop가 끝났을 때 DOM을 업데이트 한다. (즉, 변경감지시 즉시 DOM 반영이 아닌 Loop끝났을 때 반영함)
- 예를 보자.
1) $watch를 하나 가진다. ng-click의 경우는 클릭하면 펑션이 수행되므로 변화가 발생하지 않기 때문에 {{ name}}에 대해 1개만 생성
2) 버튼을 클릭한다
3) 브라우져는 "angular context"로 들어가서 처리될 이벤트를 받는다
4) $digest loop 가 수행되고, 변경을 체크하기 위하여 $watch에게 문의를 한다
5) $watch는 $scope.name에 변경이 있으면 변경을 보고한다. 그러면 다시 한번 $digest loop가 강제 수행된다
6) $digest loop 돌면서 더 이상 변경된 것이 없다
7) 브라우져는 통제권을 돌려받고 $scope.name 변경값을 반영하기 위하여 DOM을 업데이트 한다
여기서 중요한 것은 "angular context" 안으로 들어간 모든 이벤트는 $digest loop를 수행한다 는 것이다.
즉, 예로 input에 write하는 매번, 모든 $watch를 돌면서 변경을 체크하는 루프가 수행되는 것이다
// script
app.controller('MainCtrl', function() { $scope.name = "Foo"; $scope.changeFoo = function() { $scope.name = "Bar"; } });
// html
{{ name }} <button ng-click="changeFoo()">Change the name</button>
4. $apply를 통하여 angular context로 들어가기
- 이벤트가 발생할 때 $apply를 호출하게 되면, 이벤트는 "angular context"로 들어가게 된다
- 그런데 $apply를 호출하지 않으면 "angular context" 밖에서 이벤트는 수행하게 된다
- 기존 ng-click 같은 이미 만들어져 있는 Directive들은 이벤트를 $apply 안에 랩핑한다.
또는 ng-model="foo"가 있다면 'f'를 입력하면 $apply("foo='f';")식으로 랩핑하여 호출한다
5. Angular는 우리를 위해 자동으로 $apply를 호출해 주지 않는다
- jQuery의 예를 보면 jQuery 플러그인에서 이벤트에 대해 $apply가 호출되지 않기 때문에 발생한 이벤트는 "angular context"로 못들어가게 되므로 "$digest loop"도 수행되지 않게 된다. 결국 DOM의 변경이 발생하지 않는다
- 예를 보자 : <clickable> 앨리먼트를 클릭할 때마다 foo, bar 값이 1씩 증가하는 Directive이다
1) 클릭을 해보면 1씩 증가를 할까? 증가 하지 않는다
2) click 이벤트는 공통 이벤트이고 $apply로 감싸(랩핑)지지 않았기 때문이다
3) 결국 "angular context"에 못들어가니 "$digest loop"가 수행되지 않으니 $watch도 수행되지 않기 때문에 DOM 변경은 없다.
단, Click을 하게 되면 값은 1씩 증가한다. 즉 $scope값 변경이 DOM에 반영되지 않는다
app.directive('clickable', function() { return { restrict: "E", scope: { foo: '=', bar: '=' }, template: '<ul style="background-color: lightblue"><li>{{foo}}</li><li>{{bar}}</li></ul>', link: function(scope, element, attrs) { element.bind('click', function() { scope.foo++; scope.bar++; }); } } });
- 예제 : http://jsbin.com/opimat/2/edit 를 보자

1) <clickable> 파란색 영역을 2번 클릭하면 숫자값의 변경에 대해서 DOM에 반영되지 않는다. 즉, 화면은 그대로 0 이다
2) <button>의 ng-click을 하게되면 setHello()가 호출되고 자동으로 $apply에 감싸서 수행된다
3) 이벤트가 "angular context"로 들어가면 "$digest loop"가 수행되면서 모든 "$watch list"를 돌면서 변경을 체크한다
4) 변경된 값이 있다면 DOM을 업데이트 하므로 <clickable>의 foo, bar값이 현재 2번 클릭하여 2이므로 DOM으로 2로 변경한다
<script src="https://ajax.googleapis.com/ajax/libs/angularjs/1.0.7/angular.min.js"></script>
<meta charset=utf-8 />
<title>Directive example</title>
</head>
<body ng-controller="MainCtrl">
<clickable foo="foo" bar="bar"></clickable>
<hr />
{{ hello }} <button ng-click="setHello()">Change hello</button>
</body>
</html>
- 이벤트를 "angular context"로 들어가서 처리하게 해주는 방법-1
이벤트 안에서 $apply()를 호출한다
$apply는 $scope(또는 Directive link의 scope)의 메소드이다. 따라서 $apply를 호출하여 "$digest loop"를 강제로 수행시킨다.
});
- 이벤트를 "angular context"로 들어가서 처리하게 해주는 방법-2
여기서는 단순 값의 증가이지만 내부적으로 서버요청하다 에러가 발생하면 "방법-1"에서는 "angular context"가 전혀 에러를 알 수 없다
방법-2처럼 감싸서(Wrapped) 사용해야 에러가 발생하면 "angular context"가 알 수 있도록 대응을 할 수 있다
})
- jQuery 플로그인을 사용하면 $apply 호출을 통해 "$digest loop"가 수행시켜 DOM 업데이트를 할 수 있다
6. 우리 것은 $watch를 사용하자
- 우리의 모든 바인딩은 DOM 업데이트를 위하여 각각 $watch를 생성한다는 것을 알고 있다.
우리가 직접 $watch를 만들고 싶다면 어떨까?
- 예를 보자
1) $watch 첫번째 인자는 String, function이 가능하다. 여러개 모델 감시는 ; 로 구분한다
2) 두번째 인자는 첫번째 인자의 값이 변경되면 수행될 Handler 이다
3) 여기서는 <input>의 값을 변경할 때마다 updated 값이 1씩증가하여 {{updated}}에 값이 반영된다. 즉, DOM이 업데이트 된다
4) View에서 값이 변경되어 Controller가 수행될 때 $watch를 발견하게 되고 바로 $watch가 수행된다.
// script
app.controller('MainCtrl', function($scope) { $scope.name = "Angular"; $scope.updated = -1; $scope.$watch('name', function() { $scope.updated++; }); });
// html
<body ng-controller="MainCtrl">
<input ng-model="name" /> Name updated: {{updated}} times. </body>5) Controller가 수행되면서 $watch가 무조건 수행되는 것을 막기 위한 방법으로 두번째 인자 펑션의 파라미터 값으로 new, old 값을 받아 비교한다. 즉 최초에는 수행되지 않게 된다
});
6) 만일 값변경을 체크하는 것이 Object일 경우는 $watch의 3번째 인자값으로 true를 준다. 즉, Object의 비교를 수행도록 한다
app.controller('MainCtrl', function($scope) {
$scope.user = { name: "Fox" }; $scope.updated = 0; $scope.$watch('user', function(newValue, oldValue) { if (newValue === oldValue) { return; } $scope.updated++; }, true); });
주의할 점은 한 페이지에 $digest loop를 돌면서 체크하는 $watch가 2000~3000개 정도 생성되는 경우라면 성능상에 이슈가 있겠지만, 일반적인 경우 dirty-checking 하는 $digest loop은 상당히 빠르다
<참조>
- 원문 : Watch how the apply runs a digest
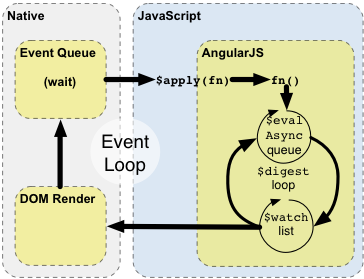
The diagram and the example below describe how Angular interacts with the browser's event loop.
일반적인 세상)
1. The browser's event-loop waits for an event to arrive. An event is a user interaction, timer event, or network event (response from a server).
2. The event's callback gets executed. This enters the JavaScript context. The callback can modify the DOM structure.
3. Once the callback executes, the browser leaves the JavaScript context and re-renders the view based on DOM changes.
앵귤러 세상)
Angular modifies the normal JavaScript flow by providing its own event processing loop. This splits the JavaScript into classical and Angular execution context. Only operations which are applied in Angular execution context will benefit from Angular data-binding, exception handling, property watching, etc... You can also use $apply() to enter Angular execution context from JavaScript. Keep in mind that in most places (controllers, services) $apply has already been called for you by the directive which is handling the event. An explicit call to $apply is needed only when implementing custom event callbacks, or when working with third-party library callbacks.
1. Enter Angular execution context by calling scope.$apply(stimulusFn). Where stimulusFn is the work you wish to do in Angular execution context.
2. Angular executes the stimulusFn(), which typically modifies application state.
3. Angular enters the $digest loop. The loop is made up of two smaller loops which process $evalAsync queue and the $watch list. The $digest loop keeps iterating until the model stabilizes, which means that the $evalAsync queue is empty and the $watch list does not detect any changes.
4. The $evalAsync queue is used to schedule work which needs to occur outside of current stack frame, but before the browser's view render. This is usually done with setTimeout(0), but the setTimeout(0) approach suffers from slowness and may cause view flickering since the browser renders the view after each event.
5. The $watch list is a set of expressions which may have changed since last iteration. If a change is detected then the $watch function is called which typically updates the DOM with the new value.
6. Once the Angular $digest loop finishes the execution leaves the Angular and JavaScript context. This is followed by the browser re-rendering the DOM to reflect any changes. H
예)
ere is the explanation of how the Hello world example achieves the data-binding effect when the user enters text into the text field.
1. During the compilation phase:
1. the ng-model and input directive set up a keydown listener on the <input> control.
2. the {{name}}interpolation sets up a $watch to be notified of name changes.
2. During the runtime phase:
1. Pressing an 'X' key causes the browser to emit a keydown event on the input control.
2. The input directive captures the change to the input's value and calls $apply("name = 'X';") to update the application model inside the Angular execution context.
3. Angular applies the name = 'X'; to the model.
4. The $digest loop begins
5. The $watch list detects a change on the name property and notifies the {{name}} interpolation, which in turn updates the DOM.
6. Angular exits the execution context, which in turn exits the keydown event and with it the JavaScript execution context.
7. The browser re-renders the view with update text.
'AngularJS > Concept' 카테고리의 다른 글
| [SPA] Modern Web에서의 Design Pattern 인식의 전환 (0) | 2013.09.28 |
|---|---|
| [AngularJS] Service 종류 이해하기 (0) | 2013.08.22 |
| [AngularJS] Think in AngularJS Way (0) | 2013.08.21 |
| [AngularJS] 웹 애플리케이션 견고하게 만드는 방법 (0) | 2013.04.27 |
| [AngularJS] 개발자 가이드 - 06. 모듈 (0) | 2013.04.11 |


