

NestJS과 React에 i18n을 적용하고, config 파일로딩에 대한 리팩토링과 기타 기능들을 추가로 적용한다.
NestJS에 i18n 적용
nestjs-i18n 패키지를 사용한다.
$> yarn add nestjs-i18n
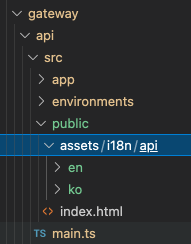
i18n message 파일은 json 포멧이고, 이를 위해 apps/gateway/api/src/public/assets/i18n/api 폴더를 생성한다. i18n/api 폴더에는 언어에 맞는 폴더를 생성한다.
- nestjs 번들링 배포시 api 서버의 i18n 파일은 public/assets/i18n/api 폴더 하위에 위치한다.
- react 번들링 파일의 i18n 파일은 public/assets/i18n/web 폴더 하위에 위치한다.
libs/shared/src/lib/configuration/config.model.ts 의 GatewayConfiguration에 I18N_LANG 을 추가한다.
// config.model.ts
export interface MicroServiceConfiguration {
  REVERSE_CONTEXT?: string;
  REVERSE_ADDRESS?: string;
  HTTP_PORT?: number,
  TCP_HOST?: string;
  TCP_PORT?: number,
  GLOBAL_API_PREFIX?: string;
  AUTH?: AuthConfig;
  I18N_LANG?: string; // <== 요기
  I18N_JSON_PATH?: string; // <== 요기
}

export interface GatewayConfiguration {
  HTTP_PORT?: number,
  DASHBOARD?: MicroServiceConfiguration;
  CONFIGURATION?: MicroServiceConfiguration;
  BACK_OFFICE?: MicroServiceConfiguration;
  AUTH?: AuthConfig;
  I18N_LANG?: string; // <== 요기
  I18N_JSON_PATH?: string; // <== 요기
}
apps/gateway/api/src/environments/config.json 파일에 환경을 설정한다.
// config.json
{
  "HTTP_PORT": 8000,
  "AUTH": {
    "SECRET": "iot_secret_auth",
    "EXPIRED_ON": "1d",
    "REFRESH_SECRET": "iot_secret_refresh",
    "REFRESH_EXPIRED_ON": "7d"
  },
  "I18N_LANG": "en",
  "I18N_JSON_PATH": "/public/assets/i18n/api/",
  ...
}
i18n 파일을 apps/gateway/api/src/public/assets/i18n/api/en(ko)/message.json 파일을 생성하고, 설정한다.
{
  "USER_NOT_EXIST": "User {username} with this id does not exist"
}
다음으로 libs/shared 쪽에 libs/shared/src/lib/i18n/translater.service.ts 파일을 생성한다.
// translater.service.ts
import { Injectable } from '@nestjs/common';
import { I18nService } from 'nestjs-i18n';

@Injectable()
export class TranslaterService {
  constructor(private readonly i18nService: I18nService) { }

  async message(key: string, message: (string | { [k: string]: any; })[] | { [k: string]: any; }): Promise<string> {
    return this.i18nService.translate(`message.${key}`, { args: message });
  }
}
translater module도 libs/shared/src/lib/i18n/translater.module.ts 파일도 생성한다.
// translater.module.ts
import { join } from 'path';
import { Module } from '@nestjs/common';
import { I18nModule, I18nJsonParser } from 'nestjs-i18n';
import { loadConfigJson } from '@rnm/shared';
import { TranslaterService } from './translater.service';

const config: any = loadConfigJson();

@Module({
  imports: [
    I18nModule.forRoot({
      fallbackLanguage: config.I18N_LANG,
      parser: I18nJsonParser,
      parserOptions: {
        path: join(__dirname, config.I18N_JSON_PATH),
      },
    })
  ],
  providers: [TranslaterService],
  exports: [TranslaterService]
})
export class TranslaterModule { }


// libs/shared/src/index.ts 안에 export도 추가한다.
export * from './lib/i18n/translater.service';
export * from './lib/i18n/translater.module';
이제 사용을 해본다.
- apps/gateway/api/src/app/app.module.ts 에 TranslaterModule을 추가한다.
- apps/gateway/api/src/app/app.controller.ts 에 Service를 사용한다. translate key로는 [fileName].[jsonKey] 를 넣는다.
// app.module.ts
import { TranslaterModule } from '@rnm/shared';
@Module({
  imports: [
    ...
    // i18n
    TranslaterModule,
    ...
}


// app.controller.ts
import { Controller, Get } from '@nestjs/common';
import { GatewayApiAppService } from '@rnm/domain';
import { TranslaterService } from '@rnm/shared';

@Controller('api/gateway')
export class AppController {
  constructor(
    private readonly appService: GatewayApiAppService,
    private readonly translater: TranslaterService
  ) { }

  @Get()
  getData() {
    return this.translater.message('USER_NOT_EXIST', { username: 'Peter Yun' });
  }
}
Gateway API를 디버깅 시작하고, 호출 테스트한다. Forbidden 에러가 떨어지면 app.module.ts의 AuthMiddleware 경로에서 잠시 "/api*" 설정을 제거후 테스트 한다.
// apps/gateway/api/src/app/app.module.ts
export class AppModule implements NestModule {
  configure(consumer: MiddlewareConsumer) {
    consumer
      .apply(AuthMiddleware)
      .forRoutes(...[
        { path: '/dashboard*', method: RequestMethod.ALL },
        { path: '/configuration*', method: RequestMethod.ALL },
        { path: '/back-office*', method: RequestMethod.ALL },
        // { path: '/api/*', method: RequestMethod.ALL }, <== 요기
      ]);
  }
}
에러 메세지에 대해 Global Exception에 적용해 본다.
import { Request, Response } from 'express';
import { ArgumentsHost, Catch, ExceptionFilter, HttpException, HttpStatus, Logger } from '@nestjs/common';
import { TranslaterService } from '../i18n/translater.service';

@Catch()
export class GlobalExceptionFilter implements ExceptionFilter {
  constructor(private readonly translater: TranslaterService) { }

  // async로 Promise 반환
  async catch(exception: any, host: ArgumentsHost) {
    const ctx = host.switchToHttp();
    const response = ctx.getResponse<Response>();
    const request = ctx.getRequest<Request>();
    let message = (exception as any).message;
    // key, args가 있으면 translater
    if (message && message.key && message.args) {
      message = await this.translater.message(message.key, message.args);
    }
    ...
  }
}
React에 i18n 적용
react-i18next를 사용한다.
$> yarn add react-i18next i18next i18next-xhr-backendi18n 설정을 위해 apps/gateway/web/src/app/core/i18n.ts 파일을 생성한다.
// i18n.ts
import i18next from 'i18next';
import { initReactI18next } from 'react-i18next';
import XHR from 'i18next-xhr-backend';

const backendOptions = {
  loadPath: '/assets/i18n/web/locale-{{lng}}.json',
  crossDomain: true,
};

i18next
  .use(XHR)
  .use(initReactI18next)
  .init({
    backend: backendOptions,
    debug: true,
    lng: 'en',
    fallbackLng: false,
    react: {
      useSuspense: true
    }
  });

export default i18next;
설정파일을 apps/gateway/web/src/assets/i18n/web/locale-en.json 을 생성한다.
{
  "LOGIN": {
    "USERNAME": "Username",
    "PASSWORD": "Password"
  }
}
apps/gateway/web/src/app/app.tsx 파일에 i18n 파일을 로딩한다.
// app.tsx
import { Suspense } from 'react';
import styles from './app.module.scss';
import Login from './login/login';

import './core/i18n';

const Loader = () => (
  <div className={styles.loading}>
    {/* <img src={logo} className="App-logo" alt="logo" /> */}
    <div>loading...</div>
  </div>
);

export function App() {
  return (
    <Suspense fallback={<Loader />}>
      <Login />;
    </Suspense>
  );
}
export default App;
apps/gateway/web/src/app/login/login.tsx 에서 useTranslation() hook을 사용한다.
import { Row, Col, Form, Input, Button } from 'antd';
// import
import { useTranslation } from 'react-i18next';
...

function Login() {
  const { t, i18n } = useTranslation();
  return (
    <div className={styles.login_container}>
     ...
              // t를 통해 translation
              <Form.Item
                label={t('LOGIN.USERNAME')}
                name="username"
                rules={[{ required: true, message: 'Please input your username!' }]}
              >
                <Input />
              </Form.Item>

              <Form.Item
                label={t('LOGIN.PASSWORD')}
                name="password"
                rules={[{ required: true, message: 'Please input your password!' }]}
              >
                <Input.Password />
              </Form.Item>
     ...
   </div>
  );
}
Configuration 리팩토링
NestJS에서 사용하는 config.json 파일을 한번만 로딩하도록 libs/shared/src/lib/configuration/config.service.ts 파일을 리팩토링한다.
// config.service.ts
import * as fs from "fs";
import { join } from 'path';
import { GatewayConfiguration, MicroServiceConfiguration, OrmConfiguration } from "./config.model";

export const loadConfigJson = (message = '[LOAD] config.json file'): MicroServiceConfiguration | GatewayConfiguration => {
  let config: any = process.env.config;
  if (!config) {
    console.log(`${message}:`, `${__dirname}/environments/config.json`);
    const jsonFile = fs.readFileSync(join(__dirname, 'environments', 'config.json'), 'utf8');
    process.env.config = jsonFile;
    config = JSON.parse(jsonFile);
  } else {
    config = JSON.parse(process.env.config as any);
  }
  return config;
}

export const loadOrmConfiguration = (message = '[LOAD] orm-config.json file'): OrmConfiguration => {
  let config: any = process.env.ormConfig;
  if (!config) {
    console.log(`${message}:`, `${__dirname}/environments/orm-config.json`);
    const jsonFile = fs.readFileSync(join(__dirname, 'environments', 'orm-config.json'), 'utf8');
    process.env.ormConfig = jsonFile;
    config = JSON.parse(jsonFile);
  } else {
    config = JSON.parse(process.env.ormConfig as any);
  }
  return config;
}
소스: https://github.com/ysyun/rnm-stack/releases/tag/ms-10
<참조>
- nestjs-i18n 적용하기
https://github.com/ToonvanStrijp/nestjs-i18n
GitHub - ToonvanStrijp/nestjs-i18n: Add i18n support inside your nestjs project
Add i18n support inside your nestjs project. Contribute to ToonvanStrijp/nestjs-i18n development by creating an account on GitHub.
github.com
- react best i18n libraries
https://phrase.com/blog/posts/react-i18n-best-libraries/
Curated List: Our Best of Libraries for React I18n – Phrase
There may be no built-in solution for React i18n, but these amazing libraries will help you manage your i18n projects from start to finish.
phrase.com
- react-i18next 공식 홈페이지
Introduction
react.i18next.com
- i18next의 react 사용예
https://github.com/i18next/react-i18next/blob/master/example/react/src/App.js
GitHub - i18next/react-i18next: Internationalization for react done right. Using the i18next i18n ecosystem.
Internationalization for react done right. Using the i18next i18n ecosystem. - GitHub - i18next/react-i18next: Internationalization for react done right. Using the i18next i18n ecosystem.
github.com
'[App FullStacker] > Architecture' 카테고리의 다른 글
| [MS-12] NodeJS, React, AntD, Nx v16 업데이트 하기 (0) | 2023.05.03 |
|---|---|
| [MS-11] i18n 외부파일 위치 변경 및 Web Dev Server 연결 (0) | 2021.10.07 |
| [MS-9] Login 화면 개발 (0) | 2021.09.30 |
| [MS-8] NestJS Auth/Role 기능 Gateway에 추가하기 (0) | 2021.09.30 |
| [MS-7] Refresh Token 설정 (0) | 2021.09.30 |

