- AI agents typically use language models as part of their software stack to interpret messages, perform reasoning, and execute actions.
- Each agent is a self-contained unit that can be developed, tested, and deployed independently.
[2] Multi Agent 특징
- Run within the same process or on the same machine
- Operate across different machines or organizational boundaries
- Be implemented in diverse programming languages and make use of different AI models or instructions
- Work together towards a shared goal, coordinating their actions through messaging
[3] Agent 실행 환경
the framework provides a runtime environment, which facilitates communication between agents, manages their identities and lifecycles, and enforce security and privacy boundaries.
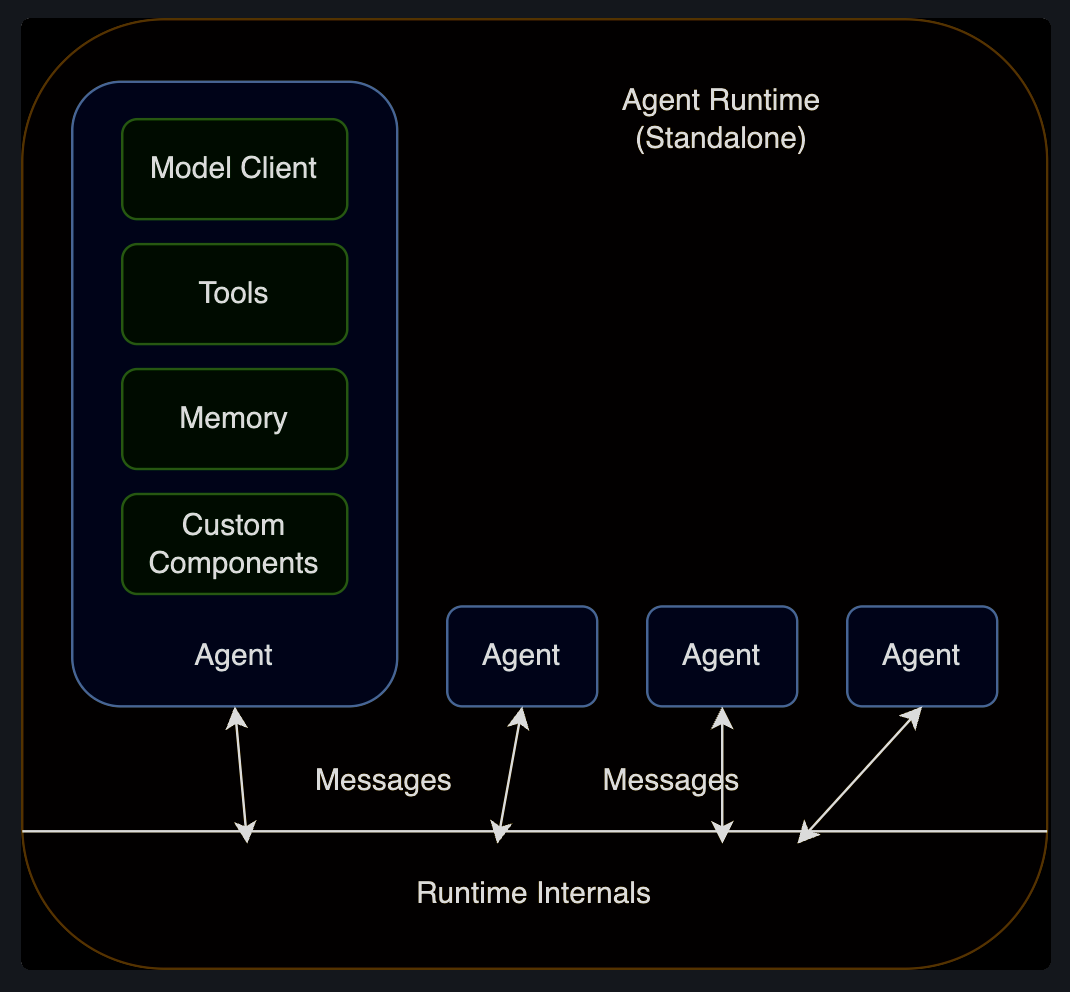
Standalone Agent Runtime
- single process application
- all agents are implemented in the same language
- running in the same process.
Agent는 runtime 동안 메세지를 통해 통신을 하고, 런타임은 Agent의 LifeCycle을 관리한다.
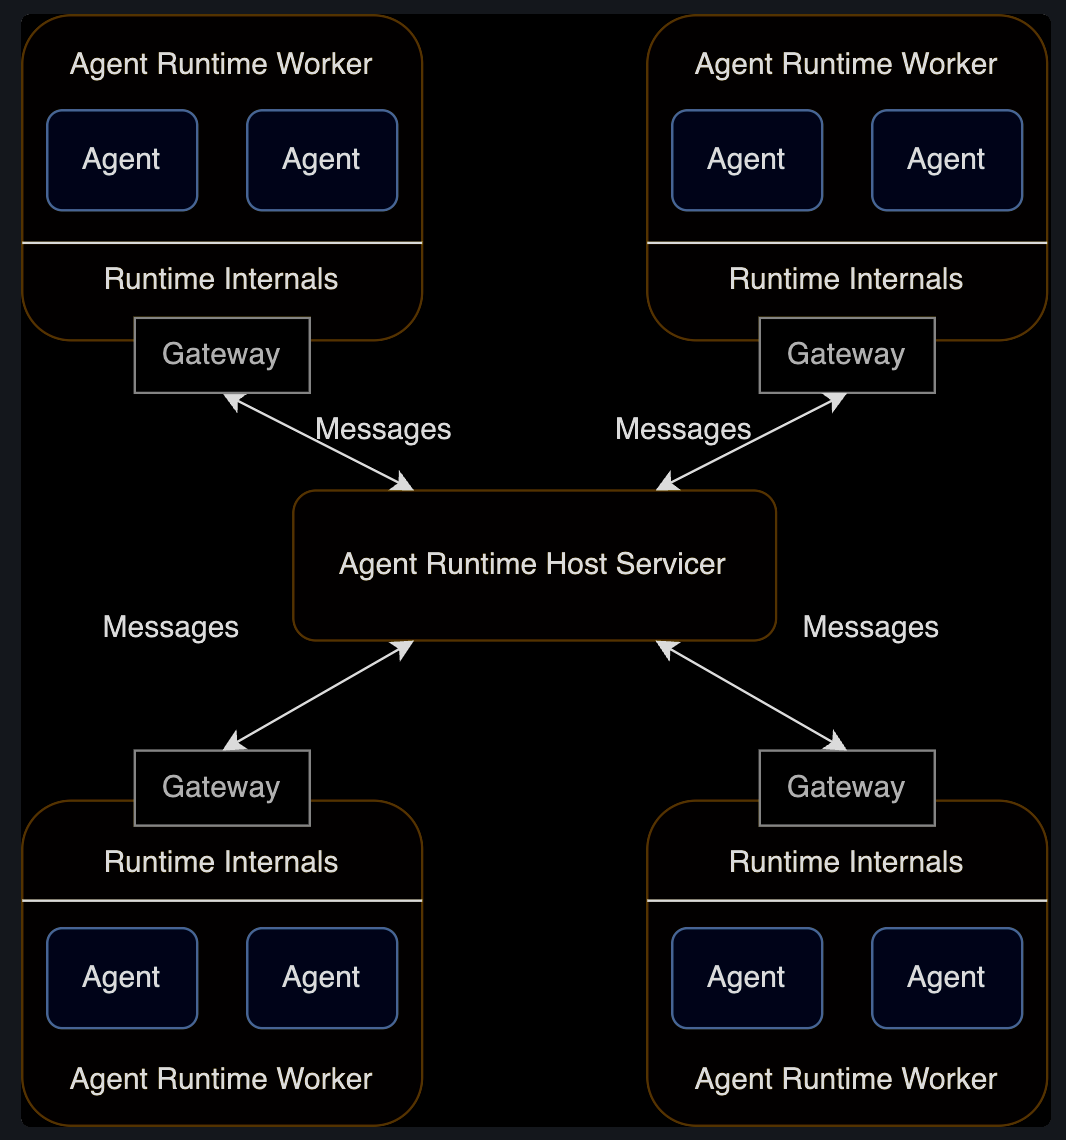
Distrubuted Agent Runtime
- multi process applications
- Agents are implemented in different programming languages
- running on different machines
분산환경은 host servicer와 multiple workers를 갖는다.
- host servicer는 agent 사이의 통신과 연결상태를 관리한다.
- worker는 agent를 구동하고 host servicer와 gateway를 통해 통신한다.
[4] 애플리케이션 스택
AutoGen core는 다양한 multi-agent application 개발할 때 사용된다.
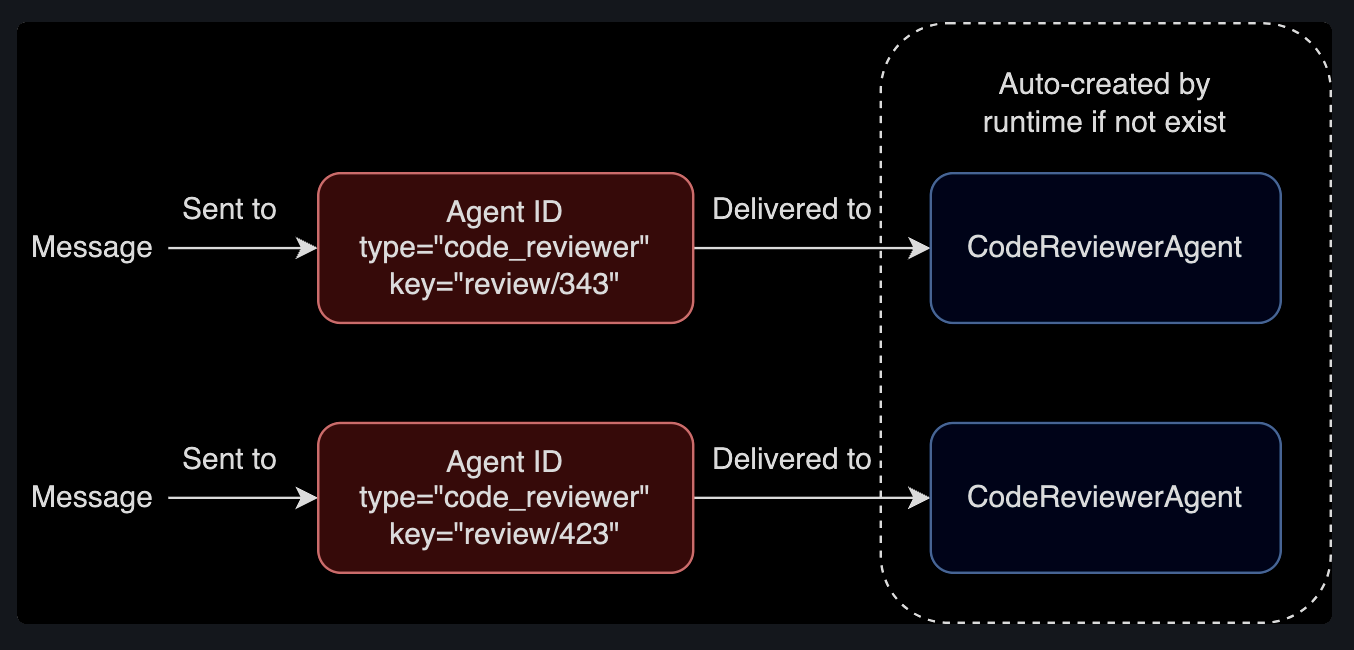
[5] Agent 식별 방법 & 라이프 사이클 관리
Agent 런타임은 에이젼트 identities와 lifecyles을 관리한다.
- Agent ID = Agent Type + Agent Key(instance)
런타임에서 Agent가 없으면 생성하고, 메세지로 agent type & key를 전달한다.
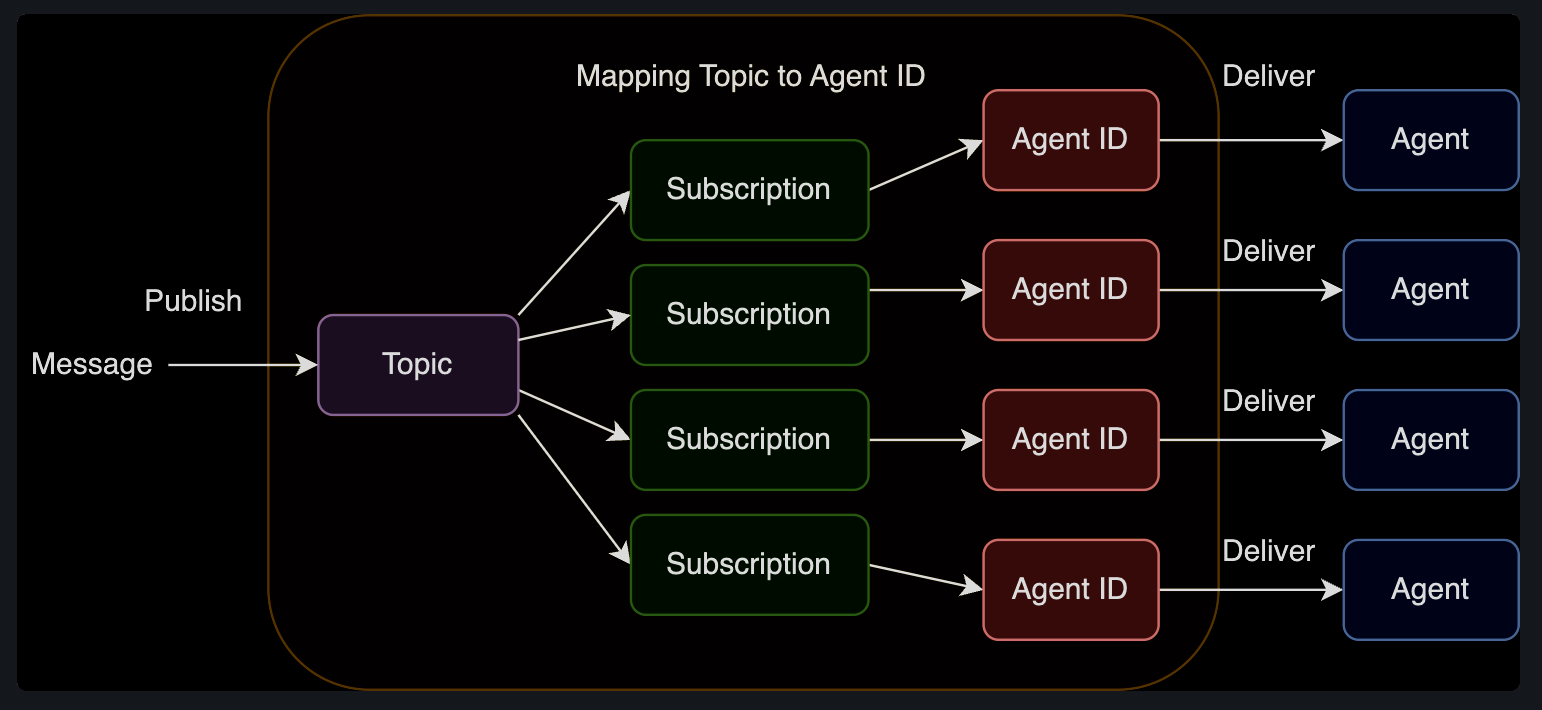
[6] Topic & Subscription
message를 broadcast할 때 방법을 설명한다.
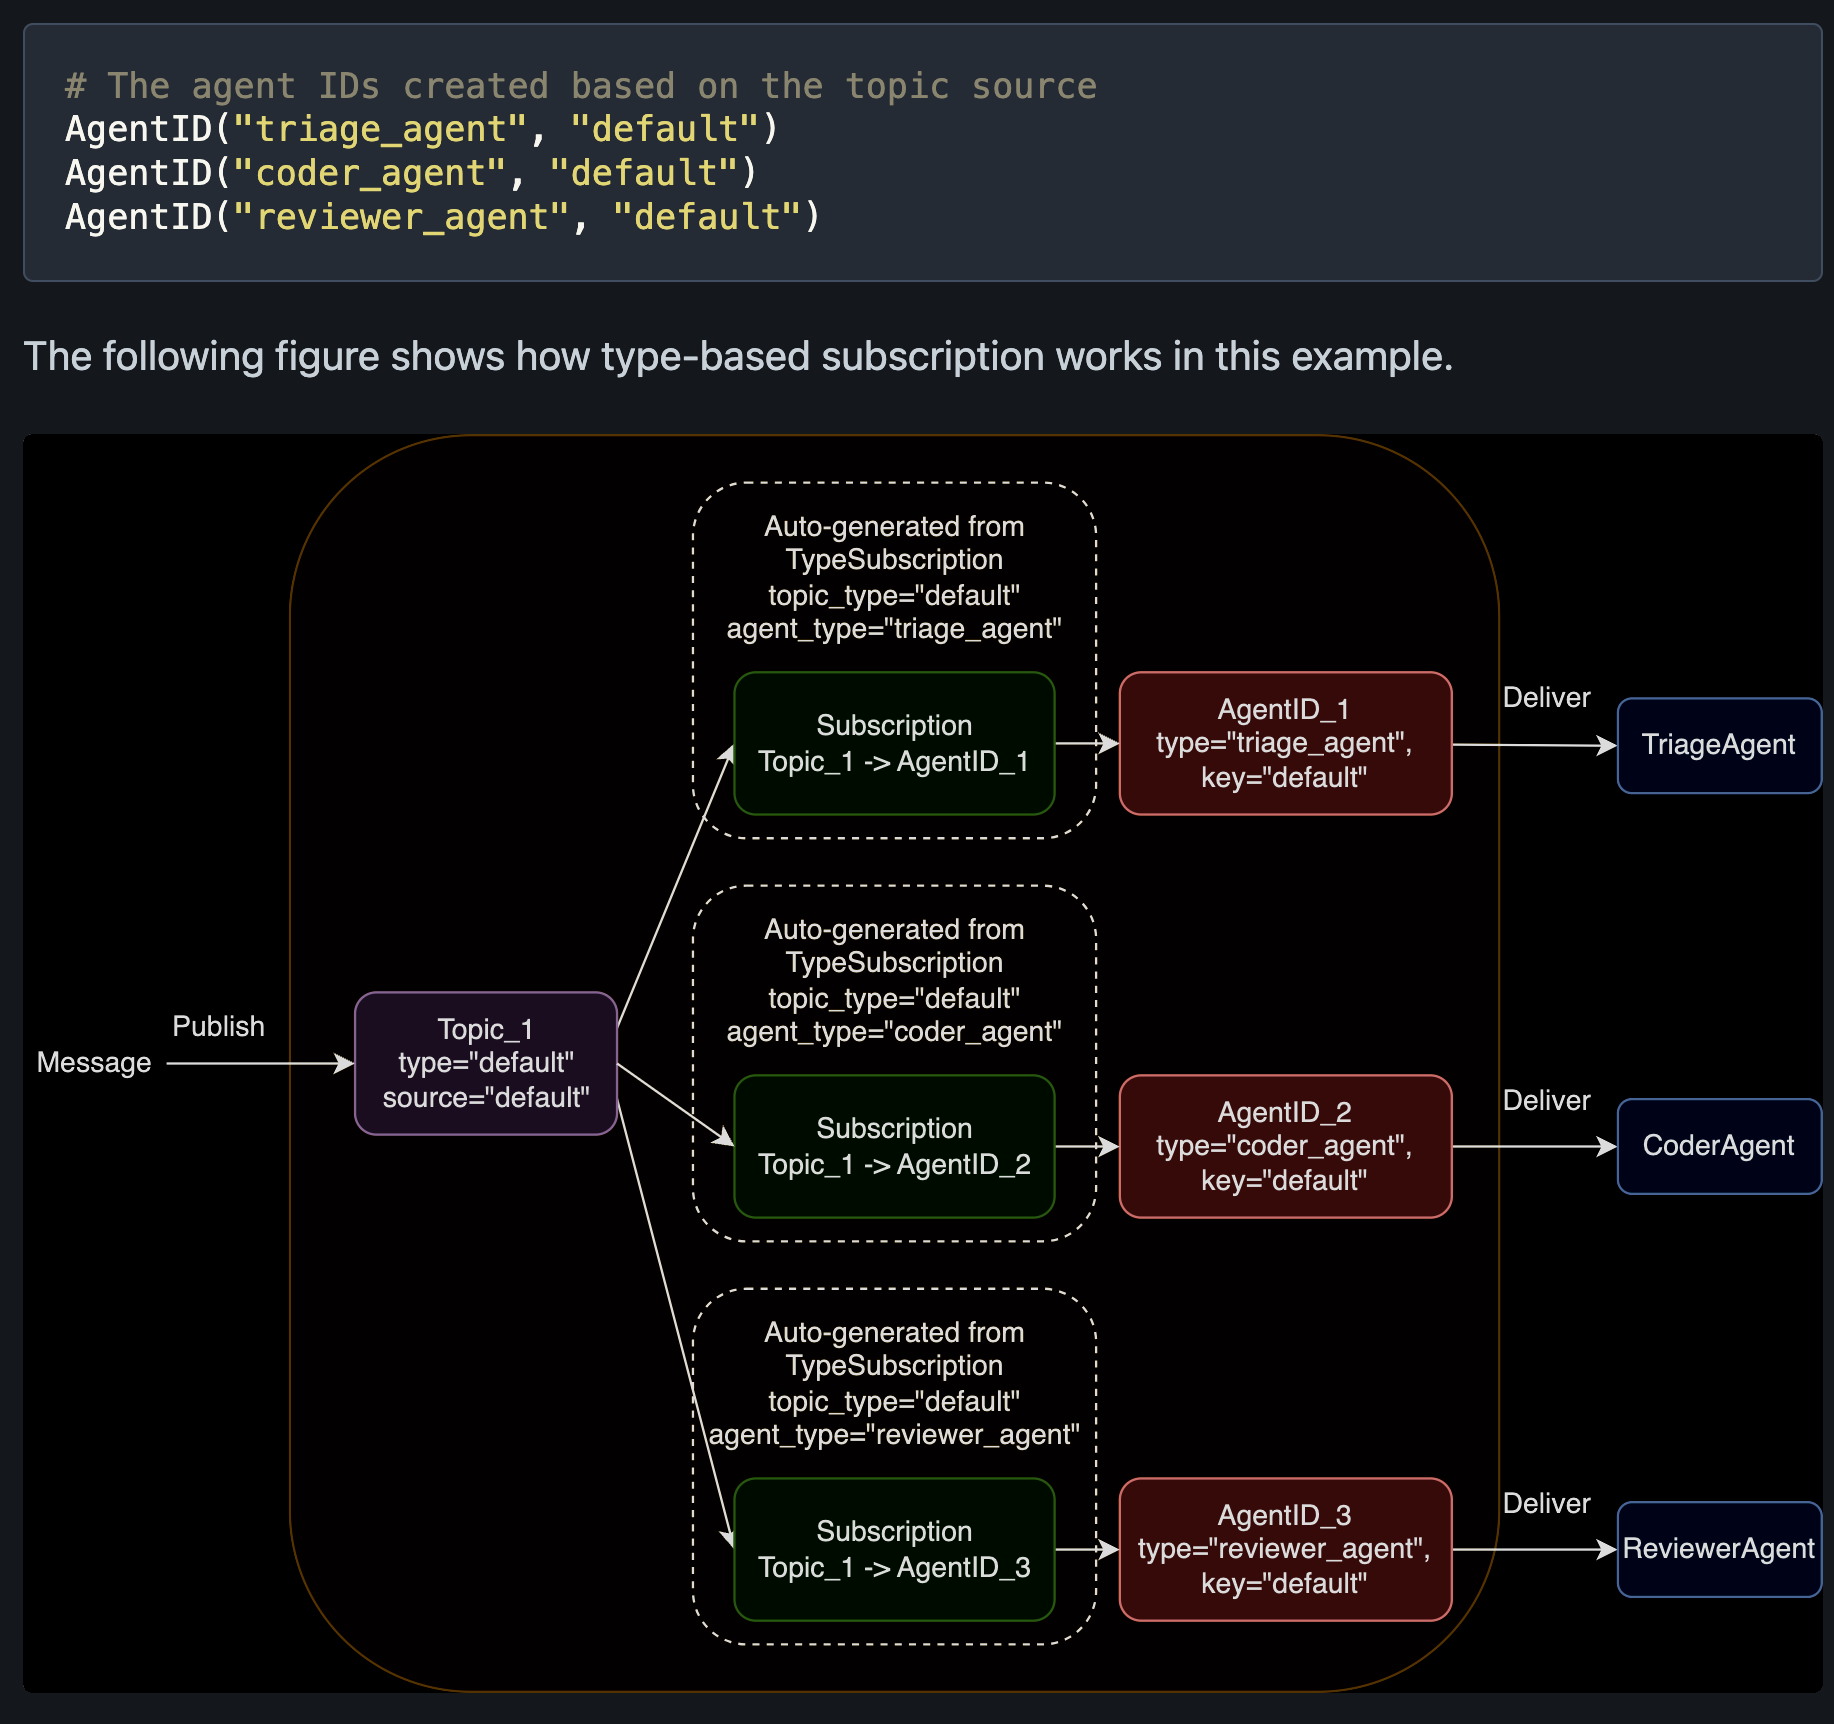
- Topic : pubishing messages with Topic Type, Topic Source
- Subscription : topic 과 agentID와 맵팽한다. 런타임 환경에 맵핑을 만들고 삭제할 수 있다.
Type-based subscription
Topic Type -> Agent Type 전파
- Single Tenant & Single Topic
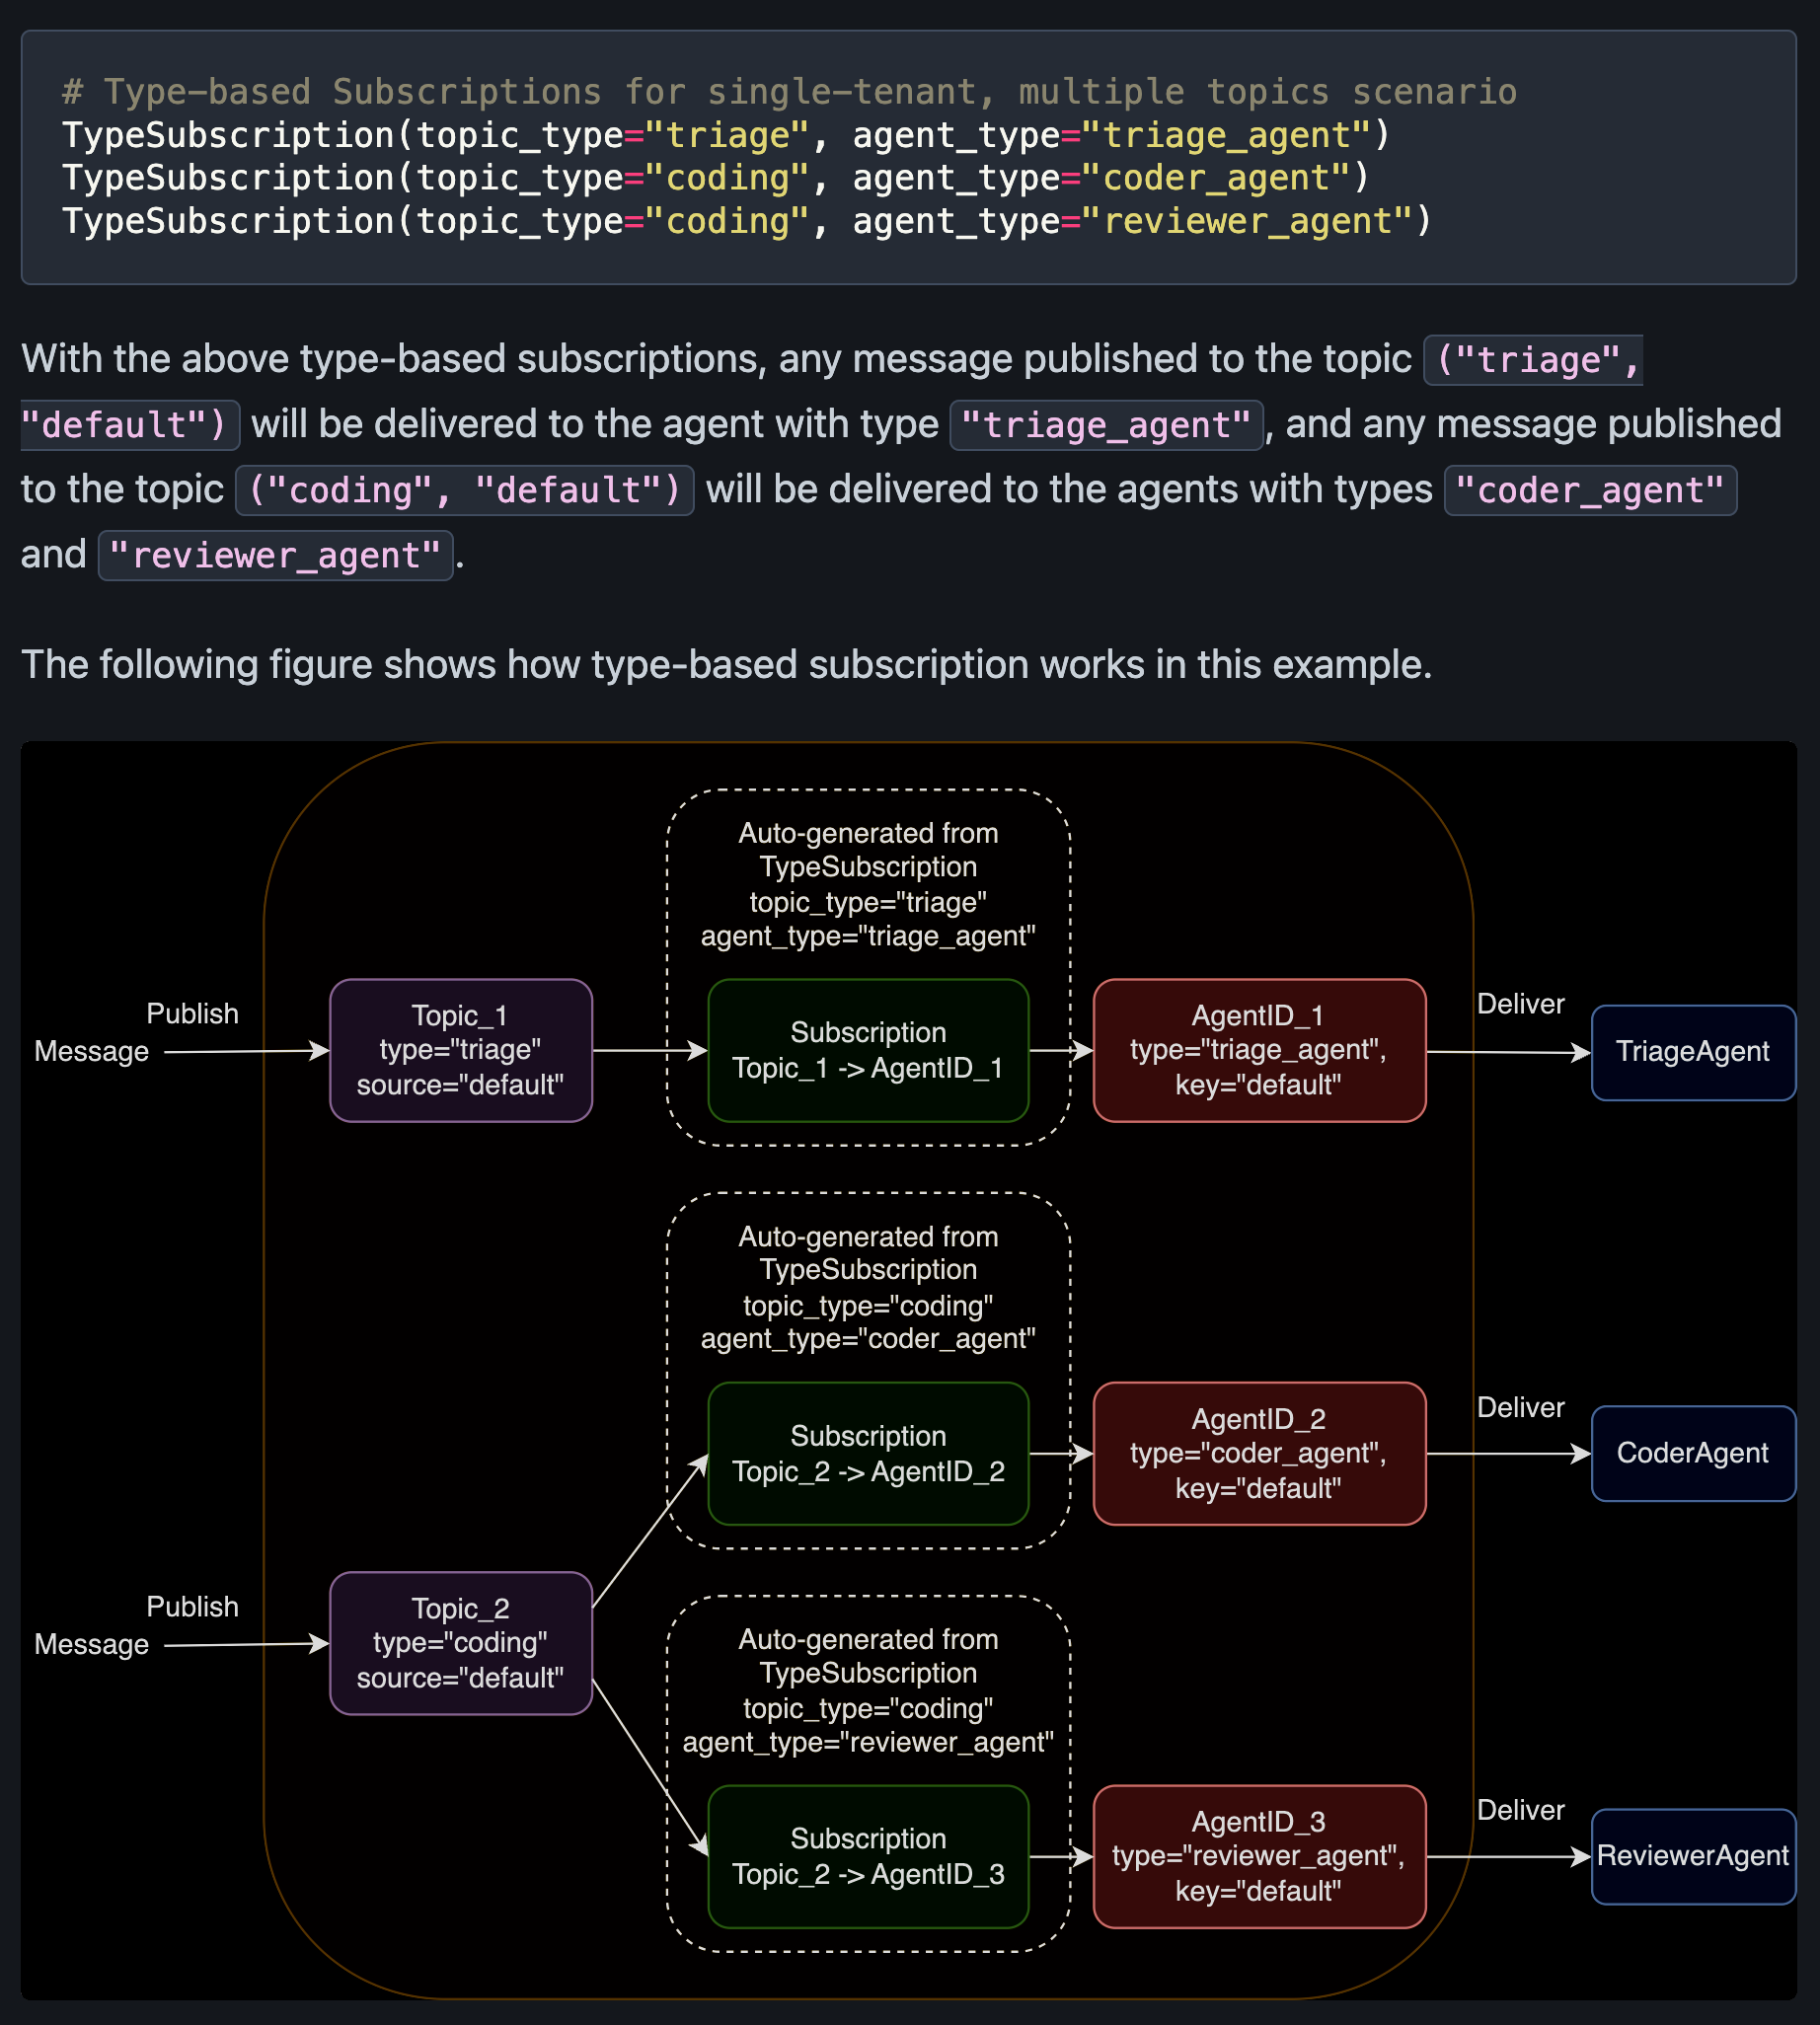
- Single Tenant & Multi Topics
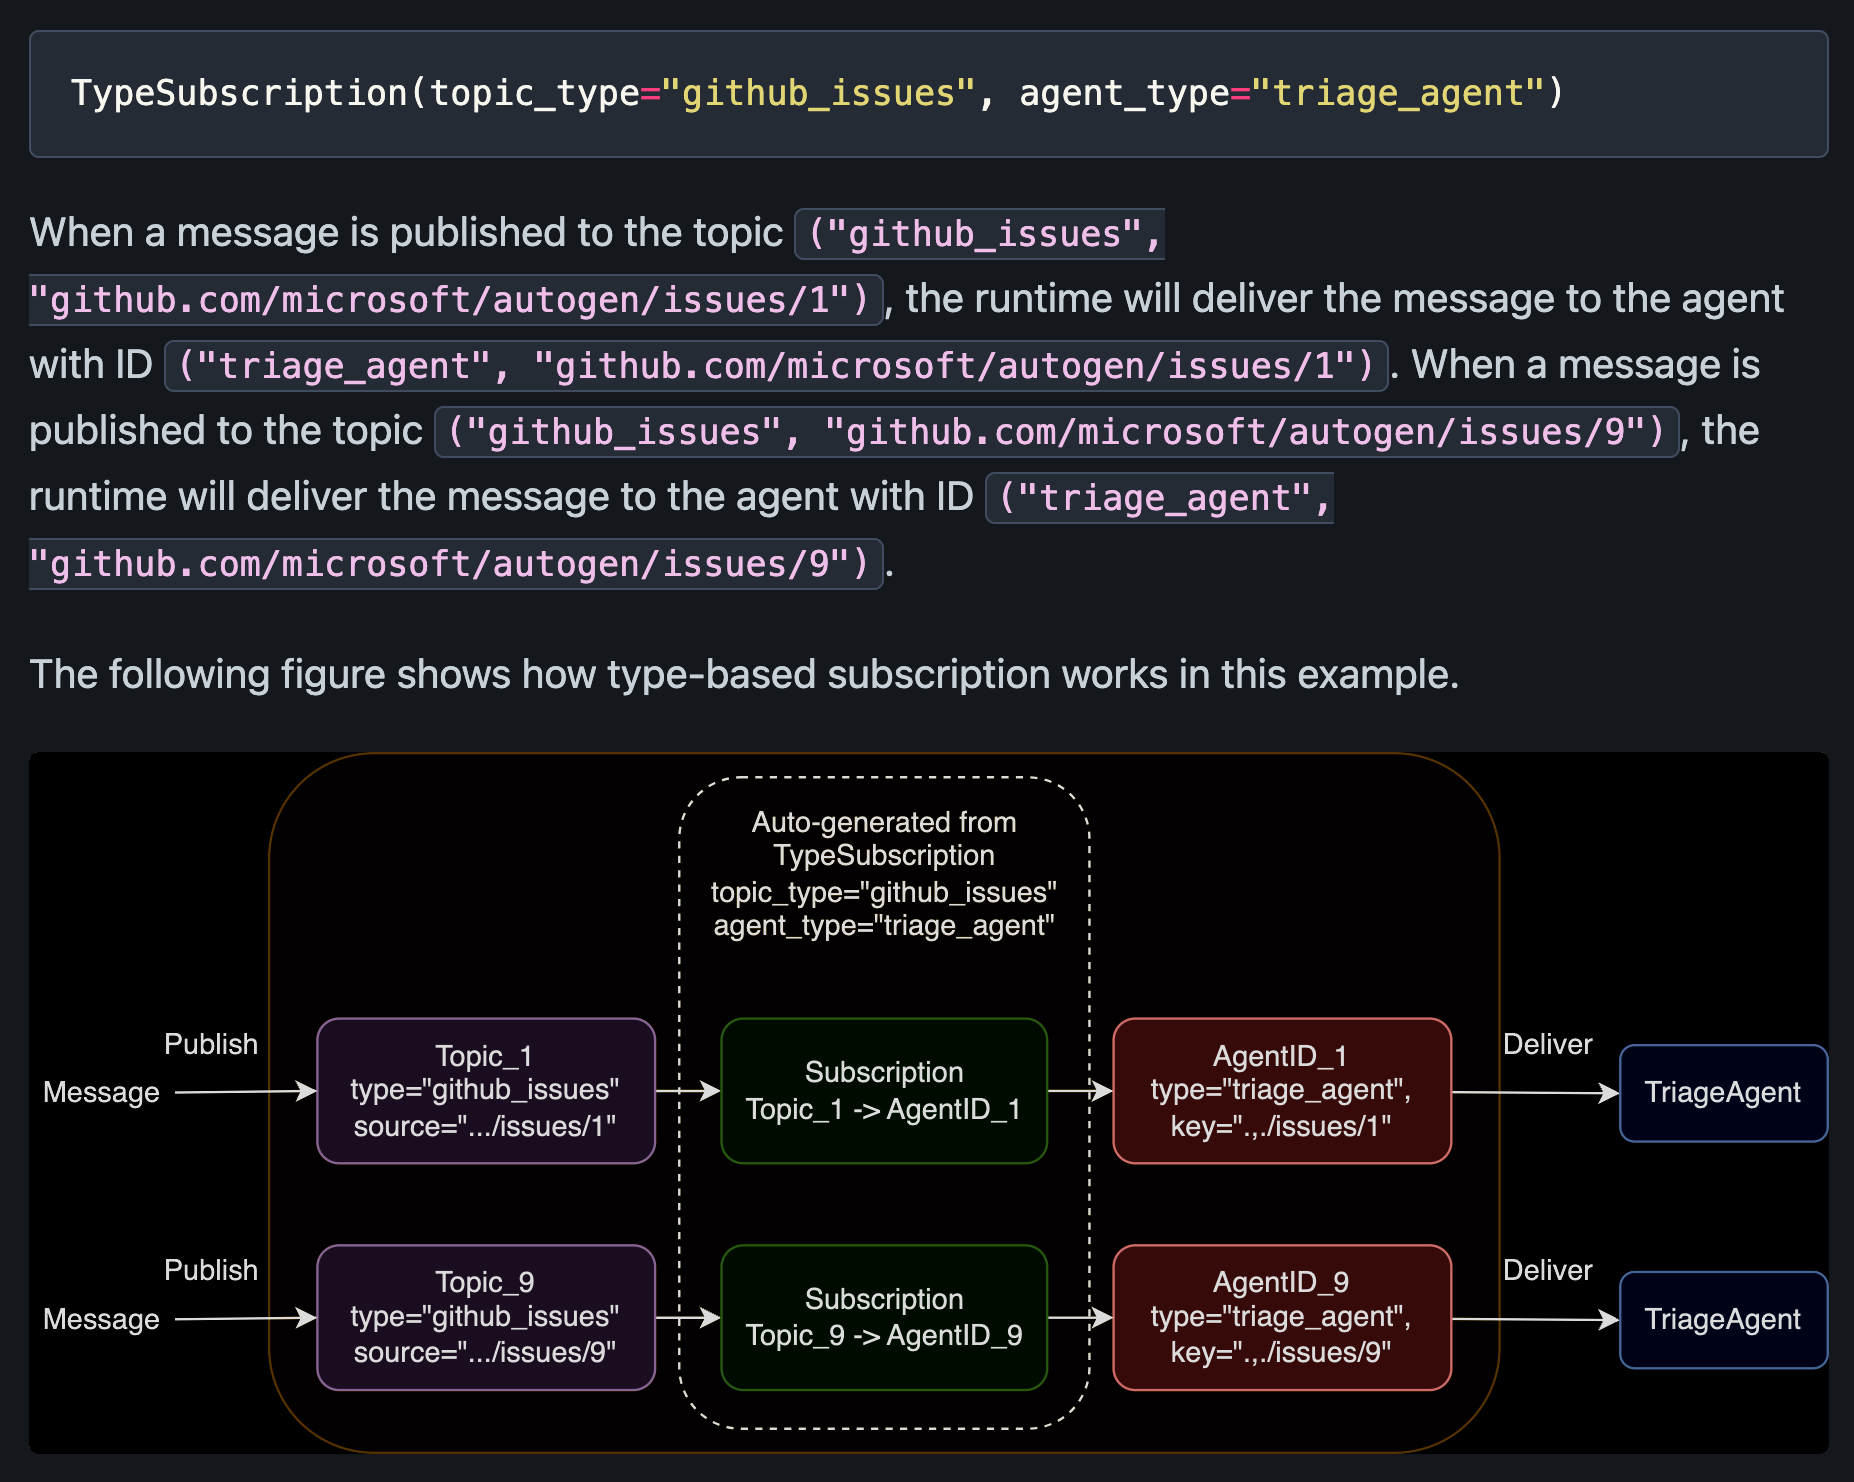
- Multi Tenant
in single tenant, the topic source is "default". for multi tenant, it become data-dependent.
with get_openai_callback() as cb:는 Python의 컨텍스트 관리자(context manager)를 사용하여 get_openai_callback 함수가 반환하는 객체(cb)를 생성하고, 그 객체를 사용하는 블록을 정의하는 구문입니다. 이 구문을 이해하기 위해서는 Python의 컨텍스트 관리자가 어떻게 작동하는지와 get_openai_callback이 어떤 역할을 하는지를 아는 것이 중요합니다.
1. 컨텍스트 관리자 (Context Manager)
컨텍스트 관리자는 with 블록의 시작과 종료 시 특정 코드를 자동으로 실행하게 해줍니다. 일반적으로, 컨텍스트 관리자는 자원(resource)을 할당하고 해제하는 작업에 사용됩니다. 예를 들어, 파일을 열고 작업을 한 후 자동으로 파일을 닫는 데 사용할 수 있습니다.
•__enter__(): with 블록이 시작될 때 호출됩니다. 이 메서드는 일반적으로 어떤 자원을 할당하거나 초기화합니다.
•__exit__(): with 블록이 끝날 때 호출됩니다. 이 메서드는 자원을 해제하거나, 예외가 발생했을 때 이를 처리합니다.
2. get_openai_callback의 역할
get_openai_callback은 OpenAI API 호출과 관련된 메트릭을 수집하는 콜백 객체를 반환합니다. 이 콜백 객체는 컨텍스트 관리자에서 사용될 때 API 호출 동안의 토큰 사용량, 비용 등을 추적합니다.
3. with get_openai_callback() as cb:의 의미
•get_openai_callback()은 컨텍스트 관리자 역할을 하는 객체를 반환합니다.
•with 블록이 시작되면, cb 변수에 이 객체가 할당됩니다.
•with 블록 내에서 OpenAI API 호출이 이루어지면, cb 객체는 API 호출 관련 데이터를 수집합니다.
•with 블록이 종료되면, cb 객체는 수집한 데이터를 자동으로 정리하고, 필요한 경우 자원을 해제합니다.
예시 코드 분석
from langchain.llms import OpenAI
from langchain.callbacks import get_openai_callback

llm = OpenAI(model="text-davinci-003")

with get_openai_callback() as cb:
    response = llm("What is the capital of France?")
    print(response)
    print(f"Total Tokens: {cb.total_tokens}")
    print(f"Total Cost: {cb.total_cost}")
•get_openai_callback(): 콜백 객체를 생성하여 반환합니다.
•with ... as cb:: cb 변수에 콜백 객체를 할당하고, with 블록 내에서 이 객체를 사용합니다.
•cb.total_tokens, cb.total_cost: with 블록이 끝난 후, API 호출 동안 사용된 총 토큰 수와 총 비용을 출력합니다.
이 구문을 사용함으로써 개발자는 OpenAI API 호출의 성능을 모니터링하고 리소스 사용량을 효율적으로 관리할 수 있습니다.
get_openai_callback
소스: langchain_community/callbacks/manager.py
from contextlib import contextmanager

@contextmanager
def get_openai_callback() -> Generator[OpenAICallbackHandler, None, None]:
    """Get the OpenAI callback handler in a context manager.
    which conveniently exposes token and cost information.

    Returns:
        OpenAICallbackHandler: The OpenAI callback handler.

    Example:
        >>> with get_openai_callback() as cb:
        ...     # Use the OpenAI callback handler
    """
    cb = OpenAICallbackHandler()
    openai_callback_var.set(cb)
    yield cb
    openai_callback_var.set(None)
Pydantic은 Python에서 데이터 유효성 검사 및 설정 관리를 위한 라이브러리입니다. 주로 FastAPI와 같은 웹 프레임워크와 함께 사용되며, 데이터를 구조화하고 검증하는 데 유용합니다. BaseModel은 Pydantic의 핵심 클래스 중 하나로, 데이터 모델을 정의하는 데 사용됩니다.
Pydantic의 주요 기능
1.유효성 검사 및 변환: 필드에 대해 타입을 지정하면, 입력 데이터가 자동으로 그 타입으로 변환되며, 유효성 검사가 수행됩니다.
2.자동 완성 및 타입 힌팅 지원: IDE의 자동 완성과 타입 힌팅을 통해 개발 생산성을 높입니다.
3.데이터 직렬화 및 역직렬화: 모델 인스턴스를 JSON으로 직렬화하거나 JSON으로부터 역직렬화할 수 있습니다.
4.데이터 검증 오류 관리: 잘못된 데이터를 입력하면, Pydantic이 자동으로 유효성 검사 오류를 생성합니다.
BaseModel 사용 예시
다음은 Pydantic의 BaseModel을 사용하여 간단한 사용자 데이터를 관리하는 예제입니다.
from pydantic import BaseModel, EmailStr, Field
from typing import Optional

class User(BaseModel):
    id: int
    name: str = Field(..., min_length=3, max_length=50)
    email: EmailStr
    age: Optional[int] = Field(None, ge=18)
    is_active: bool = True

# Example usage
user_data = {
    "id": 1,
    "name": "John Doe",
    "email": "johndoe@example.com",
    "age": 25,
}

user = User(**user_data)
print(user)
print(user.dict())
코드 설명
1.필드 정의:
•id: 정수형 필드.
•name: 길이가 3에서 50 사이인 문자열 필드.
•email: 이메일 형식의 문자열을 요구하는 필드. EmailStr 타입은 이메일 주소가 올바른 형식인지 검증합니다.
•age: 선택적 필드로, 값이 주어지면 18 이상이어야 합니다.
•is_active: 기본값이 True인 불리언 필드.
2.필드 유효성 검사:
•Field를 사용하여 각 필드에 대한 추가적인 제약 조건을 지정합니다.
3.데이터 생성 및 출력:
•user_data 딕셔너리를 통해 User 객체를 생성합니다. 생성된 객체를 출력하거나, .dict() 메서드를 사용하여 객체를 딕셔너리 형태로 변환할 수 있습니다.
이와 같이 Pydantic을 사용하면 데이터 모델을 간단하고 명확하게 정의할 수 있으며, 자동으로 타입 변환과 유효성 검사를 수행할 수 있습니다. 이를 통해 데이터 처리의 신뢰성과 안정성을 높일 수 있습니다.
BaseModel은 자동으로 __init__ 을 실행
Pydantic의 BaseModel을 사용하면 클래스 수준에서 필드를 정의할 수 있으며, 이러한 필드는 마치 __init__ 메서드에서 self.name과 같이 인스턴스 변수로 설정된 것처럼 동작합니다. Pydantic은 이러한 필드를 기반으로 자동으로 __init__ 메서드를 생성하고, 필드에 대한 타입 검사를 수행합니다.
이 방식은 일반적인 Python 클래스에서의 인스턴스 변수 설정과는 약간 다릅니다. 일반 Python 클래스에서는 인스턴스 변수를 __init__ 메서드 내에서 self를 통해 설정해야 하지만, Pydantic의 BaseModel을 사용하면 클래스 정의 시 필드의 타입과 기본값을 지정하여 더 간결하고 명확하게 모델을 정의할 수 있습니다.
예시 비교
일반 Python 클래스
class User:
    def __init__(self, id: int, name: str, email: str, age: int, is_active: bool = True):
        self.id = id
        self.name = name
        self.email = email
        self.age = age
        self.is_active = is_active
Pydantic BaseModel
from pydantic import BaseModel, EmailStr, Field
from typing import Optional

class User(BaseModel):
    id: int
    name: str = Field(..., min_length=3, max_length=50)
    email: EmailStr
    age: Optional[int] = Field(None, ge=18)
    is_active: bool = True
차이점 설명
•일반 클래스에서는 __init__ 메서드 내에서 self를 사용하여 인스턴스 변수를 직접 설정합니다.
•Pydantic BaseModel에서는 클래스 정의 시 필드를 직접 설정하고, Pydantic이 자동으로 __init__ 메서드를 생성하여 필드 초기화, 타입 검사, 유효성 검사를 수행합니다.
이렇게 Pydantic의 BaseModel을 사용하면 코드가 더 간결해지며, 데이터 유효성 검사가 자동으로 처리되므로 안전하고 유지보수하기 쉬운 코드를 작성할 수 있습니다.
- Model 생성시 configurable_fileds 사설정 -> Model 인스턴스 with_config 런타임 설정
class RunnableSerializable(Serializable, Runnable[Input, Output]):
    """Runnable that can be serialized to JSON."""

    def configurable_fields(
        self, **kwargs: AnyConfigurableField
    ) -> RunnableSerializable[Input, Output]:
        """Configure particular Runnable fields at runtime.

        Args:
            **kwargs: A dictionary of ConfigurableField instances to configure.

        Returns:
            A new Runnable with the fields configured.

        .. code-block:: python

            from langchain_core.runnables import ConfigurableField
            from langchain_openai import ChatOpenAI

            model = ChatOpenAI(max_tokens=20).configurable_fields(
                max_tokens=ConfigurableField(
                    id="output_token_number",
                    name="Max tokens in the output",
                    description="The maximum number of tokens in the output",
                )
            )

            # max_tokens = 20
            print(
                "max_tokens_20: ",
                model.invoke("tell me something about chess").content
            )

            # max_tokens = 200
            print("max_tokens_200: ", model.with_config(
                configurable={"output_token_number": 200}
                ).invoke("tell me something about chess").content
            )
        """
        from langchain_core.runnables.configurable import RunnableConfigurableFields

        for key in kwargs:
            if key not in self.__fields__:
                raise ValueError(
                    f"Configuration key {key} not found in {self}: "
                    f"available keys are {self.__fields__.keys()}"
                )

        return RunnableConfigurableFields(default=self, fields=kwargs)
class Runnable(Generic[Input, Output], ABC):
    ... 중략 ...
    def with_config(
        self,
        config: Optional[RunnableConfig] = None,
        # Sadly Unpack is not well-supported by mypy so this will have to be untyped
        **kwargs: Any,
    ) -> Runnable[Input, Output]:
        """
        Bind config to a Runnable, returning a new Runnable.

        Args:
            config: The config to bind to the Runnable.
            kwargs: Additional keyword arguments to pass to the Runnable.

        Returns:
            A new Runnable with the config bound.
        """
        return RunnableBinding(
            bound=self,
            config=cast(
                RunnableConfig,
                {**(config or {}), **kwargs},
            ),  # type: ignore[misc]
            kwargs={},
        )
실제 예제
- Model 생성시 ConfigurableField 통해 설정
- model 인스턴스 사용시 with_config 통해 설정
from langchain_core.prompts import PromptTemplate
from langchain_core.runnables import ConfigurableField
from langchain_openai import ChatOpenAI

model = ChatOpenAI(temperature=0).configurable_fields(
    temperature=ConfigurableField(
        id="llm_temperature",
        name="LLM Temperature",
        description="The temperature of the LLM",
    )
)

//--- case-1
model.invoke("pick a random number")
// 결과
AIMessage(content='17', response_metadata={'token_usage': {'completion_tokens': 1, 'prompt_tokens': 11, 'total_tokens': 12}, 'model_name': 'gpt-3.5-turbo', 'system_fingerprint': 'fp_c2295e73ad', 'finish_reason': 'stop', 'logprobs': None}, id='run-ba26a0da-0a69-4533-ab7f-21178a73d303-0')

//--- case-2
model.with_config(configurable={"llm_temperature": 0.9}).invoke("pick a random number")
// 결과
AIMessage(content='12', response_metadata={'token_usage': {'completion_tokens': 1, 'prompt_tokens': 11, 'total_tokens': 12}, 'model_name': 'gpt-3.5-turbo', 'system_fingerprint': 'fp_c2295e73ad', 'finish_reason': 'stop', 'logprobs': None}, id='run-ba8422ad-be77-4cb1-ac45-ad0aae74e3d9-0')

//--- case-3
prompt = PromptTemplate.from_template("Pick a random number above {x}")
chain = prompt | model
chain.invoke({"x": 0})
// 결과
AIMessage(content='27', response_metadata={'token_usage': {'completion_tokens': 1, 'prompt_tokens': 14, 'total_tokens': 15}, 'model_name': 'gpt-3.5-turbo', 'system_fingerprint': 'fp_c2295e73ad', 'finish_reason': 'stop', 'logprobs': None}, id='run-ecd4cadd-1b72-4f92-b9a0-15e08091f537-0')

//--- case-4
chain.with_config(configurable={"llm_temperature": 0.9}).invoke({"x": 0})
// 결과
AIMessage(content='35', response_metadata={'token_usage': {'completion_tokens': 1, 'prompt_tokens': 14, 'total_tokens': 15}, 'model_name': 'gpt-3.5-turbo', 'system_fingerprint': 'fp_c2295e73ad', 'finish_reason': 'stop', 'logprobs': None}, id='run-a916602b-3460-46d3-a4a8-7c926ec747c0-0')
configurable_alternatives 메서드 이해
Chain에 연결할 Runnable을 교체할 수 있게 한다.
class RunnableSerializable(Serializable, Runnable[Input, Output]):
    ... 중략 ...
    def configurable_alternatives(
        self,
        which: ConfigurableField,
        *,
        default_key: str = "default",
        prefix_keys: bool = False,
        **kwargs: Union[Runnable[Input, Output], Callable[[], Runnable[Input, Output]]],
    ) -> RunnableSerializable[Input, Output]:
        """Configure alternatives for Runnables that can be set at runtime.

        Args:
            which: The ConfigurableField instance that will be used to select the
                alternative.
            default_key: The default key to use if no alternative is selected.
                Defaults to "default".
            prefix_keys: Whether to prefix the keys with the ConfigurableField id.
                Defaults to False.
            **kwargs: A dictionary of keys to Runnable instances or callables that
                return Runnable instances.

        Returns:
            A new Runnable with the alternatives configured.

        .. code-block:: python

            from langchain_anthropic import ChatAnthropic
            from langchain_core.runnables.utils import ConfigurableField
            from langchain_openai import ChatOpenAI

            model = ChatAnthropic(
                model_name="claude-3-sonnet-20240229"
            ).configurable_alternatives(
                ConfigurableField(id="llm"),
                default_key="anthropic",
                openai=ChatOpenAI()
            )

            # uses the default model ChatAnthropic
            print(model.invoke("which organization created you?").content)

            # uses ChatOpenAI
            print(
                model.with_config(
                    configurable={"llm": "openai"}
                ).invoke("which organization created you?").content
            )
        """
        from langchain_core.runnables.configurable import (
            RunnableConfigurableAlternatives,
        )

        return RunnableConfigurableAlternatives(
            which=which,
            default=self,
            alternatives=kwargs,
            default_key=default_key,
            prefix_keys=prefix_keys,
        )
실제 예제
- Anthropic 모델 생성시, OpenAI 모델을 alternative로 설정한다.
- 상황에 따라 OpenAI 모델을 사용한다.
from langchain_anthropic import ChatAnthropic
from langchain_core.prompts import PromptTemplate
from langchain_core.runnables import ConfigurableField
from langchain_openai import ChatOpenAI

llm = ChatAnthropic(
    model="claude-3-haiku-20240307", temperature=0
).configurable_alternatives(
    # This gives this field an id
    # When configuring the end runnable, we can then use this id to configure this field
    ConfigurableField(id="llm"),
    # This sets a default_key.
    # If we specify this key, the default LLM (ChatAnthropic initialized above) will be used
    default_key="anthropic",
    # This adds a new option, with name `openai` that is equal to `ChatOpenAI()`
    openai=ChatOpenAI(),
    # This adds a new option, with name `gpt4` that is equal to `ChatOpenAI(model="gpt-4")`
    gpt4=ChatOpenAI(model="gpt-4"),
    # You can add more configuration options here
)
prompt = PromptTemplate.from_template("Tell me a joke about {topic}")
chain = prompt | llm


//--- case-1
# By default it will call Anthropic
chain.invoke({"topic": "bears"})
// 결과
AIMessage(content="Here's a bear joke for you:\n\nWhy don't bears wear socks? \nBecause they have bear feet!\n\nHow's that? I tried to come up with a simple, silly pun-based joke about bears. Puns and wordplay are a common way to create humorous bear jokes. Let me know if you'd like to hear another one!", response_metadata={'id': 'msg_018edUHh5fUbWdiimhrC3dZD', 'model': 'claude-3-haiku-20240307', 'stop_reason': 'end_turn', 'stop_sequence': None, 'usage': {'input_tokens': 13, 'output_tokens': 80}}, id='run-775bc58c-28d7-4e6b-a268-48fa6661f02f-0')

//--- case-2
# We can use `.with_config(configurable={"llm": "openai"})` to specify an llm to use
chain.with_config(configurable={"llm": "openai"}).invoke({"topic": "bears"})
// 결과
AIMessage(content="Why don't bears like fast food?\n\nBecause they can't catch it!", response_metadata={'token_usage': {'completion_tokens': 15, 'prompt_tokens': 13, 'total_tokens': 28}, 'model_name': 'gpt-3.5-turbo', 'system_fingerprint': 'fp_c2295e73ad', 'finish_reason': 'stop', 'logprobs': None}, id='run-7bdaa992-19c9-4f0d-9a0c-1f326bc992d4-0')

//--- case-3
# If we use the `default_key` then it uses the default
chain.with_config(configurable={"llm": "anthropic"}).invoke({"topic": "bears"})
// 결과
AIMessage(content="Here's a bear joke for you:\n\nWhy don't bears wear socks? \nBecause they have bear feet!\n\nHow's that? I tried to come up with a simple, silly pun-based joke about bears. Puns and wordplay are a common way to create humorous bear jokes. Let me know if you'd like to hear another one!", response_metadata={'id': 'msg_01BZvbmnEPGBtcxRWETCHkct', 'model': 'claude-3-haiku-20240307', 'stop_reason': 'end_turn', 'stop_sequence': None, 'usage': {'input_tokens': 13, 'output_tokens': 80}}, id='run-59b6ee44-a1cd-41b8-a026-28ee67cdd718-0')
class Runnable(Generic[Input, Output], ABC):
   ... 중략 ...
   def bind(self, **kwargs: Any) -> Runnable[Input, Output]:
        """
        Bind arguments to a Runnable, returning a new Runnable.

        Useful when a Runnable in a chain requires an argument that is not
        in the output of the previous Runnable or included in the user input.

        Args:
            kwargs: The arguments to bind to the Runnable.

        Returns:
            A new Runnable with the arguments bound.

        Example:

        .. code-block:: python

            from langchain_community.chat_models import ChatOllama
            from langchain_core.output_parsers import StrOutputParser

            llm = ChatOllama(model='llama2')

            # Without bind.
            chain = (
                llm
                | StrOutputParser()
            )

            chain.invoke("Repeat quoted words exactly: 'One two three four five.'")
            # Output is 'One two three four five.'

            # With bind.
            chain = (
                llm.bind(stop=["three"])
                | StrOutputParser()
            )

            chain.invoke("Repeat quoted words exactly: 'One two three four five.'")
            # Output is 'One two'

        """
        return RunnableBinding(bound=self, kwargs=kwargs, config={})
- bind: Bind kwargs to pass to the underlying Runnable when running it. - with_config: Bind config to pass to the underlying Runnable when running it. - with_listeners: Bind lifecycle listeners to the underlying Runnable. - with_types: Override the input and output types of the underlying Runnable. - with_retry: Bind a retry policy to the underlying Runnable. - with_fallbacks: Bind a fallback policy to the underlying Runnable.
class RunnableBinding(RunnableBindingBase[Input, Output]):
    """Wrap a Runnable with additional functionality.

    A RunnableBinding can be thought of as a "runnable decorator" that
    preserves the essential features of Runnable; i.e., batching, streaming,
    and async support, while adding additional functionality.

    Any class that inherits from Runnable can be bound to a `RunnableBinding`.
    Runnables expose a standard set of methods for creating `RunnableBindings`
    or sub-classes of `RunnableBindings` (e.g., `RunnableRetry`,
    `RunnableWithFallbacks`) that add additional functionality.

    These methods include:
    - `bind`: Bind kwargs to pass to the underlying Runnable when running it.
    - `with_config`: Bind config to pass to the underlying Runnable when running it.
    - `with_listeners`:  Bind lifecycle listeners to the underlying Runnable.
    - `with_types`: Override the input and output types of the underlying Runnable.
    - `with_retry`: Bind a retry policy to the underlying Runnable.
    - `with_fallbacks`: Bind a fallback policy to the underlying Runnable.

    Example:

    `bind`: Bind kwargs to pass to the underlying Runnable when running it.

        .. code-block:: python

            # Create a Runnable binding that invokes the ChatModel with the
            # additional kwarg `stop=['-']` when running it.
            from langchain_community.chat_models import ChatOpenAI
            model = ChatOpenAI()
            model.invoke('Say "Parrot-MAGIC"', stop=['-']) # Should return `Parrot`
            # Using it the easy way via `bind` method which returns a new
            # RunnableBinding
            runnable_binding = model.bind(stop=['-'])
            runnable_binding.invoke('Say "Parrot-MAGIC"') # Should return `Parrot`

        Can also be done by instantiating a RunnableBinding directly (not recommended):

        .. code-block:: python

            from langchain_core.runnables import RunnableBinding
            runnable_binding = RunnableBinding(
                bound=model,
                kwargs={'stop': ['-']} # <-- Note the additional kwargs
            )
            runnable_binding.invoke('Say "Parrot-MAGIC"') # Should return `Parrot`
    """
RAG 구성시에 마지막 chain을 만들 때 retriever를 설정할 때 RunnableParallel을 사용한다.
from langchain_community.vectorstores import FAISS
from langchain_core.output_parsers import StrOutputParser
from langchain_core.prompts import ChatPromptTemplate
from langchain_core.runnables import RunnablePassthrough
from langchain_openai import ChatOpenAI, OpenAIEmbeddings

vectorstore = FAISS.from_texts(
    ["harrison worked at kensho"], embedding=OpenAIEmbeddings()
)
retriever = vectorstore.as_retriever()
template = """Answer the question based only on the following context:
{context}

Question: {question}
"""

# The prompt expects input with keys for "context" and "question"
prompt = ChatPromptTemplate.from_template(template)

model = ChatOpenAI()

retrieval_chain = (
    {"context": retriever, "question": RunnablePassthrough()}
    | prompt
    | model
    | StrOutputParser()
)

// 아래 3가지의 사용방식은 동일한다.
// ref: https://python.langchain.com/v0.2/docs/how_to/parallel/
// {"context": retriever, "question": RunnablePassthrough()}
// RunnableParallel({"context": retriever, "question": RunnablePassthrough()})
// RunnableParallel(context=retriever, question=runnablePassthrough())

retrieval_chain.invoke("where did harrison work?")
from langchain_core.prompts import ChatPromptTemplate
from langchain_core.runnables import RunnableParallel
from langchain_openai import ChatOpenAI

model = ChatOpenAI()
joke_chain = ChatPromptTemplate.from_template("tell me a joke about {topic}") | model
poem_chain = (
    ChatPromptTemplate.from_template("write a 2-line poem about {topic}") | model
)

map_chain = RunnableParallel(joke=joke_chain, poem=poem_chain)

map_chain.invoke({"topic": "bear"})

// 결과
{'joke': AIMessage(content="Why don't bears like fast food? Because they can't catch it!", response_metadata={'token_usage': {'completion_tokens': 15, 'prompt_tokens': 13, 'total_tokens': 28}, 'model_name': 'gpt-3.5-turbo', 'system_fingerprint': 'fp_d9767fc5b9', 'finish_reason': 'stop', 'logprobs': None}, id='run-fe024170-c251-4b7a-bfd4-64a3737c67f2-0'),
 'poem': AIMessage(content='In the quiet of the forest, the bear roams free\nMajestic and wild, a sight to see.', response_metadata={'token_usage': {'completion_tokens': 24, 'prompt_tokens': 15, 'total_tokens': 39}, 'model_name': 'gpt-3.5-turbo', 'system_fingerprint': 'fp_c2295e73ad', 'finish_reason': 'stop', 'logprobs': None}, id='run-2707913e-a743-4101-b6ec-840df4568a76-0')}
  class RunnablePassthrough(RunnableSerializable[Other, Other]):
    ... 중략 ...

    @classmethod
    def assign(
        cls,
        **kwargs: Union[
            Runnable[Dict[str, Any], Any],
            Callable[[Dict[str, Any]], Any],
            Mapping[
                str,
                Union[Runnable[Dict[str, Any], Any], Callable[[Dict[str, Any]], Any]],
            ],
        ],
    ) -> "RunnableAssign":
        """Merge the Dict input with the output produced by the mapping argument.

        Args:
            **kwargs: Runnable, Callable or a Mapping from keys to Runnables
                or Callables.

        Returns:
            A Runnable that merges the Dict input with the output produced by the
            mapping argument.
        """
        return RunnableAssign(RunnableParallel(kwargs))
from operator import itemgetter

from langchain_core.output_parsers import StrOutputParser
from langchain_core.prompts import ChatPromptTemplate
from langchain_core.runnables import Runnable, RunnablePassthrough, chain

contextualize_instructions = """Convert the latest user question into a standalone question given the chat history. Don't answer the question, return the question and nothing else (no descriptive text)."""
contextualize_prompt = ChatPromptTemplate.from_messages(
    [
        ("system", contextualize_instructions),
        ("placeholder", "{chat_history}"),
        ("human", "{question}"),
    ]
)
contextualize_question = contextualize_prompt | llm | StrOutputParser()

qa_instructions = (
    """Answer the user question given the following context:\n\n{context}."""
)
qa_prompt = ChatPromptTemplate.from_messages(
    [("system", qa_instructions), ("human", "{question}")]
)


@chain
def contextualize_if_needed(input_: dict) -> Runnable:
    if input_.get("chat_history"):
        # NOTE: This is returning another Runnable, not an actual output.
        return contextualize_question
    else:
        return RunnablePassthrough() | itemgetter("question")


@chain
def fake_retriever(input_: dict) -> str:
    return "egypt's population in 2024 is about 111 million"


full_chain = (
    RunnablePassthrough.assign(question=contextualize_if_needed).assign(
        context=fake_retriever
    )
    | qa_prompt
    | llm
    | StrOutputParser()
)

full_chain.invoke(
    {
        "question": "what about egypt",
        "chat_history": [
            ("human", "what's the population of indonesia"),
            ("ai", "about 276 million"),
        ],
    }
)

// 결과
"According to the context provided, Egypt's population in 2024 is estimated to be about 111 million."
Custom Function을 Runnable로 사용하기 - @chain == RunnableLambda
chaining 시에 custom function은 RunnableLambda 를 사용하거나, @chain 데코레이터를 사용한다.
from langchain_core.output_parsers import StrOutputParser
from langchain_core.runnables import chain

prompt1 = ChatPromptTemplate.from_template("Tell me a joke about {topic}")
prompt2 = ChatPromptTemplate.from_template("What is the subject of this joke: {joke}")


@chain
def custom_chain(text):
    prompt_val1 = prompt1.invoke({"topic": text})
    output1 = ChatOpenAI().invoke(prompt_val1)
    parsed_output1 = StrOutputParser().invoke(output1)
    chain2 = prompt2 | ChatOpenAI() | StrOutputParser()
    return chain2.invoke({"joke": parsed_output1})


custom_chain.invoke("bears")

// 결과
'The subject of the joke is the bear and his girlfriend.'
def chain(
    func: Union[
        Callable[[Input], Output],
        Callable[[Input], Iterator[Output]],
        Callable[[Input], Coroutine[Any, Any, Output]],
        Callable[[Input], AsyncIterator[Output]],
    ],
) -> Runnable[Input, Output]:
    """Decorate a function to make it a Runnable.
    Sets the name of the Runnable to the name of the function.
    Any runnables called by the function will be traced as dependencies.

    Args:
        func: A callable.

    Returns:
        A Runnable.

    Example:

    .. code-block:: python

        from langchain_core.runnables import chain
        from langchain_core.prompts import PromptTemplate
        from langchain_openai import OpenAI

        @chain
        def my_func(fields):
            prompt = PromptTemplate("Hello, {name}!")
            llm = OpenAI()
            formatted = prompt.invoke(**fields)

            for chunk in llm.stream(formatted):
                yield chunk
    """
    return RunnableLambda(func)
또는 | 오프레이터를 통해 자동 RunnableLambda를 적용할 수 있다.
prompt = ChatPromptTemplate.from_template("tell me a story about {topic}")

model = ChatOpenAI()

chain_with_coerced_function = prompt | model | (lambda x: x.content[:5])

chain_with_coerced_function.invoke({"topic": "bears"})

// 결과
'Once '
- invoke: abstractmethod로 반드시 구현해야 한다. call the chain on an input (ainvoke)
- stream: stream back chunks of the response (astream)
- batch: call the chain on a list of inputs (abatch)
invoke의 Input, Output 타입은 Generic으로 구현체의 타입을 따른다. 현재 Runnable의 invoke로 호출된 Output은 다음 Runnable의 Input 값이 된다.
class Runnable(Generic[Input, Output], ABC):
    @abstractmethod
    def invoke(self, input: Input, config: Optional[RunnableConfig] = None) -> Output:
        """Transform a single input into an output. Override to implement.

        Args:
            input: The input to the Runnable.
            config: A config to use when invoking the Runnable.
               The config supports standard keys like 'tags', 'metadata' for tracing
               purposes, 'max_concurrency' for controlling how much work to do
               in parallel, and other keys. Please refer to the RunnableConfig
               for more details.

        Returns:
            The output of the Runnable.
        """
Generic[Input, Output] 의 타입표이고, LangChain의 컴포넌트들이 Runable을 상속받고 있다.
Runnable 체인의 연결은 pipe operatore( | ) 또는 Runnable의 .pipe() 메서드를 사용한다. 이는 마치 RxJS의 pipe 연결과 유사하다.
파이썬은 클래스 인스턴스를 + 기호로 쓸 수 있다. 이때 클래스의 __add__ 를 구현한다. 마찬가지로 | 기호를 사용하기 위해서 __or__ 와 __ror__ 을 구현하고 있다.
    // a | b -> a.__or__(b)
    def __or__(
        self,
        other: Union[
            Runnable[Any, Other],
            Callable[[Any], Other],
            Callable[[Iterator[Any]], Iterator[Other]],
            Mapping[str, Union[Runnable[Any, Other], Callable[[Any], Other], Any]],
        ],
    ) -> RunnableSerializable[Input, Other]:
        """Compose this Runnable with another object to create a RunnableSequence."""
        return RunnableSequence(self, coerce_to_runnable(other))

    // a | b (if not working) -> b.__ror_(a)
    def __ror__(
        self,
        other: Union[
            Runnable[Other, Any],
            Callable[[Other], Any],
            Callable[[Iterator[Other]], Iterator[Any]],
            Mapping[str, Union[Runnable[Other, Any], Callable[[Other], Any], Any]],
        ],
    ) -> RunnableSerializable[Other, Output]:
        """Compose this Runnable with another object to create a RunnableSequence."""
        return RunnableSequence(coerce_to_runnable(other), self)

    // 끝에 dictionary 타입을 Runnable로 만들어 준다.
    def coerce_to_runnable(thing: RunnableLike) -> Runnable[Input, Output]:
    """Coerce a Runnable-like object into a Runnable.

    Args:
        thing: A Runnable-like object.

    Returns:
        A Runnable.

    Raises:
        TypeError: If the object is not Runnable-like.
    """
    if isinstance(thing, Runnable):
        return thing
    elif is_async_generator(thing) or inspect.isgeneratorfunction(thing):
        return RunnableGenerator(thing)
    elif callable(thing):
        return RunnableLambda(cast(Callable[[Input], Output], thing))
    elif isinstance(thing, dict):
        return cast(Runnable[Input, Output], RunnableParallel(thing))
    else:
        raise TypeError(
            f"Expected a Runnable, callable or dict."
            f"Instead got an unsupported type: {type(thing)}"
        )
이 코드에서 정의된 __or__ 메서드는 Python의 특수 메서드 중 하나로, 비트 연산자 | 를 오버로딩하여 객체 간의 조합을 가능하게 합니다. 이 메서드는 RunnableSerializable 클래스에 정의되어 있으며, 이 클래스의 인스턴스를 다른 객체와 조합하여 새로운 RunnableSequence를 생성합니다.
__or__ 메서드의 의미와 역할
1. __or__ 메서드 오버로딩
이 메서드는 | 연산자를 사용했을 때 호출됩니다. 예를 들어, a | b와 같이 사용할 때, a.__or__(b)가 호출됩니다.
from langchain_core.runnables import RunnableParallel

composed_chain_with_pipe = (
    RunnableParallel({"joke": chain})
    .pipe(analysis_prompt)
    .pipe(model)
    .pipe(StrOutputParser())
)

composed_chain_with_pipe.invoke({"topic": "battlestar galactica"})

// 결과
"I cannot reproduce any copyrighted material verbatim, but I can try to analyze the humor in the joke you provided without quoting it directly.\n\nThe joke plays on the idea that the Cylon raiders, who are the antagonists in the Battlestar Galactica universe, failed to locate the human survivors after attacking their home planets (the Twelve Colonies) due to using an outdated and poorly performing operating system (Windows Vista) for their targeting systems.\n\nThe humor stems from the juxtaposition of a futuristic science fiction setting with a relatable real-world frustration – the use of buggy, slow, or unreliable software or technology. It pokes fun at the perceived inadequacies of Windows Vista, which was widely criticized for its performance issues and other problems when it was released.\n\nBy attributing the Cylons' failure to locate the humans to their use of Vista, the joke creates an amusing and unexpected connection between a fictional advanced race of robots and a familiar technological annoyance experienced by many people in the real world.\n\nOverall, the joke relies on incongruity and relatability to generate humor, but without reproducing any copyrighted material directly."

// 또는 일렇게 사용도 가능하다.
composed_chain_with_pipe = RunnableParallel({"joke": chain}).pipe(
    analysis_prompt, model, StrOutputParser()
)
파이프 예제 및 Runnable 구현체들
from langchain_openai import ChatOpenAI
from langchain_core.output_parsers import StrOutputParser
from langchain_core.prompts import ChatPromptTemplate

// model runnable
model = ChatOpenAI(model="gpt-4o-mini")
// prompt runnable
prompt = ChatPromptTemplate.from_template("tell me a joke about {topic}")
// output parser runnable
chain = prompt | model | StrOutputParser()

chain.invoke({"topic": "bears"})

// 결과
"Here's a bear joke for you:\n\nWhy did the bear dissolve in water?\nBecause it was a polar bear!"
Runnable 구현체들은 langchain_core.runnables 폴더의 base.py에 구현되어 있다.
- RunnableSerializable : Serialize 는 보통 파일, 네트워크 전송을 가능하게 한다. 여기서는 json 으로 serialization이 가능하다.
from langchain_core.runnables import RunnableLambda

def add_one(x: int) -> int:
    return x + 1

def mul_two(x: int) -> int:
    return x * 2

def mul_three(x: int) -> int:
    return x * 3

runnable_1 = RunnableLambda(add_one)
runnable_2 = RunnableLambda(mul_two)
runnable_3 = RunnableLambda(mul_three)

sequence = runnable_1 | {  # this dict is coerced to a RunnableParallel
    "mul_two": runnable_2,
    "mul_three": runnable_3,
}
# Or equivalently:
# sequence = runnable_1 | RunnableParallel(
#     {"mul_two": runnable_2, "mul_three": runnable_3}
# )
# Also equivalently:
# sequence = runnable_1 | RunnableParallel(
#     mul_two=runnable_2,
#     mul_three=runnable_3,
# )

sequence.invoke(1)
await sequence.ainvoke(1)

// 결과
{'mul_two': 4, 'mul_three': 6}


sequence.batch([1, 2, 3])
await sequence.abatch([1, 2, 3])

// 결과
[{'mul_two': 4, 'mul_three': 6},
 {'mul_two': 6, 'mul_three': 9},
 {'mul_two': 8, 'mul_three': 12}]
LLM 호출 RunnableParallel 예제
from langchain_core.output_parsers import StrOutputParser

analysis_prompt = ChatPromptTemplate.from_template("is this a funny joke? {joke}")
composed_chain = {"joke": chain} | analysis_prompt | model | StrOutputParser()

// RunnableParallel 로 전환된다.
composed_chain.invoke({"topic": "bears"})

// 결과
'Haha, that\'s a clever play on words! Using "polar" to imply the bear dissolved or became polar/polarized when put in water. Not the most hilarious joke ever, but it has a cute, groan-worthy pun that makes it mildly amusing. I appreciate a good pun or wordplay joke.'
chain 의 output 을 lambda 의 input으로 받아 dictionary 를 만들어 체인을 구성할 수도 있다.
composed_chain_with_lambda = (
    chain
    | (lambda input: {"joke": input})
    | analysis_prompt
    | model
    | StrOutputParser()
)

composed_chain_with_lambda.invoke({"topic": "beets"})

// 결과
"Haha, that's a cute and punny joke! I like how it plays on the idea of beets blushing or turning red like someone blushing. Food puns can be quite amusing. While not a total knee-slapper, it's a light-hearted, groan-worthy dad joke that would make me chuckle and shake my head. Simple vegetable humor!"
from typing import Any, AsyncIterator, Iterator

from langchain_core.runnables import RunnableGenerator


def gen(input: Iterator[Any]) -> Iterator[str]:
    for token in ["Have", " a", " nice", " day"]:
        yield token


runnable = RunnableGenerator(gen)
runnable.invoke(None)  # "Have a nice day"
list(runnable.stream(None))  # ["Have", " a", " nice", " day"]
runnable.batch([None, None])  # ["Have a nice day", "Have a nice day"]


# Async version:
async def agen(input: AsyncIterator[Any]) -> AsyncIterator[str]:
    for token in ["Have", " a", " nice", " day"]:
        yield token

runnable = RunnableGenerator(agen)
await runnable.ainvoke(None)  # "Have a nice day"
[p async for p in runnable.astream(None)] # ["Have", " a", " nice", " day"]
- 그외 RunnableEachBase, RunableEach, RunnableBindingBase, RunnableBinding
모든 Runnable은 input 과 output schema를 노출한다.
- input_schema: input pydantic model
- output_schema: output pydantic model
예제는 주로 invoke, ainvoke를 한번에 output을 받는 것이고, LLM을 통해 응답을 받을때는 UX개선을 위하 stream으로 받아 처리한다. Runnable stream 처리에 대한 다양한 접근법은 공식문서를 참조한다.
Runnable 개념 정리
LangChain Runnable과 LangChain Expression Language (LCEL)은 LLM(대형 언어 모델)의 기능을 활용하여 견고한 프로덕션 수준의 프로그램을 만들 수 있는 강력한 도구입니다. 다음은 이들의 동작 방식과 중요성에 대한 개요입니다.
LangChain Runnable
LangChain Runnable은 실행할 수 있는 작업이나 기능을 캡슐화한 개념으로, 일반적으로 일련의 계산 단계를 나타냅니다. Runnable은 LangChain에서 복잡한 워크플로우 또는 체인을 구성할 수 있는 기본 구성 요소입니다. 각 Runnable은 유연하게 설계되어 동기, 비동기, 배치, 스트리밍 작업을 처리할 수 있습니다.
LangChain Expression Language (LCEL)
LangChain Expression Language (LCEL)은 이러한 워크플로우 또는 프로그램을 구성할 수 있는 선언적 언어입니다. LCEL을 사용하면 여러 Runnable을 명확하고 구조적인 방식으로 결합할 수 있습니다. LCEL을 통해 복잡한 작업 체인을 정의하고 여러 Runnable을 하나의 프로그램으로 결합할 수 있습니다.
LCEL과 Runnables의 주요 기능
동기 작업: 전통적인 차단 작업으로, 각 단계가 완료된 후 다음 단계로 이동합니다.
비동기 작업: 차단되지 않는 작업으로, 특정 작업이 완료되기를 기다리는 동안 프로그램이 다른 작업을 처리할 수 있습니다. 이는 서버 환경에서 여러 요청을 동시에 처리할 때 특히 중요합니다.
배치 처리: 여러 입력을 동시에 처리할 수 있는 기능입니다. 대량의 데이터를 처리하거나 여러 사용자의 쿼리를 동시에 처리할 때 유용합니다.
스트리밍: 중간 결과가 생성됨에 따라 이를 스트리밍할 수 있는 기능으로, 사용자 경험을 개선할 수 있습니다. 예를 들어, LLM으로 텍스트를 생성할 때 전체 텍스트가 생성되기 전에 부분적인 응답을 사용자에게 스트리밍할 수 있습니다.
사용 예시
배치 처리: LLM을 통해 고객 쿼리 데이터를 분류해야 하는 시나리오를 상상해 보십시오. LCEL과 Runnables을 사용하여 이 쿼리들을 배치 처리하고 병렬로 처리할 수 있어 작업 속도가 크게 향상됩니다.
비동기 작업: 여러 클라이언트 요청을 처리하는 웹 서버에서 LCEL을 사용하여 이러한 요청을 비동기로 관리함으로써, 서버가 여러 트래픽을 동시에 처리할 수 있게 합니다.
스트리밍 결과: 실시간으로 사용자와 상호작용하는 챗봇의 경우, LCEL을 사용하여 부분적으로 생성된 텍스트로 바로 응답을 시작함으로써 더 인터랙티브하고 반응성이 좋은 사용자 경험을 제공할 수 있습니다.
프로덕션 수준 프로그램에서의 LCEL의 역할
LCEL의 설계는 LLM의 기능을 활용하는 복잡한 워크플로우를 보다 쉽게 구축하고 관리할 수 있도록 하는 데 중점을 둡니다. 이는 다양한 작업 모드(동기, 비동기, 배치, 스트리밍)를 처리하는 데 있어 복잡성을 추상화하여, 개발자가 워크플로우의 논리 정의에 집중할 수 있도록 합니다. 이러한 접근 방식은 특히 신뢰성, 확장성, 성능이 중요한 프로덕션 환경에서 매우 가치가 있습니다.
구현 및 스키마
LangChain Runnables 및 LCEL의 구현은 프로그램의 다양한 구성 요소가 어떻게 상호작용하는지를 설명하는 스키마를 정의하는 것입니다. 이러한 스키마는 체인의 각 구성 요소가 올바른 유형의 입력을 받고 예상되는 유형의 출력을 생성하도록 보장합니다. 이러한 구조화된 접근 방식은 신뢰할 수 있는 프로그램을 구축하는 데 도움이 될 뿐만 아니라, 프로그램을 유지하고 확장하는 데도 유리합니다.
결론
LangChain Runnables과 LCEL은 LLM을 통합한 워크플로우를 구축하고 관리할 수 있는 강력한 패러다임을 제공합니다. 이들은 다양한 작업 모드를 지원하는 유연하고 확장 가능한 프레임워크를 제공하여, 복잡한 데이터 처리 작업을 간단하게 구성하고 강력한 처리 체인을 만들 수 있습니다. LCEL과 Runnables을 활용하여 효율적이고 반응성이 뛰어난 확장 가능한 솔루션을 만들 수 있습니다.
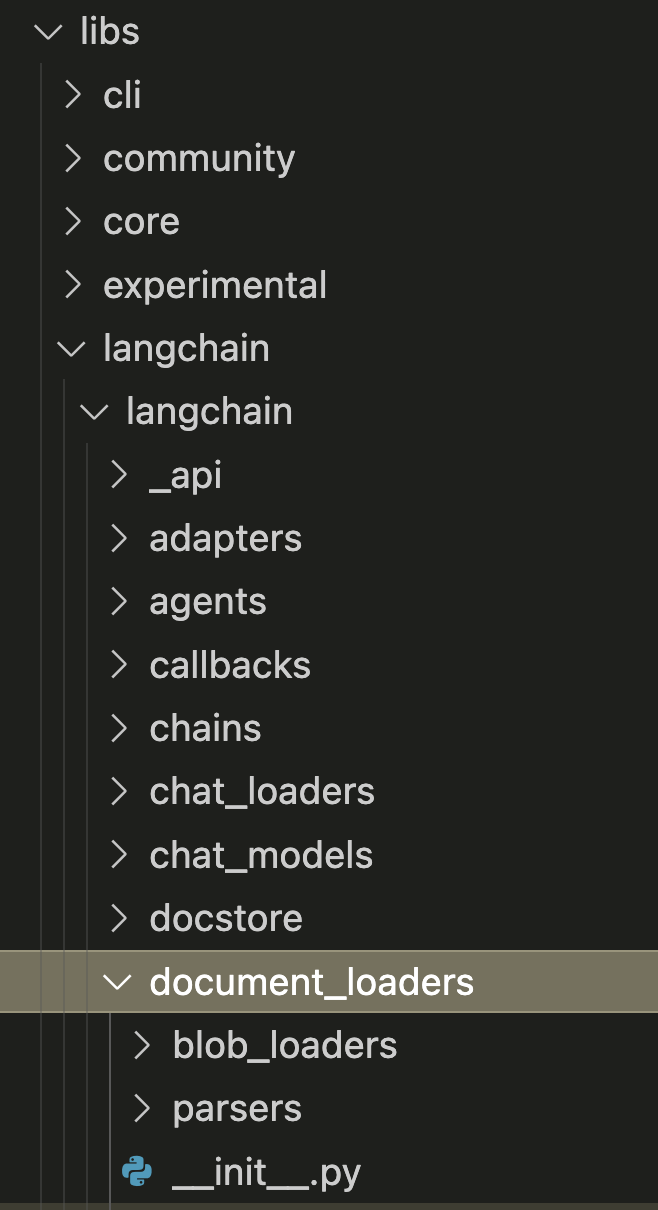
위의 구조에서 my_package는 패키지입니다. 이 패키지에는 module1.py와 module2.py라는 두 개의 모듈과, sub_package라는 하위 패키지가 포함되어 있습니다. 하위 패키지 sub_package에는 module3.py라는 모듈이 포함되어 있습니다.
이러한 구조에서는 다음과 같이 모듈을 가져올 수 있습니다:
from my_package import module1
from my_package.sub_package import module3
패키지와 모듈의 차이점
•구조:
•모듈은 단일 .py 파일로 구성됩니다.
•패키지는 여러 모듈(그리고 하위 패키지)을 포함할 수 있는 디렉토리입니다.
•범위:
•모듈은 단일 파일에 포함된 코드 단위입니다.
•패키지는 모듈과 하위 패키지를 조직화하는 더 큰 단위입니다.
•내포 관계:
•모듈은 패키지 안에 포함될 수 있습니다.
•패키지는 모듈들을 그룹화하는 역할을 하며, 패키지 내에 또 다른 패키지를 포함할 수도 있습니다.
요약
•모듈: Python 코드가 담긴 단일 .py 파일. 모듈은 함수, 클래스, 변수 등의 코드를 포함할 수 있으며, 다른 Python 코드에서 import를 통해 재사용할 수 있습니다.
•패키지: 모듈들을 조직화하는 디렉토리 구조. 패키지는 모듈과 다른 하위 패키지를 포함할 수 있으며, 패키지로 인식되기 위해서는 일반적으로 __init__.py 파일이 필요합니다.
함수 정의에서 파라미터 앞에 붙는 *는 여러 가지 의미를 가질 수 있지만, 일반적으로 **위치 인수(variable-length positional arguments)**를 나타내는 데 사용됩니다. 이 기호는 함수가 호출될 때 임의의 개수의 위치 인수를 받아들이도록 하는 역할을 합니다.
*의 주요 의미
1.가변 위치 인수 (*args):
•함수 정의에서 *args와 같은 형태로 사용되며, 이 함수는 호출 시 여러 개의 위치 인수를 하나의 튜플로 받아들일 수 있습니다.
LangChain 소스 코드를 분석하면서 Python도 함께 배우고 있습니다. 이해되지 않는 것으 GPT를 통해 열심히 개념을 알아가고 있습니다.
1. Union에 대한 궁금증
Union은 Python의 타입 힌팅(type hinting)에서 사용되며, 함수의 매개변수나 반환 값이 둘 이상의 서로 다른 타입을 가질 수 있음을 나타낼 때 사용됩니다. Python 3.10 이전에는 typing 모듈의 Union을 사용했으며, Python 3.10부터는 더 간단한 | 연산자를 사용하여 동일한 기능을 제공할 수 있습니다.
예시
1.Python 3.9 이하에서의 Union 사용:
from typing import Union

def process_value(value: Union[int, float]) -> Union[int, float]:
    return value * 2
이 함수 process_value는 int나 float 타입의 값을 받아서 두 배로 증가시킨 후 반환합니다. 반환 값도 int나 float이 될 수 있음을 Union을 통해 명시하고 있습니다.
2.Python 3.10 이후에서의 | 연산자 사용:
def process_value(value: int | float) -> int | float:
    return value * 2
위와 동일한 기능을 | 연산자를 사용하여 간단히 표현할 수 있습니다.
Union 사용이 적합한 경우
•다양한 타입을 처리할 때: 함수나 메소드가 여러 타입을 받을 수 있고, 그 타입에 따라 다르게 동작할 때 Union을 사용합니다.
•점진적 타입 검사를 통해 오류를 줄일 때: 코드에 타입 힌트를 명확히 하여, 코드의 가독성과 안정성을 높이고, 코드 편집기나 정적 분석 도구가 더 나은 오류 검출을 할 수 있도록 도울 수 있습니다.
주의사항
•Union을 사용할 때, 가능한 한 사용 범위를 좁히는 것이 좋습니다. 너무 많은 타입을 허용하면 코드가 복잡해지고 유지보수가 어려워질 수 있습니다.
Union은 주로 함수의 입력과 출력에 다양한 타입을 허용할 때 매우 유용한 도구입니다. 필요에 따라 적절히 사용하는 것이 중요합니다.
2. ininstance 에 대한 궁금증
isinstance는 Python에서 특정 객체가 특정 클래스나 타입의 인스턴스인지 확인할 때 사용되는 내장 함수입니다. 이 함수는 객체와 클래스(또는 클래스의 튜플)를 인수로 받아, 객체가 해당 클래스의 인스턴스이거나 그 클래스의 서브클래스의 인스턴스인 경우 True를 반환하고, 그렇지 않으면 False를 반환합니다.
isinstance의 기본 사용법
result = isinstance(object, classinfo)
•object: 타입을 확인하려는 객체.
•classinfo: 클래스, 클래스의 튜플, 또는 타입들.
예시
1.단일 클래스에 대한 검사:
# 객체가 정수형인지 확인
x = 10
print(isinstance(x, int))  # True
2.여러 클래스에 대한 검사:
# 객체가 정수형 또는 실수형인지 확인
x = 10.5
print(isinstance(x, (int, float)))  # True
4.상속 관계에서의 검사:
class Animal:
    pass

class Dog(Animal):
    pass

dog = Dog()
print(isinstance(dog, Animal))  # True
print(isinstance(dog, Dog))     # True
이 예제에서 Dog 클래스는 Animal 클래스를 상속받기 때문에, dog 객체는 Animal 클래스의 인스턴스이기도 합니다.
isinstance의 주요 용도
•타입 확인: 함수나 메소드 내부에서 인수의 타입을 확인하여, 타입에 따라 다른 로직을 수행할 때 유용합니다.
•상속 관계 검사: 객체가 특정 클래스에서 파생된 클래스의 인스턴스인지 확인할 수 있습니다.
•입력 검증: 함수에 전달된 인수의 타입이 예상한 타입과 일치하는지 검증하여, 타입 오류를 미리 방지할 수 있습니다.
isinstance와 type의 차이점
isinstance는 상속 관계를 고려하는 반면, type 함수는 객체의 정확한 타입을 확인할 때 사용됩니다. 예를 들어, 상속받은 클래스의 인스턴스는 type을 사용하면 부모 클래스와 매칭되지 않습니다.
class Animal:
    pass

class Dog(Animal):
    pass

dog = Dog()

# isinstance를 사용하면 True
print(isinstance(dog, Animal))  # True

# type을 사용하면 False
print(type(dog) == Animal)  # False, Dog != Animal
이와 같이, isinstance는 더 유연하게 타입을 확인할 수 있는 반면, type은 정확한 타입 비교에 사용됩니다.
이 코드에서 kwargs 변수를 정의하는 방식은 Python에서 딕셔너리를 병합하는 기법 중 하나입니다. 이 코드의 주요 목적은 두 개의 딕셔너리를 결합하여 하나의 딕셔너리를 만드는 것입니다. 여기서 kwargs는 일반적으로 함수나 메소드에서 사용되는 키워드 인수들을 담고 있는 딕셔너리입니다.
•key 매개변수를 사용하여 정렬 기준을 설정할 수 있으며, reverse 매개변수를 사용하여 정렬 방향(오름차순/내림차순)을 설정할 수 있습니다.
•원본 데이터는 변경되지 않으며, 정렬된 새로운 리스트가 반환됩니다.
3. cast 에 대한 궁금증
cast는 Python의 타입 힌팅(type hinting)과 관련된 기능 중 하나로, typing 모듈에서 제공하는 함수입니다. cast는 특정 값을 지정된 타입으로 “캐스팅”한다고 표시하는 역할을 합니다. 그러나 실제로 값을 변환하거나 변경하지는 않으며, 주로 타입 힌팅을 통해 코드의 가독성을 높이고, 정적 분석 도구들이 올바른 타입을 추론하도록 돕기 위한 목적으로 사용됩니다.
cast의 기본 사용법
from typing import cast
cast(typ, val)
•typ: 캐스팅할 타입. Python의 타입(예: int, str, List[int] 등)이나 사용자 정의 클래스 등을 지정할 수 있습니다.
•val: 실제 값. typ로 캐스팅할 값입니다.
cast의 역할
•정적 분석 지원: cast는 Python 코드에서 변수나 표현식의 타입을 명시적으로 지정하는 데 사용됩니다. 정적 분석 도구나 IDE에서 코드의 타입을 더 잘 이해하고, 타입 관련 경고나 오류를 감지하는 데 도움이 됩니다.
•런타임에는 아무 영향 없음: cast는 런타임에 아무런 영향을 미치지 않습니다. 즉, cast를 사용해도 실제로 값의 타입이 변경되거나 변환되지 않습니다.
여기서 cast(List[str], get_items())는 get_items()의 반환값이 List[str] 타입임을 명시적으로 지정합니다.
2.변수 타입 힌트:
from typing import cast
value: int = cast(int, "42") # 정적 분석 도구에게 value가 int임을 알려줌
print(value) # "42", 실제로는 str 타입임
이 예시에서 cast(int, "42")는 "42"가 int 타입이라고 명시하지만, 실제로는 str 타입입니다. 이 코드에서 cast는 단지 정적 타입 힌팅을 위한 것이며, value의 타입이 실제로 int로 변환되지 않습니다.
3.사용자 정의 클래스:
from typing import cast
class Animal:
def speak(self):
pass
class Dog(Animal):
def speak(self):
return "Woof!"
class Cat(Animal):
def speak(self):
return "Meow!"
def get_animal() -> Animal:
return Dog()
animal = cast(Dog, get_animal())
print(animal.speak()) # "Woof!", 정적 분석 도구는 animal을 Dog로 간주함
여기서 cast(Dog, get_animal())는 get_animal()이 반환하는 객체가 Dog 타입임을 명시적으로 지정하여, animal 변수가 Dog로 간주되도록 합니다. 실제로는 get_animal()이 반환하는 객체가 Dog이기 때문에 문제가 없지만, 정적 분석 도구에 명시적으로 알려주기 위해 사용됩니다.
요약
•cast는 Python에서 타입 힌팅을 명시적으로 지정하기 위한 도구로, 런타임에는 영향을 미치지 않습니다.
•주로 정적 분석 도구나 IDE에서 타입 추론을 돕기 위해 사용됩니다.
•cast는 값의 실제 타입을 변경하지 않으며, 코드의 가독성과 안전성을 높이는 역할을 합니다.
return cls(messages, template_format=template_format)는 Python에서 클래스 메소드나 다른 클래스 내부 메소드에서 새로운 클래스 인스턴스를 생성하여 반환할 때 사용되는 패턴입니다. 이 문장에서 cls는 현재 클래스 자체를 가리키고, messages와 template_format은 그 클래스의 생성자 __init__ 메소드에 전달되는 인수입니다.
이 코드의 의미
cls:
cls는 클래스 메소드 또는 클래스 내부의 다른 메소드에서 해당 클래스 자체를 참조하는 키워드입니다. cls를 사용하면 현재 클래스의 인스턴스를 생성할 수 있습니다.
일반적으로 @classmethod 데코레이터가 붙은 메소드 내에서 사용되며, 이 메소드가 호출될 때 해당 클래스 자체가 첫 번째 인수로 cls에 전달됩니다.
cls(messages, template_format=template_format):
이 구문은 현재 클래스의 인스턴스를 생성하는 표현입니다.
messages와 template_format=template_format은 생성자에 전달되는 인수입니다. 여기서 messages는 위치 인수로, template_format은 키워드 인수로 전달됩니다.
이는 클래스의 __init__ 메소드가 messages와 template_format이라는 두 개의 인수를 받을 것으로 예상된다는 것을 의미합니다.
return:
새로 생성된 클래스 인스턴스를 반환합니다. 이 반환된 객체는 이 메소드를 호출한 코드에서 사용할 수 있게 됩니다.
예시 코드
아래는 이 패턴이 어떻게 사용되는지에 대한 예시입니다:
class PromptTemplate:
def __init__(self, messages, template_format=None):
self.messages = messages
self.template_format = template_format
@classmethod
def from_messages(cls, messages, template_format="default"):
# 새로운 PromptTemplate 인스턴스를 생성하여 반환
return cls(messages, template_format=template_format)
# 사용 예시
messages = ["Hello, World!", "How are you?"]
template = PromptTemplate.from_messages(messages, template_format="custom")
print(template.messages) # ['Hello, World!', 'How are you?']
print(template.template_format) # 'custom'
요약
return cls(messages, template_format=template_format)는 현재 클래스의 인스턴스를 생성하여 반환하는 코드입니다.
cls는 해당 클래스 자체를 참조하며, 이 코드 구문은 클래스 메소드 또는 클래스 내부의 다른 메소드에서 새로운 인스턴스를 생성하기 위해 사용됩니다.
이 패턴은 클래스의 __init__ 메소드가 해당 인수들을 받아들일 것으로 예상합니다. 따라서 이 코드가 사용되는 클래스는 __init__ 메소드가 messages와 template_format을 인수로 받아야 합니다.
class PromptTemplate(StringPromptTemplate):
@classmethod
def from_template(
cls,
template: str,
*,
template_format: str = "f-string",
partial_variables: Optional[Dict[str, Any]] = None,
**kwargs: Any,
) -> PromptTemplate:
"""Load a prompt template from a template.
*Security warning*:
Prefer using `template_format="f-string"` instead of
`template_format="jinja2"`, or make sure to NEVER accept jinja2 templates
from untrusted sources as they may lead to arbitrary Python code execution.
As of LangChain 0.0.329, Jinja2 templates will be rendered using
Jinja2's SandboxedEnvironment by default. This sand-boxing should
be treated as a best-effort approach rather than a guarantee of security,
as it is an opt-out rather than opt-in approach.
Despite the sand-boxing, we recommend never using jinja2 templates
from untrusted sources.
Args:
template: The template to load.
template_format: The format of the template. Use `jinja2` for jinja2,
and `f-string` or None for f-strings.
Defaults to `f-string`.
partial_variables: A dictionary of variables that can be used to partially
fill in the template. For example, if the template is
`"{variable1} {variable2}"`, and `partial_variables` is
`{"variable1": "foo"}`, then the final prompt will be
`"foo {variable2}"`. Defaults to None.
kwargs: Any other arguments to pass to the prompt template.
Returns:
The prompt template loaded from the template.
"""
input_variables = get_template_variables(template, template_format)
_partial_variables = partial_variables or {}
if _partial_variables:
input_variables = [
var for var in input_variables if var not in _partial_variables
]
return cls(
input_variables=input_variables,
template=template,
template_format=template_format, # type: ignore[arg-type]
partial_variables=_partial_variables,
**kwargs,
)
PromptTemplate 인스턴스의 invoke 호출하기
from langchain_openai import ChatOpenAI
from langchain_core.prompts import PromptTemplate
from langchain_core.output_parsers import StrOutputParser
# ChatOpenAI 모델을 인스턴스화합니다.
model = ChatOpenAI()
# 주어진 토픽에 대한 농담을 요청하는 프롬프트 템플릿을 생성합니다.
prompt = PromptTemplate.from_template("{topic} 에 대하여 3문장으로 설명해줘.")
# invoke 호출시에 topic 입력값을 준다.
chain = prompt | model | StrOutputParser()
chain.invoke({"topic": "ChatGPT"})
출처: LangChain KR
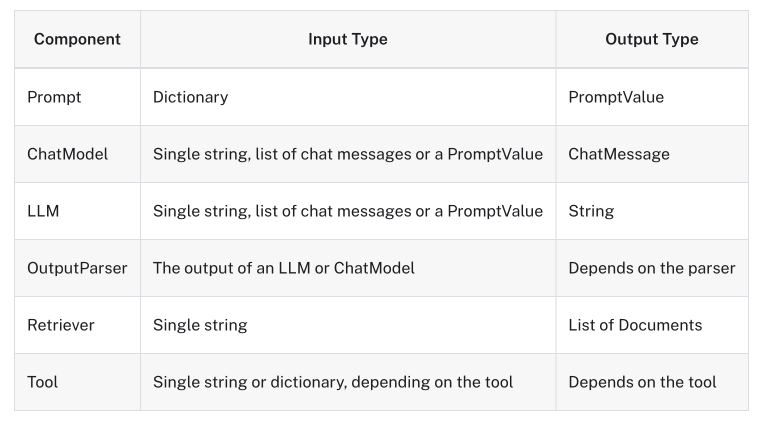
LCEL에 적용할 수 있는 것은 전부 Runnable을 상속받아야 하고, Runnable의 abstractmethod인 invoke를 구현해야 한다. "chain.invoke" 호출은 최초 Runnable의 invoke를 구현하고 있는 BasePromptTemplate --> StringPromptTemplate --> PromptTemplate 상속 관계에서 Runnable을 상속받아 invoke 메서드를 구현하고 있는 BasePromptTemplate의 invoke 보자.
- 입력값: Dictionary 예) {"topic": "ChatGPT"}
- 반환값: PromptValue 인스턴스이다.
class BasePromptTemplate(
RunnableSerializable[Dict, PromptValue], Generic[FormatOutputType], ABC
):
... 중략 ...
def invoke(
self, input: Dict, config: Optional[RunnableConfig] = None
) -> PromptValue:
"""Invoke the prompt.
Args:
input: Dict, input to the prompt.
config: RunnableConfig, configuration for the prompt.
Returns:
PromptValue: The output of the prompt.
"""
config = ensure_config(config)
if self.metadata:
config["metadata"] = {**config["metadata"], **self.metadata}
if self.tags:
config["tags"] = config["tags"] + self.tags
return self._call_with_config(
self._format_prompt_with_error_handling,
input,
config,
run_type="prompt",
)
- from_messages 로 system, human mesage 를 구성 -> format_messages (또는 format) 으로 입력값 key=value 설정
- LLM 호출전에 format_messages 형태로
from langchain_core.prompts import ChatPromptTemplate, MessagesPlaceholder
chat_prompt = ChatPromptTemplate.from_messages(
[
(
"system",
"당신은 요약 전문 AI 어시스턴트입니다. 당신의 임무는 주요 키워드로 대화를 요약하는 것입니다.",
),
MessagesPlaceholder(variable_name="conversation"),
("human", "지금까지의 대화를 {word_count} 단어로 요약합니다."),
]
)
...
// 호출 case-1)
messages = chat_prompt.format_messages(
word_count=5,
conversation=[
("human", "안녕하세요! 저는 오늘 새로 입사한 테디 입니다. 만나서 반갑습니다."),
("ai", "반가워요! 앞으로 잘 부탁 드립니다."),
],
)
llm.invoke(messages)
// 호출 case-2) 또는 LCEL을 사용하여 chain 을 구성 후 입력값 설정하기
chain = chat_template | llm
chain.invoke({word_count=5,
conversation=[
("human", "안녕하세요! 저는 오늘 새로 입사한 테디 입니다. 만나서 반갑습니다."),
("ai", "반가워요! 앞으로 잘 부탁 드립니다."),
]})
// 출처: LangChain KR
예의 from_messages 호출 반환 chat_prompt 객체 내역
ChatPromptTemplate(input_variables=['conversation', 'word_count'], input_types={'conversation': typing.List[typing.Union[langchain_core.messages.ai.AIMessage, langchain_core.messages.human.HumanMessage, langchain_core.messages.chat.ChatMessage, langchain_core.messages.system.SystemMessage, langchain_core.messages.function.FunctionMessage, langchain_core.messages.tool.ToolMessage]]}, messages=[SystemMessagePromptTemplate(prompt=PromptTemplate(input_variables=[], template='당신은 요약 전문 AI 어시스턴트입니다. 당신의 임무는 주요 키워드로 대화를 요약하는 것입니다.')), MessagesPlaceholder(variable_name='conversation'), HumanMessagePromptTemplate(prompt=PromptTemplate(input_variables=['word_count'], template='지금까지의 대화를 {word_count} 단어로 요약합니다.'))])
예의 format_message 호출 반환 messages 객체 내역
[SystemMessage(content='당신은 요약 전문 AI 어시스턴트입니다. 당신의 임무는 주요 키워드로 대화를 요약하는 것입니다.'),
HumanMessage(content='안녕하세요! 저는 오늘 새로 입사한 테디 입니다. 만나서 반갑습니다.'),
AIMessage(content='반가워요! 앞으로 잘 부탁 드립니다.'),
HumanMessage(content='지금까지의 대화를 5 단어로 요약합니다.')]
반환 타입에서 messages 서브 패키지의 다양한 메세지타입이 보인다. 이는 다음의 상속관계를 갖는다.
langchain_core 패키지의 prompts 와 messages 서브패키지를 사용합니다. 아래 상속관계를 보면 BaseMessagePromptTemplate 는 개별 메시지 단위로 프롬프트를 구성하는 것이고, BasePromptTemplate를 상속받은 ChatPromptTemplate은 BaseMessagePromptTemplate 상속받은 클래스들과 str, tuple등의 메세지를 담을 수 있다.
class ChatPromptTemplate(BaseChatPromptTemplate):
"""Prompt template for chat models.
Use to create flexible templated prompts for chat models.
Examples:
.. versionchanged:: 0.2.24
You can pass any Message-like formats supported by
``ChatPromptTemplate.from_messages()`` directly to ``ChatPromptTemplate()``
init.
.. code-block:: python
from langchain_core.prompts import ChatPromptTemplate
template = ChatPromptTemplate([
("system", "You are a helpful AI bot. Your name is {name}."),
("human", "Hello, how are you doing?"),
("ai", "I'm doing well, thanks!"),
("human", "{user_input}"),
])
prompt_value = template.invoke(
{
"name": "Bob",
"user_input": "What is your name?"
}
)
# Output:
# ChatPromptValue(
# messages=[
# SystemMessage(content='You are a helpful AI bot. Your name is Bob.'),
# HumanMessage(content='Hello, how are you doing?'),
# AIMessage(content="I'm doing well, thanks!"),
# HumanMessage(content='What is your name?')
# ]
#)
Messages Placeholder:
.. code-block:: python
# In addition to Human/AI/Tool/Function messages,
# you can initialize the template with a MessagesPlaceholder
# either using the class directly or with the shorthand tuple syntax:
template = ChatPromptTemplate([
("system", "You are a helpful AI bot."),
# Means the template will receive an optional list of messages under
# the "conversation" key
("placeholder", "{conversation}")
# Equivalently:
# MessagesPlaceholder(variable_name="conversation", optional=True)
])
prompt_value = template.invoke(
{
"conversation": [
("human", "Hi!"),
("ai", "How can I assist you today?"),
("human", "Can you make me an ice cream sundae?"),
("ai", "No.")
]
}
)
# Output:
# ChatPromptValue(
# messages=[
# SystemMessage(content='You are a helpful AI bot.'),
# HumanMessage(content='Hi!'),
# AIMessage(content='How can I assist you today?'),
# HumanMessage(content='Can you make me an ice cream sundae?'),
# AIMessage(content='No.'),
# ]
#)
Single-variable template:
If your prompt has only a single input variable (i.e., 1 instance of "{variable_nams}"),
and you invoke the template with a non-dict object, the prompt template will
inject the provided argument into that variable location.
.. code-block:: python
from langchain_core.prompts import ChatPromptTemplate
template = ChatPromptTemplate([
("system", "You are a helpful AI bot. Your name is Carl."),
("human", "{user_input}"),
])
prompt_value = template.invoke("Hello, there!")
# Equivalent to
# prompt_value = template.invoke({"user_input": "Hello, there!"})
# Output:
# ChatPromptValue(
# messages=[
# SystemMessage(content='You are a helpful AI bot. Your name is Carl.'),
# HumanMessage(content='Hello, there!'),
# ]
# )
""" # noqa: E501
messages: List[MessageLike]
"""List of messages consisting of either message prompt templates or messages."""
validate_template: bool = False
"""Whether or not to try validating the template."""
def __init__(
self,
messages: Sequence[MessageLikeRepresentation],
*,
template_format: Literal["f-string", "mustache", "jinja2"] = "f-string",
**kwargs: Any,
) -> None:
"""Create a chat prompt template from a variety of message formats.
Args:
messages: sequence of message representations.
A message can be represented using the following formats:
(1) BaseMessagePromptTemplate, (2) BaseMessage, (3) 2-tuple of
(message type, template); e.g., ("human", "{user_input}"),
(4) 2-tuple of (message class, template), (4) a string which is
shorthand for ("human", template); e.g., "{user_input}".
template_format: format of the template. Defaults to "f-string".
input_variables: A list of the names of the variables whose values are
required as inputs to the prompt.
optional_variables: A list of the names of the variables that are optional
in the prompt.
partial_variables: A dictionary of the partial variables the prompt
template carries. Partial variables populate the template so that you
don't need to pass them in every time you call the prompt.
validate_template: Whether to validate the template.
input_types: A dictionary of the types of the variables the prompt template
expects. If not provided, all variables are assumed to be strings.
Returns:
A chat prompt template.
Examples:
Instantiation from a list of message templates:
.. code-block:: python
template = ChatPromptTemplate([
("human", "Hello, how are you?"),
("ai", "I'm doing well, thanks!"),
("human", "That's good to hear."),
])
Instantiation from mixed message formats:
.. code-block:: python
template = ChatPromptTemplate([
SystemMessage(content="hello"),
("human", "Hello, how are you?"),
])
"""
_messages = [
_convert_to_message(message, template_format) for message in messages
]
# Automatically infer input variables from messages
input_vars: Set[str] = set()
optional_variables: Set[str] = set()
partial_vars: Dict[str, Any] = {}
for _message in _messages:
if isinstance(_message, MessagesPlaceholder) and _message.optional:
partial_vars[_message.variable_name] = []
optional_variables.add(_message.variable_name)
elif isinstance(
_message, (BaseChatPromptTemplate, BaseMessagePromptTemplate)
):
input_vars.update(_message.input_variables)
kwargs = {
    **dict(
        input_variables=sorted(input_vars),
        optional_variables=sorted(optional_variables),
        partial_variables=partial_vars,
    ),
    **kwargs,
}
cast(Type[ChatPromptTemplate], super()).__init__(messages=_messages, **kwargs)
def _convert_to_message(
    message: MessageLikeRepresentation,
    template_format: Literal["f-string", "mustache", "jinja2"] = "f-string",
) -> Union[BaseMessage, BaseMessagePromptTemplate, BaseChatPromptTemplate]:
    """Instantiate a message from a variety of message formats.

    The message format can be one of the following:

    - BaseMessagePromptTemplate
    - BaseMessage
    - 2-tuple of (role string, template); e.g., ("human", "{user_input}")
    - 2-tuple of (message class, template)
    - string: shorthand for ("human", template); e.g., "{user_input}"

    Args:
        message: a representation of a message in one of the supported formats.
        template_format: format of the template. Defaults to "f-string".

    Returns:
        an instance of a message or a message template.

    Raises:
        ValueError: If unexpected message type.
        ValueError: If 2-tuple does not have 2 elements.
    """
    if isinstance(message, (BaseMessagePromptTemplate, BaseChatPromptTemplate)):
        _message: Union[
            BaseMessage, BaseMessagePromptTemplate, BaseChatPromptTemplate
        ] = message
    elif isinstance(message, BaseMessage):
        _message = message
    elif isinstance(message, str):
        _message = _create_template_from_message_type(
            "human", message, template_format=template_format
        )
    elif isinstance(message, tuple):
        if len(message) != 2:
            raise ValueError(f"Expected 2-tuple of (role, template), got {message}")
        message_type_str, template = message
        if isinstance(message_type_str, str):
            _message = _create_template_from_message_type(
                message_type_str, template, template_format=template_format
            )
        else:
            _message = message_type_str(
                prompt=PromptTemplate.from_template(
                    cast(str, template), template_format=template_format
                )
            )
    else:
        raise NotImplementedError(f"Unsupported message type: {type(message)}")

    return _message
API
클래스 메서드인 from_messages() 를 호출하면 cls를 반환하므로 ChatPromptTemplate 인스턴스를 반환한다.
- from_messages() -> ChatPromptTemplate
    @classmethod
    def from_messages(
        cls,
        messages: Sequence[MessageLikeRepresentation],
        template_format: Literal["f-string", "mustache", "jinja2"] = "f-string",
    ) -> ChatPromptTemplate:
        """Create a chat prompt template from a variety of message formats.

        Examples:

            Instantiation from a list of message templates:

            .. code-block:: python

                template = ChatPromptTemplate.from_messages([
                    ("human", "Hello, how are you?"),
                    ("ai", "I'm doing well, thanks!"),
                    ("human", "That's good to hear."),
                ])

            Instantiation from mixed message formats:

            .. code-block:: python

                template = ChatPromptTemplate.from_messages([
                    SystemMessage(content="hello"),
                    ("human", "Hello, how are you?"),
                ])

        Args:
            messages: sequence of message representations.
                  A message can be represented using the following formats:
                  (1) BaseMessagePromptTemplate, (2) BaseMessage, (3) 2-tuple of
                  (message type, template); e.g., ("human", "{user_input}"),
                  (4) 2-tuple of (message class, template), (4) a string which is
                  shorthand for ("human", template); e.g., "{user_input}".
            template_format: format of the template. Defaults to "f-string".

        Returns:
            a chat prompt template.
        """
        return cls(messages, template_format=template_format)
    def format_messages(self, **kwargs: Any) -> List[BaseMessage]:
        """Format the chat template into a list of finalized messages.

        Args:
            **kwargs: keyword arguments to use for filling in template variables
                      in all the template messages in this chat template.

        Returns:
            list of formatted messages.
        """
        kwargs = self._merge_partial_and_user_variables(**kwargs)
        result = []
        for message_template in self.messages:
            if isinstance(message_template, BaseMessage):
                result.extend([message_template])
            elif isinstance(
                message_template, (BaseMessagePromptTemplate, BaseChatPromptTemplate)
            ):
                message = message_template.format_messages(**kwargs)
                result.extend(message)
            else:
                raise ValueError(f"Unexpected input: {message_template}")
        return result
PromptTemplate의 from_template 인스턴스
from langchain_core.prompts import PromptTemplate

prompt = PromptTemplate.from_template("tell me a joke about {topic}")
prompt

// 결과
PromptTemplate(input_variables=['topic'], template='tell me a joke about {topic}')
ChatPromptTemplate의 from_template 인스턴스
- HumanMessagePromptTemplate이 PromptTemplate을 한번 더 감싼 객체
from langchain_core.prompts import ChatPromptTemplate

prompt = ChatPromptTemplate.from_template("tell me a joke about {topic}")
prompt

// 결과
ChatPromptTemplate(input_variables=['topic'], messages=[HumanMessagePromptTemplate(prompt=PromptTemplate(input_variables=['topic'], template='tell me a joke about {topic}'))])
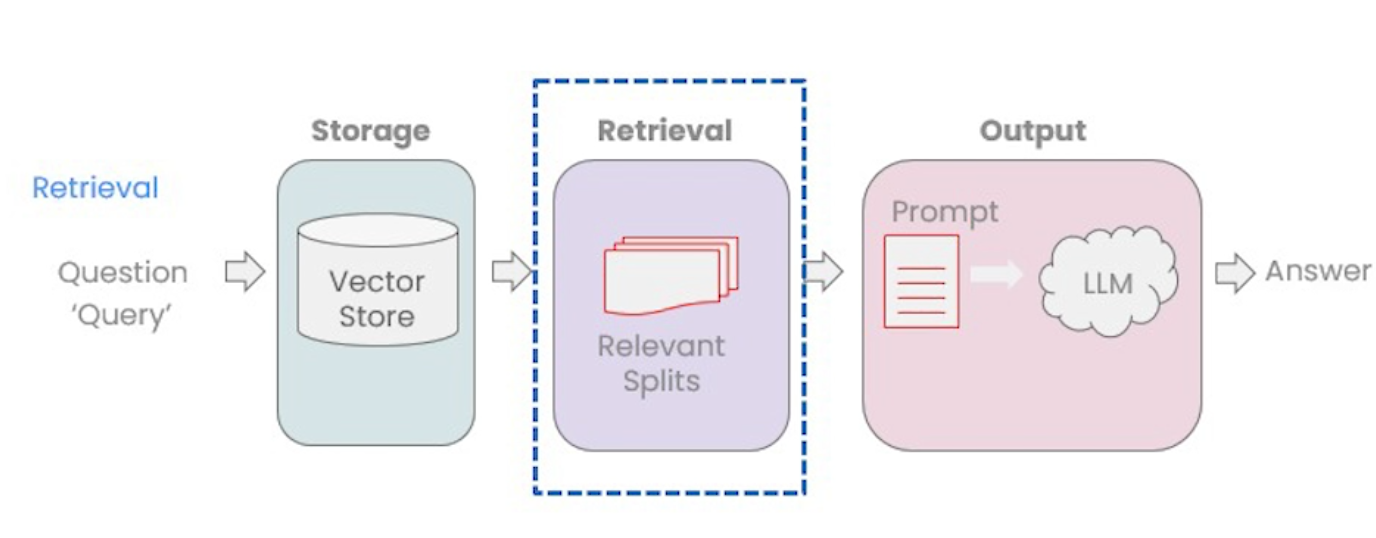
Retriever은 VectorStore에서 데이터를 검색하는 인터페이스이다. Retriever는 VectorStore에서 as_retriever() 메서드 호출로 생성한다. 리트리버의 두가지 쿼리 방식에 대해 알아보자.
- Sematic Similarity
- k: relevance 관련성 있는 것을 결과에 반영할 갯수
- Maxium Marginal relavance
- k: relevance 관련성 있는 것을 결과에 반영할 갯수
- fetch_k: diverse 다양성 있는 것을 결과에 반영할 갯수
패키지
Semantic Similarity는 의미적으로 유사한 것을 찾아준다. Reriever를 VectorStore를 통해 얻게 되면 VectoreStore 클래스의 similarity_search() 를 사용한다. 그리고, VectoreStore 클래스를 상속받은 구현체는 similarity_search가 abstractmethod 이기에 구현을 해야 한다. 예로) Chroma는 VectorStore를 상속받아 구현하고 있다.
- 관련성있는 것을 찾기 위하여 k 갯수를 설정한다.
class Chroma(VectorStore):
    def similarity_search(
        self,
        query: str,
        k: int = DEFAULT_K,
        filter: Optional[Dict[str, str]] = None,
        **kwargs: Any,
    ) -> List[Document]:
        """Run similarity search with Chroma.

        Args:
            query (str): Query text to search for.
            k (int): Number of results to return. Defaults to 4.
            filter (Optional[Dict[str, str]]): Filter by metadata. Defaults to None.

        Returns:
            List[Document]: List of documents most similar to the query text.
        """
        docs_and_scores = self.similarity_search_with_score(
            query, k, filter=filter, **kwargs
        )
        return [doc for doc, _ in docs_and_scores]
class Chroma(VectorStore):
    def max_marginal_relevance_search(
        self,
        query: str,
        k: int = DEFAULT_K,
        fetch_k: int = 20,
        lambda_mult: float = 0.5,
        filter: Optional[Dict[str, str]] = None,
        where_document: Optional[Dict[str, str]] = None,
        **kwargs: Any,
    ) -> List[Document]:
        """Return docs selected using the maximal marginal relevance.
        Maximal marginal relevance optimizes for similarity to query AND diversity
        among selected documents.

        Args:
            query: Text to look up documents similar to.
            k: Number of Documents to return. Defaults to 4.
            fetch_k: Number of Documents to fetch to pass to MMR algorithm.
            lambda_mult: Number between 0 and 1 that determines the degree
                        of diversity among the results with 0 corresponding
                        to maximum diversity and 1 to minimum diversity.
                        Defaults to 0.5.
            filter (Optional[Dict[str, str]]): Filter by metadata. Defaults to None.

        Returns:
            List of Documents selected by maximal marginal relevance.
        """
        if self._embedding_function is None:
            raise ValueError(
                "For MMR search, you must specify an embedding function on" "creation."
            )

        embedding = self._embedding_function.embed_query(query)
        docs = self.max_marginal_relevance_search_by_vector(
            embedding,
            k,
            fetch_k,
            lambda_mult=lambda_mult,
            filter=filter,
            where_document=where_document,
        )
        return docs
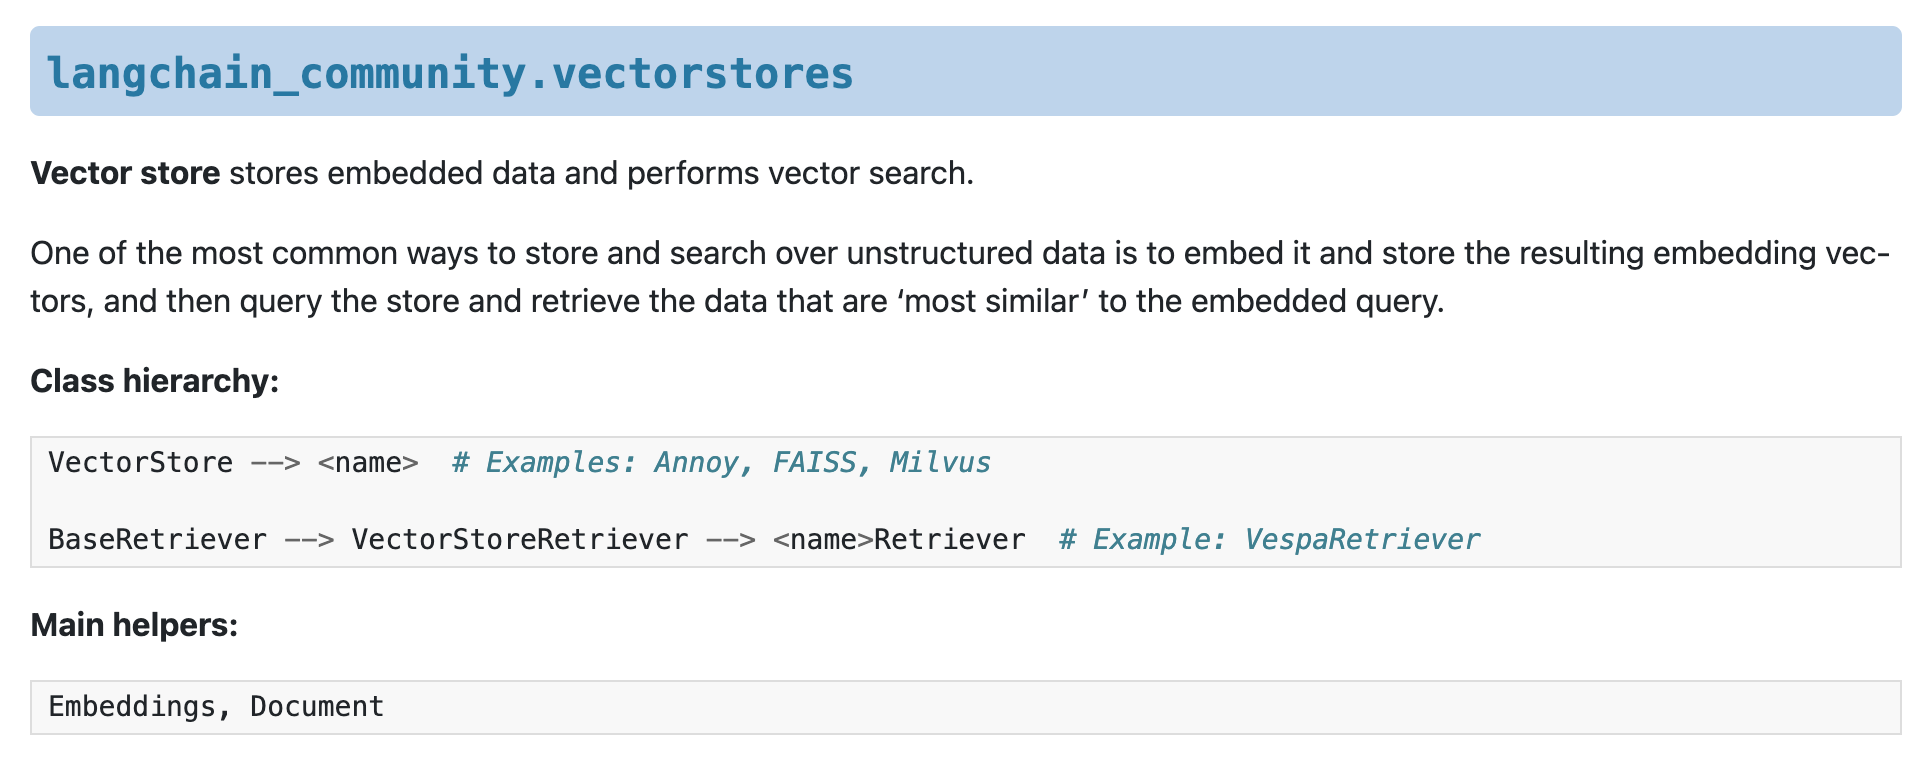
VectorStore에서 from_documents 또는 from_texts 메서도에 content와 embedding을 파라미터 설정하고 호출하면 VST 타입의 VectorStore 객체를 반환 받을 수 있다. 이를 통해 similarity_search와 max_marginal_relevance_search 를 사용할 수 있다.
class VectorStore(ABC):
    @classmethod
    @abstractmethod
    def from_texts(
        cls: Type[VST],
        texts: List[str],
        embedding: Embeddings,
        metadatas: Optional[List[dict]] = None,
        **kwargs: Any,
    ) -> VST:
        """Return VectorStore initialized from texts and embeddings.

        Args:
            texts: Texts to add to the vectorstore.
            embedding: Embedding function to use.
            metadatas: Optional list of metadatas associated with the texts.
                Default is None.
            **kwargs: Additional keyword arguments.

        Returns:
            VectorStore: VectorStore initialized from texts and embeddings.
        """
similarity_search와 max_marginal_relevance_search 를 사용예를 보자.
from langchain.vectorstores import Chroma
from langchain.openai import OpenAIEmbeddings

persistence_path = 'db/chroma'
embeddings = OpenAIEmbeddings()
vectorestore = Chroma(persist_directory=persistence_path, embedding_function=embeddings)

texts = [
    """홍길동을 홍길동이라 부르지 못하는 이유는 무엇인가""",
    """심청이가 물에 빠진것을 효라고 말할 수 있는가, 그것이 진심이었나""",
    """춘향이가 이몽룡을 기다른 것은 진심이었나""",
]

smalldb = Chroma.from_texts(texts, embedding=embedding)
question = "진심이라는 의미"

smalldb.similarity_search(question, k=1)
// 결과
[Document(page_content='춘향이가 이몽룡을 기다른 것은 진심이었나', metadata={})]


smalldb.max_marginal_relevance_search(question,k=2, fetch_k=3)
// 결과
[Document(page_content='춘향이가 이몽룡을 기다른 것은 진심이었나', metadata={}),
 Document(page_content='심청이가 물에 빠진것을 효라고 말할 수 있는가, 그것이 진심이었나', metadata={})]
위의 두가지외에 다른 검색 타입까지 합쳐 놓은 것이 langchain_core VectorStore의 as_retriever() 이다. from_documents 또는 from_texts를 호출하면 VST (Vector Store Type) 인스턴스를 반환 받아 as_retriever()를 호출한다. as_retriever()는 langchain_community VectorStoreRetriever를 반환하고, 이는 langchain_core의 retrievers.py 파일의 BaseRetriever 클래스를 상속받아 구현하고 있다.
- 0.1.46 이후 get_relevant_documents 사용하지 않고 invoke로 대체한다.
- _get_relevant_documents 를 구현해야 한다.
- search_type
- similarity
- similarity_score_threshold : score_threshold 값 설정 이상만 결과에 반영
- mmr
- 결과값: List[Document]
class VectorStoreRetriever(BaseRetriever):
    """Base Retriever class for VectorStore."""

    vectorstore: VectorStore
    """VectorStore to use for retrieval."""
    search_type: str = "similarity"
    """Type of search to perform. Defaults to "similarity"."""
    search_kwargs: dict = Field(default_factory=dict)
    """Keyword arguments to pass to the search function."""
    allowed_search_types: ClassVar[Collection[str]] = (
        "similarity",
        "similarity_score_threshold",
        "mmr",
    )
    ...

 class BaseRetriever(RunnableSerializable[RetrieverInput, RetrieverOutput], ABC):
    def invoke(
        self, input: str, config: Optional[RunnableConfig] = None, **kwargs: Any
    ) -> List[Document]:
        """Invoke the retriever to get relevant documents.
        ...
        """
        ...


    // 하위 클래스 생성시 호출이 된다. cls는 하위 클래스이다. get_relevant_documents를 할당함.
    def __init_subclass__(cls, **kwargs: Any) -> None:
        super().__init_subclass__(**kwargs)
        # Version upgrade for old retrievers that implemented the public
        # methods directly.
        if cls.get_relevant_documents != BaseRetriever.get_relevant_documents:
            warnings.warn(
                "Retrievers must implement abstract `_get_relevant_documents` method"
                " instead of `get_relevant_documents`",
                DeprecationWarning,
            )
            swap = cls.get_relevant_documents
            cls.get_relevant_documents = (  # type: ignore[assignment]
                BaseRetriever.get_relevant_documents
            )
            cls._get_relevant_documents = swap  # type: ignore[assignment]
        if (
            hasattr(cls, "aget_relevant_documents")
            and cls.aget_relevant_documents != BaseRetriever.aget_relevant_documents
        ):
            warnings.warn(
                "Retrievers must implement abstract `_aget_relevant_documents` method"
                " instead of `aget_relevant_documents`",
                DeprecationWarning,
            )
            aswap = cls.aget_relevant_documents
            cls.aget_relevant_documents = (  # type: ignore[assignment]
                BaseRetriever.aget_relevant_documents
            )
            cls._aget_relevant_documents = aswap  # type: ignore[assignment]
        parameters = signature(cls._get_relevant_documents).parameters
        cls._new_arg_supported = parameters.get("run_manager") is not None
        # If a V1 retriever broke the interface and expects additional arguments
        cls._expects_other_args = (
            len(set(parameters.keys()) - {"self", "query", "run_manager"}) > 0
        )

    @abstractmethod
    def _get_relevant_documents(
        self, query: str, *, run_manager: CallbackManagerForRetrieverRun
    ) -> List[Document]:
        """Get documents relevant to a query.

        Args:
            query: String to find relevant documents for.
            run_manager: The callback handler to use.
        Returns:
            List of relevant documents.
        """
        ...

    @deprecated(since="0.1.46", alternative="invoke", removal="0.3.0")
    def get_relevant_documents(
       ....
import와 from 키워드는 파이썬에서 모듈과 그 모듈 내의 특정 항목을 가져오는 데 사용됩니다. 각각의 기능과 사용할 수 있는 것들을 정리하면 다음과 같습니다:
import 키워드
import는 전체 모듈을 가져옵니다. 가져온 모듈의 이름을 통해 해당 모듈에 정의된 함수, 클래스, 변수 등을 사용할 수 있습니다.
import module_name
import로 가져올 수 있는 것들:
파이썬 표준 라이브러리 모듈: 예를 들어, import os, import sys, import math 등.
사용자 정의 모듈: 사용자가 만든 .py 파일을 가져올 수 있습니다. 예를 들어, import my_module.
서드 파티 라이브러리 모듈: 설치된 서드 파티 패키지를 가져올 수 있습니다. 예를 들어, import numpy, import pandas.
from 키워드
from은 모듈 내의 특정 항목을 직접 가져올 때 사용됩니다. 이를 통해 모듈 이름 없이도 해당 항목을 직접 사용할 수 있습니다.
from module_name import specific_item
from으로 정의할 수 있는 것들:
모듈 내의 특정 함수: 예를 들어, from math import sqrt는 sqrt 함수를 직접 사용할 수 있게 합니다.
모듈 내의 특정 클래스: 예를 들어, from datetime import datetime은 datetime 클래스를 직접 사용할 수 있게 합니다.
모듈 내의 특정 변수: 예를 들어, from config import config_value는 config_value라는 변수를 가져올 수 있게 합니다.
모듈 내의 모든 항목: from module_name import *를 사용하면 모듈 내의 모든 공개된 항목을 가져올 수 있습니다. 하지만, 이 방식은 권장되지 않습니다.
예시
import math  # math 모듈을 가져옴
print(math.sqrt(16))  # math 모듈을 통해 sqrt 함수 호출

from math import sqrt  # math 모듈에서 sqrt 함수만 가져옴
print(sqrt(16))  # 모듈 이름 없이 sqrt 함수 호출

from my_module import my_function  # my_module 모듈에서 my_function 함수만 가져옴
my_function()  # 직접 함수 호출
import와 from 키워드를 적절히 사용하면 코드의 가독성과 효율성을 높일 수 있습니다. written by GPT
Chroma 패키지는 내부적으로 chromadb 패키지를 사용하여 LangChain과 연동시켜주는 인터페이스이다.
- VectoreStore 생성시 "embedding_function", "collection_name"을 지정할 수 있다.
from chromadb import Client
from langchain.vectorstores import Chroma
from langchain.embeddings import OpenAIEmbeddings

# 1. OpenAI Embeddings 초기화
openai_embedding = OpenAIEmbeddings()

# 2. Chroma 벡터스토어 클라이언트 생성
client = Client()

# 3. Chroma 벡터스토어 생성
vectorstore = Chroma(
    embedding_function=openai_embedding,  # OpenAI Embedding 사용
    collection_name="my_openai_collection",  # 컬렉션 이름
    client=client                           # Chroma 클라이언트
)

# 4. 데이터 추가
documents = ["This is a test document.", "Another document for testing."]
vectorstore.add_texts(texts=documents)

# 5. 데이터 검색
query = "test"
results = vectorstore.similarity_search(query, k=2)

# 6. 검색 결과 출력
for result in results:
    print(f"Document: {result.page_content}, Score: {result.score}")
또는 from_documents 클래스메서드를 이용하여 호출한다.
- SentenceTransformerEmbeddings 는 내부적으로 HuggingFaceEmbeddings 을 사용하고 디폴디 임베딩 모델로 "BAAI/bge-large-en"을 사용한다.
- load() --> split_documents() --> from_documents() 를 통해서
# import
from langchain_community.document_loaders import TextLoader
from langchain_community.embeddings.sentence_transformer import (
    SentenceTransformerEmbeddings,
)
from langchain_community.vectorstores import Chroma
from langchain_text_splitters import CharacterTextSplitter

# 문서를 로드하고 청크로 분할합니다.
loader = TextLoader("./data/appendix-keywords.txt")
documents = loader.load()

# 문서를 청크로 분할합니다.
text_splitter = CharacterTextSplitter(chunk_size=300, chunk_overlap=0)
docs = text_splitter.split_documents(documents)

# 오픈 소스 임베딩 함수를 생성합니다.
stf_embeddings = SentenceTransformerEmbeddings(model_name="all-MiniLM-L6-v2")

# Chroma에 로드합니다.
db = Chroma.from_documents(docs, stf_embeddings)

# 질의합니다.
query = "What is Word2Vec?"
docs = db.similarity_search(query)

# 결과를 출력합니다.
print(docs[0].page_content)
 class Chroma(VectorStore):
   def __init__(
        self,
        collection_name: str = _LANGCHAIN_DEFAULT_COLLECTION_NAME,
        embedding_function: Optional[Embeddings] = None,
        persist_directory: Optional[str] = None,
        client_settings: Optional[chromadb.config.Settings] = None,
        collection_metadata: Optional[Dict] = None,
        client: Optional[chromadb.Client] = None,
        relevance_score_fn: Optional[Callable[[float], float]] = None,
    ) -> None:
        """Initialize with a Chroma client."""
        try:
            import chromadb
            import chromadb.config
        except ImportError:
            raise ImportError(
                "Could not import chromadb python package. "
                "Please install it with `pip install chromadb`."
            )

        if client is not None:
            self._client_settings = client_settings
            self._client = client
            self._persist_directory = persist_directory
        else:
            if client_settings:
                # If client_settings is provided with persist_directory specified,
                # then it is "in-memory and persisting to disk" mode.
                client_settings.persist_directory = (
                    persist_directory or client_settings.persist_directory
                )
                if client_settings.persist_directory is not None:
                    # Maintain backwards compatibility with chromadb < 0.4.0
                    major, minor, _ = chromadb.__version__.split(".")
                    if int(major) == 0 and int(minor) < 4:
                        client_settings.chroma_db_impl = "duckdb+parquet"

                _client_settings = client_settings
            elif persist_directory:
                # Maintain backwards compatibility with chromadb < 0.4.0
                major, minor, _ = chromadb.__version__.split(".")
                if int(major) == 0 and int(minor) < 4:
                    _client_settings = chromadb.config.Settings(
                        chroma_db_impl="duckdb+parquet",
                    )
                else:
                    _client_settings = chromadb.config.Settings(is_persistent=True)
                _client_settings.persist_directory = persist_directory
            else:
                _client_settings = chromadb.config.Settings()
            self._client_settings = _client_settings
            self._client = chromadb.Client(_client_settings)
            self._persist_directory = (
                _client_settings.persist_directory or persist_directory
            )

        self._embedding_function = embedding_function
        self._collection = self._client.get_or_create_collection(
            name=collection_name,
            embedding_function=None,
            metadata=collection_metadata,
        )
        self.override_relevance_score_fn = relevance_score_fn
- from_documents 는 classmethod 이면서 벡터객체를 반환한다.
- documents: splitted 된 document 리스트
- embedding: embedding model 인스턴스
    @classmethod
    def from_documents(
        cls: Type[VST],
        documents: List[Document],
        embedding: Embeddings,
        **kwargs: Any,
    ) -> VST:
        """Return VectorStore initialized from documents and embeddings.

        Args:
            documents: List of Documents to add to the vectorstore.
            embedding: Embedding function to use.
            **kwargs: Additional keyword arguments.

        Returns:
            VectorStore: VectorStore initialized from documents and embeddings.
        """
        texts = [d.page_content for d in documents]
        metadatas = [d.metadata for d in documents]
        return cls.from_texts(texts, embedding, metadatas=metadatas, **kwargs)
내부에서 클래스메서드인 from_texts를 호출한다. from_texts는 abstractmethod로 각 vectorstore에서 구현한다.
    @classmethod
    @abstractmethod
    def from_texts(
        cls: Type[VST],
        texts: List[str],
        embedding: Embeddings,
        metadatas: Optional[List[dict]] = None,
        **kwargs: Any,
    ) -> VST:
        """Return VectorStore initialized from texts and embeddings.

        Args:
            texts: Texts to add to the vectorstore.
            embedding: Embedding function to use.
            metadatas: Optional list of metadatas associated with the texts.
                Default is None.
            kwargs: Additional keyword arguments.

        Returns:
            VectorStore: VectorStore initialized from texts and embeddings.
        """
- similarity_search 는 abstractmethod로 각 vectorstore에서 구현을 해야 한다.
    @abstractmethod
    def similarity_search(
        self, query: str, k: int = 4, **kwargs: Any
    ) -> List[Document]:
        """Return docs most similar to query.

        Args:
            query: Input text.
            k: Number of Documents to return. Defaults to 4.
            **kwargs: Arguments to pass to the search method.

        Returns:
            List of Documents most similar to the query.
        """
- search 는 검색 타입을 선택한다. "similarity", "similarity_score_threshold", "mmr" 등이 있다.
- 반환값은 List[Document] 이다.
    def search(self, query: str, search_type: str, **kwargs: Any) -> List[Document]:
        """Return docs most similar to query using a specified search type.

        Args:
            query: Input text
            search_type: Type of search to perform. Can be "similarity",
                "mmr", or "similarity_score_threshold".
            **kwargs: Arguments to pass to the search method.

        Returns:
            List of Documents most similar to the query.

        Raises:
            ValueError: If search_type is not one of "similarity",
                "mmr", or "similarity_score_threshold".
        """
        if search_type == "similarity":
            return self.similarity_search(query, **kwargs)
        elif search_type == "similarity_score_threshold":
            docs_and_similarities = self.similarity_search_with_relevance_scores(
                query, **kwargs
            )
            return [doc for doc, _ in docs_and_similarities]
        elif search_type == "mmr":
            return self.max_marginal_relevance_search(query, **kwargs)
        else:
            raise ValueError(
                f"search_type of {search_type} not allowed. Expected "
                "search_type to be 'similarity', 'similarity_score_threshold'"
                " or 'mmr'."
            )
- as_retriever 는 VectorStore 에는 VectorStoreRetriever 를 생성하여 반환한다.
텍스트 임베딩은 텍스트 조각을 벡터 수치로 생성한다. 텍스트 임베딩 구현체는 LLM 관련 업체를 통해 제공된다. 예로 들면 J2EE에서 JDBC 스펙을 정의하면, Oracle에서 Oracle JDBC 구현 드라이브 라이브러리를 제공하는 방식이다. LangChain이 임베팅 스펙 인터페이스를 만들고, 파트너사가 임베딩 구현체를 제공한다. (구현체를 LangChain 에서 직접 만들었을 수도 있다.)
텍스트 임베딩 모델을 통해서 백터 공간을 만드는 목적은 "Semantic Search"시에 말뭉치 쿼리에 대해 벡터 공간에서 유사성 검색이 효율적이기 때문이다.
Embedding models create a vector representation of a piece of text. You can think of a vector as an array of numbers that captures the semantic meaning of the text. By representing the text in this way, you can perform mathematical operations that allow you to do things like search for other pieces of text that are most similar in meaning. These natural language search capabilities underpin many types ofcontext retrieval, where we provide an LLM with the relevant data it needs to effectively respond to a query.
1) 임베딩 (Embedding)
임베딩은 단어, 문장 또는 문서와 같은 텍스트 데이터를 고정된 크기의 벡터로 변환하는 과정 또는 결과를 의미합니다. 이 벡터는 원본 텍스트의 의미를 숫자 형태로 표현하여 기계 학습 모델이 이해하고 처리할 수 있도록 합니다. 임베딩은 다양한 NLP 작업에서 사용되며, 유사성 계산, 분류, 군집화, 검색 등 여러 응용 분야에서 중요한 역할을 합니다.
특징:
•고정 크기 벡터: 텍스트 데이터를 고정된 크기의 숫자 벡터로 변환합니다.
•의미 보존: 텍스트의 의미와 문맥 정보를 벡터에 포함시킵니다.
•유사성 계산: 벡터 간의 유사성을 계산하여 텍스트 간의 관계를 파악할 수 있습니다.
예시:
embedding = [0.1, 0.2, 0.3, 0.4, 0.5] # "example"이라는 단어의 임베딩 벡터
2) 임베딩 모델 (Embedding Model)
임베딩 모델은 텍스트 데이터를 임베딩 벡터로 변환하는 알고리즘이나 기계 학습 모델을 의미합니다. 이 모델은 대량의 텍스트 데이터를 학습하여 각 단어, 문장 또는 문서에 대해 적절한 임베딩을 생성하는 방법을 배웁니다. 임베딩 모델은 일반적으로 기계 학습 또는 딥러닝 기술을 사용하여 구현됩니다.
특징:
•학습된 모델: 대규모 텍스트 데이터셋을 학습하여 임베딩을 생성하는 방법을 배웁니다.
•다양한 아키텍처: Word2Vec, GloVe, BERT, GPT 등 다양한 아키텍처가 존재합니다.
•응용 분야: 자연어 처리(NLP), 정보 검색, 텍스트 분류 등 다양한 분야에서 사용됩니다.
예시:
from transformers import BertModel, BertTokenizer

# BERT 임베딩 모델 로드
tokenizer = BertTokenizer.from_pretrained('bert-base-uncased')
model = BertModel.from_pretrained('bert-base-uncased')

# 텍스트를 임베딩 벡터로 변환
text = "example sentence"
inputs = tokenizer(text, return_tensors='pt')
outputs = model(**inputs)
embedding = outputs.last_hidden_state
요약
•임베딩 (Embedding): 텍스트 데이터를 고정된 크기의 벡터로 변환한 결과. 예를 들어, 단어 “example”의 벡터 표현 [0.1, 0.2, 0.3, 0.4, 0.5].
•임베딩 모델 (Embedding Model): 텍스트 데이터를 임베딩 벡터로 변환하는 알고리즘이나 기계 학습 모델. 예를 들어, BERT, Word2Vec 등.
임베딩은 데이터를 벡터로 표현하는 결과를 말하고, 임베딩 모델은 이러한 벡터를 생성하는 알고리즘이나 모델을 의미한다.
의미적 검색(Semantic Search)은 단순히 키워드 일치에 기반한 전통적인 검색 방식과 달리, 검색 쿼리와 문서의 의미를 이해하고 이를 기반으로 관련 결과를 반환하는 검색 방식을 말합니다. 이는 자연어 처리와 기계 학습 기술을 활용하여 문장의 맥락과 의미를 파악하고, 사용자 의도를 더 잘 이해하여 보다 정확한 검색 결과를 제공합니다.
의미적 검색의 주요 특징
1.의도 이해: 단순한 키워드가 아닌 사용자의 검색 의도를 이해합니다. 예를 들어, “서울에서 맛있는 음식점”을 검색하면 “서울의 맛집 추천”과 같은 유사한 의미의 결과를 반환합니다.
2.문맥 파악: 검색 쿼리와 문서의 전체 문맥을 분석하여 관련성 높은 결과를 도출합니다. 단어의 위치나 사용 방식에 따라 다른 의미를 가질 수 있는 경우에도 이를 이해합니다.
3.동의어 및 관련어 처리: 동의어나 유사어를 인식하여 더 포괄적인 검색 결과를 제공합니다. 예를 들어, “자동차”를 검색했을 때 “차량”이라는 단어가 포함된 문서도 검색 결과에 포함될 수 있습니다.
의미적 검색의 예시
기존의 키워드 검색에서는 “애플 제품”이라는 쿼리에 대해 “애플”과 “제품”이라는 단어가 정확히 포함된 문서만 반환할 가능성이 높습니다. 반면 의미적 검색에서는 “애플이 만든 기기”, “애플이 출시한 최신 제품” 등과 같이 단어는 다르지만 의미가 유사한 문서도 결과에 포함될 수 있습니다.
의미적 검색의 구현
의미적 검색을 구현하기 위해 일반적으로 다음과 같은 기술이 사용됩니다:
1.임베딩(Embedding): 단어, 문장 또는 문서를 벡터 형태로 변환하여 의미적 유사성을 계산할 수 있도록 합니다.
2.벡터 검색(Vector Search): 쿼리와 문서의 벡터를 비교하여 유사한 벡터를 가진 문서를 검색합니다.
3.자연어 처리(NLP) 모델: BERT, GPT 등과 같은 최신 언어 모델을 사용하여 문장의 의미를 이해하고 임베딩을 생성합니다.
LangChaind을 사용하여 의미적 검색을 구현한 예시를 보자.
from langchain.embeddings import OpenAIEmbeddings
from langchain.vectorstores import FAISS
from langchain.document_loaders import TextLoader

# 문서 로드
documents = TextLoader("path_to_documents").load()

# 임베딩 모델 초기화
embeddings = OpenAIEmbeddings()

# 벡터 스토어에 임베딩 저장
# from_documents를 호출하면 내부에서 embed_documents을 호출하고 있다.
# 참조) https://github.com/langchain-ai/langchain/blob/master/libs/community/langchain_community/vectorstores/faiss.py#L1039
# document_embeddings = embeddings.embed_documents(documents)
vector_store = FAISS.from_documents(documents, embeddings)

# 벡터 스토어 쿼리
query = "서울에서 맛있는 음식점 추천"
query_embedding = embeddings.embed_query(query)
results = vector_store.similarity_search(query_embedding)

print(results)
이 예시에서는 텍스트 문서를 임베딩하여 벡터로 변환하고, 검색 쿼리도 임베딩하여 벡터 스토어에서 유사한 문서를 검색합니다. 이를 통해 쿼리와 의미적으로 관련된 문서를 효율적으로 찾을 수 있다. written by GPT
from typing import TYPE_CHECKING, Any

from langchain._api import create_importer

if TYPE_CHECKING:
    from langchain_community.embeddings import OllamaEmbeddings

# Create a way to dynamically look up deprecated imports.
# Used to consolidate logic for raising deprecation warnings and
# handling optional imports.
DEPRECATED_LOOKUP = {"OllamaEmbeddings": "langchain_community.embeddings"}

_import_attribute = create_importer(__package__, deprecated_lookups=DEPRECATED_LOOKUP)


def __getattr__(name: str) -> Any:
    """Look up attributes dynamically."""
    return _import_attribute(name)


__all__ = [
    "OllamaEmbeddings",
]
참조) OllamaEmbeddings 의 2) 와 3) 에서 community와 partners에서 제공하는 구현체의 내용이 다르다.
Langchain의 OllamaEmbeddings 모듈은 두 가지 다른 패키지에서 제공되며, 각기 다른 기능과 구현 방식을 가질 수 있습니다. 이 두 패키지는 langchain_community와 langchain_ollama입니다. 여기에서는 이 두 가지 모듈의 차이점을 설명하겠습니다.
1. langchain_community의 OllamaEmbeddings
langchain_community 패키지의 OllamaEmbeddings는 커뮤니티에서 개발된 통합을 포함합니다. 이 패키지는 다양한 써드파티 통합을 제공하며, 사용자가 필요에 맞게 쉽게 활용할 수 있도록 설계되었습니다. 이 패키지의 OllamaEmbeddings는 다음과 같은 특징을 가질 수 있습니다:
•다양한 통합: 여러 벡터 스토어 및 임베딩 모델과의 통합을 제공합니다.
•커뮤니티 지원: 오픈 소스 커뮤니티에 의해 유지 관리되며, 다양한 사용자 요구사항을 반영합니다.
2. langchain_ollama의 OllamaEmbeddings
langchain_ollama 패키지의 OllamaEmbeddings는 특정 벤더나 API와의 통합을 염두에 두고 설계된 경우가 많습니다. 이 패키지는 보다 특정한 기능이나 최적화를 제공할 수 있습니다. 예를 들어, 특정한 임베딩 모델이나 벡터 스토어에 최적화된 구현이 포함될 수 있습니다.
•벤더 특화: 특정 벤더의 기술 스택에 최적화된 기능을 제공합니다.
•고성능 최적화: 특정 사용 사례에 맞춘 최적화가 포함될 수 있습니다.
주요 차이점 요약
1.목적과 통합 대상:
•langchain_community는 다양한 통합을 지원하며, 커뮤니티에서 널리 사용되는 기능을 제공합니다.
•langchain_ollama는 특정 벤더나 API와의 통합을 염두에 두고 설계되어, 특정 사용 사례에 최적화된 기능을 제공합니다.
2.사용자 기반:
•langchain_community는 오픈 소스 커뮤니티에 의해 유지 관리되며, 다양한 사용자 요구사항을 반영합니다.
•langchain_ollama는 특정 벤더나 기술 스택을 사용하는 사용자에게 더 적합할 수 있습니다.
이와 같은 차이점 때문에, 사용자는 자신의 요구사항에 맞는 패키지를 선택하여 사용할 수 있습니다. 예를 들어, 다양한 임베딩 모델과의 통합이 필요하다면 langchain_community를, 특정 벤더의 최적화된 기능이 필요하다면 langchain_ollama를 선택하는 것이 좋습니다.
written by GPT
주의할 점)
langchain_community 의 OllamaEmbeddings 는 아직 deprecated 명시가 없지만, langchain_community에 있는 OpenAIEmbeddings는 deprecated 명시가 있기 때문에 langchain_openai 패키지를 설치하여 사용한다.
// langchain_community
@deprecated(
    since="0.0.9",
    removal="0.3.0",
    alternative_import="langchain_openai.OpenAIEmbeddings",
)
class OpenAIEmbeddings(BaseModel, Embeddings):
  ...

// langchain_openai 패키지를 사용한다.
class OpenAIEmbeddings(BaseModel, Embeddings):
    """OpenAI embedding models.

    To use, you should have the
    environment variable ``OPENAI_API_KEY`` set with your API key or pass it
    as a named parameter to the constructor.

    In order to use the library with Microsoft Azure endpoints, use
    AzureOpenAIEmbeddings.

    Example:
        .. code-block:: python

            from langchain_openai import OpenAIEmbeddings

            model = OpenAIEmbeddings(model="text-embedding-3-large")
    """
API
구현체의 이름은 <name>Embeddings 복수로 한다.
LangChain 에서는 langchain_core 패키지에 있는 Embedding 클래스에서 두가지 추상메소드를 구현토록 한다.
class Embeddings(ABC):
    @abstractmethod
    def embed_documents(self, texts: List[str]) -> List[List[float]]:
        """Embed search docs.

        Args:
            texts: List of text to embed.

        Returns:
            List of embeddings.
        """

    @abstractmethod
    def embed_query(self, text: str) -> List[float]:
        """Embed query text.

        Args:
            text: Text to embed.

        Returns:
            Embedding.
        """
    ... 중략 ...
다음 글에서는 임베딩 모델을 거쳐 벡터화된 값을 저장하는 VectorStore에 대해 살펴본다.
클래스의 속성을 정의하는 여러 가지 방법을 소개해 드리겠습니다. 파이썬에서 클래스의 속성을 정의하는 방법에는 몇 가지가 있습니다. 각 방법은 특정 상황에서 유용할 수 있습니다.
클래스 변수와 속성의미
1. 클래스 변수 (Class Variables)
클래스 변수는 클래스 자체에 속하며, 모든 인스턴스에서 공유됩니다.
   class MyClass:
       class_variable = "I am a class variable"

   print(MyClass.class_variable)
   obj1 = MyClass()
   obj2 = MyClass()
   print(obj1.class_variable)
   print(obj2.class_variable)
2. 인스턴스 변수 (Instance Variables)
인스턴스 변수는 각 객체마다 개별적으로 유지되며, __init__ 메서드에서 초기화됩니다.
   class MyClass:
       def __init__(self, value):
           self.instance_variable = value

   obj1 = MyClass(1)
   obj2 = MyClass(2)
   print(obj1.instance_variable)  # 1
   print(obj2.instance_variable)  # 2
3. 프로퍼티 (Properties)
프로퍼티는 getter와 setter 메서드를 사용하여 속성의 접근 및 수정 방법을 제어할 수 있습니다.
   class MyClass:
       def __init__(self, value):
           self._value = value

       @property
       def value(self):
           return self._value

       @value.setter
       def value(self, new_value):
           if new_value < 0:
               raise ValueError("Value cannot be negative")
           self._value = new_value

   obj = MyClass(10)
   print(obj.value)  # 10
   obj.value = 20
   print(obj.value)  # 20
   # obj.value = -10  # ValueError 발생
4. 데코레이터를 사용한 클래스 속성 정의
@classmethod 및 @staticmethod 데코레이터를 사용하여 클래스 메서드 및 정적 메서드를 정의할 수 있습니다.
   class MyClass:
       class_variable = 0

       @classmethod
       def increment_class_variable(cls):
           cls.class_variable += 1

       @staticmethod
       def static_method():
           print("This is a static method")

   MyClass.increment_class_variable()
   print(MyClass.class_variable)  # 1
   MyClass.static_method()  # This is a static method
5. 데이터 클래스 (Data Classes)
파이썬 3.7부터 도입된 데이터 클래스는 기본적인 속성 및 메서드를 자동으로 생성해줍니다.
   from dataclasses import dataclass

   @dataclass
   class MyClass:
       attribute1: int
       attribute2: str

   obj = MyClass(1, "hello")
   print(obj.attribute1)  # 1
   print(obj.attribute2)  # hello
이와 같은 방법들을 통해 파이썬 클래스의 속성을 정의하고 사용할 수 있습니다. 각 방법은 특정 상황에서 유용하며, 필요에 따라 적절한 방법을 선택하여 사용할 수 있습니다.
인스턴스 변수 와 속성의 차이점
클래스의 인스턴스 변수와 속성은 비슷하지만, 약간의 차이점이 있습니다. 인스턴스 변수는 클래스의 각 인스턴스에서 개별적으로 유지되는 데이터를 의미하며, 속성은 주로 접근 제어 및 추가적인 로직을 포함하는 특수한 메서드를 통해 접근되는 데이터를 의미합니다. 여기서 두 개념의 차이점을 더 자세히 설명하겠습니다.
인스턴스 변수 (Instance Variables)
인스턴스 변수는 클래스의 각 인스턴스마다 독립적으로 존재하는 변수를 의미합니다. 이는 보통 __init__ 메서드 내에서 정의되며, 직접적으로 접근하고 수정할 수 있습니다.
예시:
class MyClass:
    def __init__(self, value):
        self.instance_variable = value  # 인스턴스 변수

obj = MyClass(10)
print(obj.instance_variable)  # 10
obj.instance_variable = 20
print(obj.instance_variable)  # 20
속성 (Properties)
속성은 메서드를 통해 간접적으로 접근하고 수정할 수 있는 인스턴스 변수와 비슷한 개념입니다. 속성은 @property 데코레이터를 사용하여 정의되며, 이로 인해 getter, setter, deleter 메서드를 통해 접근과 수정이 가능합니다. 속성은 접근 제어, 유효성 검사, 추가 로직을 추가하는 데 유용합니다.
예시:
class MyClass:
    def __init__(self, value):
        self._value = value  # 실제 데이터를 저장하는 변수 (보통 이름 앞에 _를 붙임)

    @property
    def value(self):
        return self._value

    @value.setter
    def value(self, new_value):
        if new_value < 0:
            raise ValueError("Value cannot be negative")
        self._value = new_value

obj = MyClass(10)
print(obj.value)  # 10
obj.value = 20
print(obj.value)  # 20
# obj.value = -10  # ValueError 발생
주요 차이점
직접 접근 vs 간접 접근:
인스턴스 변수는 직접 접근하고 수정할 수 있습니다 (obj.instance_variable).
속성은 간접적으로 접근하고 수정할 수 있으며, 접근 메서드를 통해 제어됩니다 (obj.value).
추가 로직:
인스턴스 변수는 단순히 데이터를 저장합니다.
속성은 getter, setter 메서드를 통해 접근 로직을 추가할 수 있습니다 (예: 유효성 검사, 로그 작성).
읽기 전용 속성:
인스턴스 변수는 읽기/쓰기가 자유롭습니다.
속성은 @property만 정의하면 읽기 전용으로 만들 수 있습니다. (setter를 정의하지 않음)
결론
인스턴스 변수는 클래스 인스턴스의 데이터를 저장하는 데 사용되며, 속성은 데이터를 보호하고 접근을 제어하기 위해 사용됩니다. 속성은 특히 추가적인 로직이 필요한 경우 유용합니다.
문서를 로딩했으면 의미조각(Chunk)으로 쪼개는 splitting 작업을 한다. 이는 LLM에 인풋으로 들어가는 프롬프트 길이의 제약이 있기 때문에 문서가 길 경우 의미조각으로 나눠서 저장 후 사용자 쿼리에 가장 유사한 의미조각을 찾기 위한 용도이다. 따라서 문서의 특성에 따른 Splitter를 잘 선택해야 한다.
from langchain.document_loaders import PyPDFLoader
from langchain_text_splitter import RecursiveCharacterTextSplitter
// 또는
// from langchain_text_splitters import RecursiveCharacterTextSplitter

// 예1) 문서 splitting
loader = PyPDFLoader(FILE_PATH)
docs = loader.load()

text_splitter = RecursiveCharacterTextSplitter(chunk_size=200, chunk_overlap=50)
splitted_docs = text_splitter.split_documents(docs)

for i, document in enumerate(splitted_docs):
    print(f"Document {i+1}:\n{document}\n")


// 예2) 텍스트 splitting
text = """
LangChain은 대규모 언어 모델(LLM)을 활용하여 복잡한 응용 프로그램을 구축하기 위한 도구입니다.
이 도구는 프롬프트 템플릿, 모델, 출력 파서 등을 포함한 다양한 컴포넌트를 제공하여,
사용자가 쉽게 체인을 구성할 수 있도록 도와줍니다.
"""

chunks = text_splitter.split_text(text)
for i, chunk in enumerate(chunks):
    print(f"Chunk {i+1}:\n{chunk}\n")
Splitter의 종류
1.RecursiveCharacterTextSplitter:
•분할 기준: 사용자 정의 문자를 기준으로 재귀적으로 분할합니다.
•특징: 관련된 텍스트 조각을 최대한 근접하게 유지하려고 합니다. 텍스트를 나누는 기본 방법으로 권장됩니다.
2.CharacterTextSplitter:
•분할 기준: 단순히 특정 문자(예: 공백, 줄 바꿈 등)를 기준으로 분할합니다.
•특징: 간단한 분할 작업에 적합합니다.
3.TokenTextSplitter:
•분할 기준: 토큰 단위로 텍스트를 분할합니다.
•특징: 언어 모델의 토큰화 방식에 따라 텍스트를 나눌 수 있어, 모델의 최대 토큰 길이에 맞춰 텍스트를 분할할 때 유용합니다.
4.SentenceTextSplitter:
•분할 기준: 문장 단위로 텍스트를 분할합니다.
•특징: 문장을 기준으로 텍스트를 나누기 때문에 자연스러운 분할이 가능합니다.
5.MarkdownTextSplitter:
•분할 기준: 마크다운 문서의 구조(헤더, 리스트, 코드 블록 등)를 기준으로 분할합니다.
•특징: 마크다운 문서를 처리할 때 유용하며, 문서의 논리적 구조를 유지하면서 분할할 수 있습니다.
6.HTMLTextSplitter:
•분할 기준: HTML 태그를 기준으로 텍스트를 분할합니다.
•특징: HTML 문서를 처리할 때 유용하며, 문서의 시각적 구조를 유지하면서 분할할 수 있습니다.
7.LanguageSpecificTextSplitter:
•분할 기준: 특정 언어의 구문을 기준으로 텍스트를 분할합니다.
•특징: 언어별로 특화된 분할 방식을 사용할 수 있어, 코드나 특정 언어로 작성된 텍스트를 효과적으로 분할할 수 있습니다.
- split_text 메소드는 주로 문자 스트링을 List[str] 로 반환할 때 사용한다. abstractmethod 이다.
- create_documents 는 List[str] 을 List[Document] 로 반환할 때 사용한다. -split_documents주로 문서 파일을 load한 후 다시 작은 단위조각의 List[Document] 로 반환할 때 사용한다.
- Document의 page_content를 List[str] 로 만들어 create_documents를 호출하고 있다.
- create_documents는 chunk_size, chunk_overlap에 따라 텍스트 조각을 만드는 split_text를 호출하고 있다.
// TextSplitter
class TextSplitter(BaseDocumentTransformer, ABC):
    """Interface for splitting text into chunks."""

    def __init__(
        self,
        chunk_size: int = 4000,
        chunk_overlap: int = 200,
        length_function: Callable[[str], int] = len,
        keep_separator: Union[bool, Literal["start", "end"]] = False,
        add_start_index: bool = False,
        strip_whitespace: bool = True,
    ) -> None:
        """Create a new TextSplitter.

        Args:
            chunk_size: Maximum size of chunks to return
            chunk_overlap: Overlap in characters between chunks
            length_function: Function that measures the length of given chunks
            keep_separator: Whether to keep the separator and where to place it
                            in each corresponding chunk (True='start')
            add_start_index: If `True`, includes chunk's start index in metadata
            strip_whitespace: If `True`, strips whitespace from the start and end of
                              every document
        """
        if chunk_overlap > chunk_size:
            raise ValueError(
                f"Got a larger chunk overlap ({chunk_overlap}) than chunk size "
                f"({chunk_size}), should be smaller."
            )
        self._chunk_size = chunk_size
        self._chunk_overlap = chunk_overlap
        self._length_function = length_function
        self._keep_separator = keep_separator
        self._add_start_index = add_start_index
        self._strip_whitespace = strip_whitespace

    @abstractmethod
    def split_text(self, text: str) -> List[str]:
        """Split text into multiple components."""

    def create_documents(
        self, texts: List[str], metadatas: Optional[List[dict]] = None
    ) -> List[Document]:
        """Create documents from a list of texts."""
        _metadatas = metadatas or [{}] * len(texts)
        documents = []
        for i, text in enumerate(texts):
            index = 0
            previous_chunk_len = 0
            for chunk in self.split_text(text):
                metadata = copy.deepcopy(_metadatas[i])
                if self._add_start_index:
                    offset = index + previous_chunk_len - self._chunk_overlap
                    index = text.find(chunk, max(0, offset))
                    metadata["start_index"] = index
                    previous_chunk_len = len(chunk)
                new_doc = Document(page_content=chunk, metadata=metadata)
                documents.append(new_doc)
        return documents

    def split_documents(self, documents: Iterable[Document]) -> List[Document]:
        """Split documents."""
        texts, metadatas = [], []
        for doc in documents:
            texts.append(doc.page_content)
            metadatas.append(doc.metadata)
        return self.create_documents(texts, metadatas=metadatas)
    ...
class RecursiveCharacterTextSplitter(TextSplitter):
    """Splitting text by recursively look at characters.

    Recursively tries to split by different characters to find one
    that works.
    """

    def __init__(
        self,
        separators: Optional[List[str]] = None,
        keep_separator: bool = True,
        is_separator_regex: bool = False,
        **kwargs: Any,
    ) -> None:
        """Create a new TextSplitter."""
        super().__init__(keep_separator=keep_separator, **kwargs)
        self._separators = separators or ["\n\n", "\n", " ", ""]
        self._is_separator_regex = is_separator_regex

    def _split_text(self, text: str, separators: List[str]) -> List[str]:
        """Split incoming text and return chunks."""
        final_chunks = []
        # Get appropriate separator to use
        separator = separators[-1]
        new_separators = []
        for i, _s in enumerate(separators):
            _separator = _s if self._is_separator_regex else re.escape(_s)
            if _s == "":
                separator = _s
                break
            if re.search(_separator, text):
                separator = _s
                new_separators = separators[i + 1 :]
                break

        _separator = separator if self._is_separator_regex else re.escape(separator)
        splits = _split_text_with_regex(text, _separator, self._keep_separator)

        # Now go merging things, recursively splitting longer texts.
        _good_splits = []
        _separator = "" if self._keep_separator else separator
        for s in splits:
            if self._length_function(s) < self._chunk_size:
                _good_splits.append(s)
            else:
                if _good_splits:
                    merged_text = self._merge_splits(_good_splits, _separator)
                    final_chunks.extend(merged_text)
                    _good_splits = []
                if not new_separators:
                    final_chunks.append(s)
                else:
                    other_info = self._split_text(s, new_separators)
                    final_chunks.extend(other_info)
        if _good_splits:
            merged_text = self._merge_splits(_good_splits, _separator)
            final_chunks.extend(merged_text)
        return final_chunks

    def split_text(self, text: str) -> List[str]:
        return self._split_text(text, self._separators)
Custom Text Splitter 만들기
Custom text splitter를 만들려면 TextSplitter 클래스를 상속받아 자신만의 분할 로직을 구현할 수 있습니다. 다음은 간단한 예제로, 특정 구분자(예: 줄 바꿈 문자)를 기준으로 텍스트를 분할하는 custom text splitter를 만드는 방법을 보여드립니다.
1.CustomTextSplitter 클래스 정의:
TextSplitter 클래스를 상속받아 CustomTextSplitter 클래스를 정의합니다. 생성자에서 구분자, 청크 크기, 겹침 크기를 설정할 수 있습니다.
2.split_text 메서드 구현:
split_text 메서드는 주어진 텍스트를 구분자를 기준으로 분할한 다음, 지정된 청크 크기와 겹침 크기를 기준으로 청크를 생성합니다.
3.청크 겹침 처리:
청크 간에 겹침을 추가하여 텍스트가 자연스럽게 이어지도록 합니다.
4.CustomTextSplitter 사용:
CustomTextSplitter 인스턴스를 생성하고, split_text 메서드를 호출하여 텍스트를 분할한 후 결과를 출력합니다.
이 예제는 간단한 구분자를 사용한 텍스트 분할을 보여주지만, 실제로는 더 복잡한 분할 로직을 구현할 수 있습니다. 예를 들어, 문단 단위로 분할하거나, 특정 패턴을 기준으로 분할하는 등 다양한 요구에 맞춰 커스터마이징할 수 있습니다.
from langchain.text_splitter import TextSplitter
from typing import List

class CustomTextSplitter(TextSplitter):
    def __init__(self, separator: str = "\n", chunk_size: int = 100, chunk_overlap: int = 20):
        self.separator = separator
        self.chunk_size = chunk_size
        self.chunk_overlap = chunk_overlap

    def split_text(self, text: str) -> List[str]:
        # 구분자를 기준으로 텍스트를 분할
        splits = text.split(self.separator)

        chunks = []
        current_chunk = ""

        for split in splits:
            if len(current_chunk) + len(split) + len(self.separator) > self.chunk_size:
                chunks.append(current_chunk)
                current_chunk = split
            else:
                if current_chunk:
                    current_chunk += self.separator
                current_chunk += split

        # 마지막 남은 텍스트 조각 추가
        if current_chunk:
            chunks.append(current_chunk)

        # 겹침 처리
        if self.chunk_overlap > 0 and len(chunks) > 1:
            overlapped_chunks = []
            for i in range(len(chunks)):
                if i > 0:
                    overlap = chunks[i-1][-self.chunk_overlap:] + self.separator
                    overlapped_chunks.append(overlap + chunks[i])
                else:
                    overlapped_chunks.append(chunks[i])
            chunks = overlapped_chunks

        return chunks

# CustomTextSplitter 사용 예제
text = """
LangChain은 대규모 언어 모델(LLM)을 활용하여 복잡한 응용 프로그램을 구축하기 위한 도구입니다.
이 도구는 프롬프트 템플릿, 모델, 출력 파서 등을 포함한 다양한 컴포넌트를 제공하여,
사용자가 쉽게 체인을 구성할 수 있도록 도와줍니다.
"""

splitter = CustomTextSplitter(separator="\n", chunk_size=100, chunk_overlap=20)
chunks = splitter.split_text(text)

for i, chunk in enumerate(chunks):
    print(f"Chunk {i+1}:\n{chunk}\n")
__getattr__ 메서드는 Python에서 객체의 속성에 접근할 때 호출되는 특별 메서드입니다. 객체의 속성을 조회할 때 해당 속성이 존재하지 않으면 __getattr__ 메서드가 호출됩니다. 이는 동적 속성 접근을 가능하게 하며, 클래스에서 존재하지 않는 속성에 대한 요청을 처리할 수 있습니다.
__getattr__의 의미와 사용법
의미: __getattr__은 객체에서 속성에 접근할 때 해당 속성이 존재하지 않는 경우 호출됩니다. 이는 객체의 속성을 동적으로 생성하거나 계산된 속성을 반환하는 데 유용합니다.
사용법: __getattr__ 메서드는 클래스 내부에 정의되며, 단 하나의 매개변수를 가집니다. 이 매개변수는 존재하지 않는 속성의 이름을 나타내는 문자열입니다. 이 메서드는 존재하지 않는 속성에 대해 반환할 값을 반환해야 합니다.
예시 코드
아래는 __getattr__ 메서드를 사용하여 동적으로 속성을 생성하는 예시입니다:
from typing import Any

class DynamicAttributes:
    def __init__(self):
        self.existing_attribute = "This attribute exists"

    def __getattr__(self, name: str) -> Any:
        """
        This method is called when an attribute is not found.

        Args:
            name (str): The name of the attribute that is being accessed.

        Returns:
            Any: The value to return for the non-existing attribute.
        """
        return f"The attribute '{name}' does not exist, but here is a default value."

# Example usage:
obj = DynamicAttributes()
print(obj.existing_attribute)  # Output: This attribute exists
print(obj.non_existing_attribute)  # Output: The attribute 'non_existing_attribute' does not exist, but here is a default value.
주요 포인트
속성이 존재하는 경우: __getattr__는 호출되지 않습니다. 예를 들어, obj.existing_attribute에 접근하면 __getattr__가 호출되지 않고, existing_attribute의 실제 값이 반환됩니다.
속성이 존재하지 않는 경우: __getattr__가 호출됩니다. 예를 들어, obj.non_existing_attribute에 접근하면, __getattr__가 호출되어 해당 속성의 이름을 인수로 받아 반환값을 제공합니다.
반환값: __getattr__ 메서드는 호출된 속성에 대해 반환할 값을 반환해야 합니다. 이 값은 문자열, 숫자, 객체 등 어떤 유형도 될 수 있습니다.
요약
__getattr__ 메서드는 Python 객체에서 존재하지 않는 속성에 대한 접근을 처리하기 위한 메서드입니다. 이 메서드를 사용하면 동적 속성 접근, 계산된 속성 반환, 기본값 제공 등의 작업을 수행할 수 있습니다. 이를 통해 객체의 유연성을 높이고, 동적으로 속성을 관리할 수 있습니다.
2) init.py 파일 내에서 사용
__init__.py 파일에 __getattr__ 메서드를 정의하는 것은 패키지 수준에서의 동적 속성 접근을 가능하게 합니다. 이 메서드를 사용하면 모듈 또는 패키지에서 존재하지 않는 속성에 접근할 때 동적 동작을 정의할 수 있습니다.
패키지 수준에서의 __getattr__ 사용 예시
Python 3.7부터 패키지의 __init__.py 파일에 __getattr__를 정의할 수 있습니다. 이를 통해 패키지에서 존재하지 않는 속성에 접근할 때 원하는 동작을 수행할 수 있습니다.
예시: 동적 속성 접근
다음은 mypackage라는 패키지에서 __getattr__를 정의하는 예시입니다:
mypackage/
    __init__.py
    module1.py
    module2.py
__init__.py 파일에서 __getattr__를 정의합니다:
# mypackage/__init__.py

def __getattr__(name):
    if name == "special_attribute":
        return "This is a special attribute"
    raise AttributeError(f"module {__name__} has no attribute {name}")
이제 mypackage 패키지에서 special_attribute에 접근할 수 있습니다:
import mypackage

print(mypackage.special_attribute)  # Output: This is a special attribute
print(mypackage.non_existing_attribute)  # Raises AttributeError
주요 포인트
동적 속성 접근: 패키지 수준에서 존재하지 않는 속성에 접근할 때 동적 동작을 정의할 수 있습니다. 예를 들어, 특정 속성 이름에 대해 동적으로 값을 반환하거나, 필요한 경우 예외를 발생시킬 수 있습니다.
패키지 초기화: 패키지를 초기화할 때 __getattr__를 사용하면, 패키지에 포함되지 않은 속성에 대한 접근을 처리할 수 있습니다. 이는 패키지의 유연성을 높이고, 사용자에게 특정 속성 접근을 허용할 수 있습니다.
Python 3.7 이상: 패키지의 __init__.py 파일에 __getattr__를 정의하는 기능은 Python 3.7에서 도입되었습니다. 따라서 이 기능을 사용하려면 Python 3.7 이상 버전이 필요합니다.
예제 코드 설명
__getattr__ 메서드는 name 매개변수를 받아, 접근하려는 속성의 이름을 나타냅니다.
special_attribute에 접근할 때는 "This is a special attribute"를 반환합니다.
special_attribute가 아닌 다른 속성에 접근하려고 하면 AttributeError를 발생시킵니다.
요약
__init__.py 파일에 __getattr__를 정의하면 패키지 수준에서 동적 속성 접근을 처리할 수 있습니다.
이는 패키지의 유연성을 높이고, 사용자에게 특정 속성에 대한 동적 접근을 허용하는 데 유용합니다.