__getattr__ 메서드는 Python에서 객체의 속성에 접근할 때 호출되는 특별 메서드입니다. 객체의 속성을 조회할 때 해당 속성이 존재하지 않으면 __getattr__ 메서드가 호출됩니다. 이는 동적 속성 접근을 가능하게 하며, 클래스에서 존재하지 않는 속성에 대한 요청을 처리할 수 있습니다.
__getattr__의 의미와 사용법
의미: __getattr__은 객체에서 속성에 접근할 때 해당 속성이 존재하지 않는 경우 호출됩니다. 이는 객체의 속성을 동적으로 생성하거나 계산된 속성을 반환하는 데 유용합니다.
사용법: __getattr__ 메서드는 클래스 내부에 정의되며, 단 하나의 매개변수를 가집니다. 이 매개변수는 존재하지 않는 속성의 이름을 나타내는 문자열입니다. 이 메서드는 존재하지 않는 속성에 대해 반환할 값을 반환해야 합니다.
예시 코드
아래는 __getattr__ 메서드를 사용하여 동적으로 속성을 생성하는 예시입니다:
from typing import Any

class DynamicAttributes:
    def __init__(self):
        self.existing_attribute = "This attribute exists"

    def __getattr__(self, name: str) -> Any:
        """
        This method is called when an attribute is not found.

        Args:
            name (str): The name of the attribute that is being accessed.

        Returns:
            Any: The value to return for the non-existing attribute.
        """
        return f"The attribute '{name}' does not exist, but here is a default value."

# Example usage:
obj = DynamicAttributes()
print(obj.existing_attribute)  # Output: This attribute exists
print(obj.non_existing_attribute)  # Output: The attribute 'non_existing_attribute' does not exist, but here is a default value.
주요 포인트
속성이 존재하는 경우: __getattr__는 호출되지 않습니다. 예를 들어, obj.existing_attribute에 접근하면 __getattr__가 호출되지 않고, existing_attribute의 실제 값이 반환됩니다.
속성이 존재하지 않는 경우: __getattr__가 호출됩니다. 예를 들어, obj.non_existing_attribute에 접근하면, __getattr__가 호출되어 해당 속성의 이름을 인수로 받아 반환값을 제공합니다.
반환값: __getattr__ 메서드는 호출된 속성에 대해 반환할 값을 반환해야 합니다. 이 값은 문자열, 숫자, 객체 등 어떤 유형도 될 수 있습니다.
요약
__getattr__ 메서드는 Python 객체에서 존재하지 않는 속성에 대한 접근을 처리하기 위한 메서드입니다. 이 메서드를 사용하면 동적 속성 접근, 계산된 속성 반환, 기본값 제공 등의 작업을 수행할 수 있습니다. 이를 통해 객체의 유연성을 높이고, 동적으로 속성을 관리할 수 있습니다.
2) init.py 파일 내에서 사용
__init__.py 파일에 __getattr__ 메서드를 정의하는 것은 패키지 수준에서의 동적 속성 접근을 가능하게 합니다. 이 메서드를 사용하면 모듈 또는 패키지에서 존재하지 않는 속성에 접근할 때 동적 동작을 정의할 수 있습니다.
패키지 수준에서의 __getattr__ 사용 예시
Python 3.7부터 패키지의 __init__.py 파일에 __getattr__를 정의할 수 있습니다. 이를 통해 패키지에서 존재하지 않는 속성에 접근할 때 원하는 동작을 수행할 수 있습니다.
예시: 동적 속성 접근
다음은 mypackage라는 패키지에서 __getattr__를 정의하는 예시입니다:
mypackage/
    __init__.py
    module1.py
    module2.py
__init__.py 파일에서 __getattr__를 정의합니다:
# mypackage/__init__.py

def __getattr__(name):
    if name == "special_attribute":
        return "This is a special attribute"
    raise AttributeError(f"module {__name__} has no attribute {name}")
이제 mypackage 패키지에서 special_attribute에 접근할 수 있습니다:
import mypackage

print(mypackage.special_attribute)  # Output: This is a special attribute
print(mypackage.non_existing_attribute)  # Raises AttributeError
주요 포인트
동적 속성 접근: 패키지 수준에서 존재하지 않는 속성에 접근할 때 동적 동작을 정의할 수 있습니다. 예를 들어, 특정 속성 이름에 대해 동적으로 값을 반환하거나, 필요한 경우 예외를 발생시킬 수 있습니다.
패키지 초기화: 패키지를 초기화할 때 __getattr__를 사용하면, 패키지에 포함되지 않은 속성에 대한 접근을 처리할 수 있습니다. 이는 패키지의 유연성을 높이고, 사용자에게 특정 속성 접근을 허용할 수 있습니다.
Python 3.7 이상: 패키지의 __init__.py 파일에 __getattr__를 정의하는 기능은 Python 3.7에서 도입되었습니다. 따라서 이 기능을 사용하려면 Python 3.7 이상 버전이 필요합니다.
예제 코드 설명
__getattr__ 메서드는 name 매개변수를 받아, 접근하려는 속성의 이름을 나타냅니다.
special_attribute에 접근할 때는 "This is a special attribute"를 반환합니다.
special_attribute가 아닌 다른 속성에 접근하려고 하면 AttributeError를 발생시킵니다.
요약
__init__.py 파일에 __getattr__를 정의하면 패키지 수준에서 동적 속성 접근을 처리할 수 있습니다.
이는 패키지의 유연성을 높이고, 사용자에게 특정 속성에 대한 동적 접근을 허용하는 데 유용합니다.
Google 스타일 docstring의 전체 포맷을 설명하기 위해, 모든 주요 섹션을 포함한 예시를 제공합니다. 이 예시는 함수와 클래스에 대한 포맷을 모두 다룹니다.
함수의 예시
def embed_query(text, model='default', verbose=False):
    """
    Embed query text using a specified model.

    This function takes a text string and converts it into an embedding
    using the specified model. It supports different models for embedding
    and can provide verbose output.

    Args:
        text (str): The text to embed. This should be a plain string without any special formatting.
        model (str, optional): The model to use for embedding. Defaults to 'default'.
        verbose (bool, optional): If True, the function will print detailed information during execution. Defaults to False.

    Returns:
        list: A list representing the text embedding.

    Raises:
        ValueError: If the text is empty or the model is not supported.
        RuntimeError: If the embedding process fails.

    Examples:
        >>> embed_query("Hello, world!")
        [0.1, 0.3, 0.5, ...]
        >>> embed_query("Hello, world!", model='advanced')
        [0.2, 0.4, 0.6, ...]

    Notes:
        The embedding process can take a significant amount of time
        depending on the length of the text and the complexity of the model.
    """
    if not text:
        raise ValueError("Text cannot be empty.")
    if model not in ['default', 'advanced']:
        raise ValueError("Unsupported model.")
    # Implementation of embedding process...
    embedding = [0.1, 0.3, 0.5]  # Dummy embedding
    if verbose:
        print(f"Embedding for '{text}' generated using model '{model}'.")
    return embedding
클래스의 예시
class EmbeddingModel:
    """
    A model for generating embeddings from text.

    This class provides methods to embed text using various models. It can
    handle different types of text inputs and supports multiple embedding
    techniques.

    Attributes:
        model_name (str): The name of the model.
        version (str): The version of the model.
        is_trained (bool): Indicates whether the model has been trained.

    Methods:
        train(data):
            Trains the model using the provided data.
        embed(text):
            Embeds the given text and returns the embedding.
        save(path):
            Saves the model to the specified path.
    """

    def __init__(self, model_name, version):
        """
        Initializes the EmbeddingModel with a name and version.

        Args:
            model_name (str): The name of the model.
            version (str): The version of the model.
        """
        self.model_name = model_name
        self.version = version
        self.is_trained = False

    def train(self, data):
        """
        Trains the model using the provided data.

        This method takes a dataset and trains the embedding model.
        It updates the is_trained attribute to True upon successful training.

        Args:
            data (list): A list of training data samples.

        Returns:
            None

        Raises:
            ValueError: If the data is empty or not in the expected format.

        Examples:
            >>> model = EmbeddingModel('text_model', '1.0')
            >>> model.train(['sample1', 'sample2'])
        """
        if not data:
            raise ValueError("Training data cannot be empty.")
        # Implementation of training process...
        self.is_trained = True

    def embed(self, text):
        """
        Embeds the given text and returns the embedding.

        Args:
            text (str): The text to embed.

        Returns:
            list: A list representing the text embedding.

        Raises:
            RuntimeError: If the model has not been trained.

        Examples:
            >>> model = EmbeddingModel('text_model', '1.0')
            >>> model.train(['sample1', 'sample2'])
            >>> model.embed('Hello, world!')
            [0.1, 0.3, 0.5, ...]
        """
        if not self.is_trained:
            raise RuntimeError("Model must be trained before embedding.")
        # Implementation of embedding process...
        return [0.1, 0.3, 0.5]  # Dummy embedding

    def save(self, path):
        """
        Saves the model to the specified path.

        Args:
            path (str): The file path to save the model to.

        Returns:
            None

        Examples:
            >>> model = EmbeddingModel('text_model', '1.0')
            >>> model.save('/path/to/save/model')
        """
        # Implementation of save process...
        pass
주요 구성 요소
요약 설명(Summary):
클래스나 함수의 첫 번째 줄에서 기능을 간략하게 설명합니다.
간결하고 명확하게 작성하며, 마침표로 끝냅니다.
확장 설명(Extended Description):
요약 설명 이후 빈 줄을 두고, 기능에 대한 상세 설명을 작성합니다.
설명이 길어질 경우 여러 문단으로 나눌 수 있습니다.
Args (인수):
Args: 섹션에서 함수나 메소드의 매개변수를 설명합니다.
각 매개변수에 대해 이름, 유형, 설명을 포함합니다.
선택적 매개변수는 (optional)로 표시합니다.
Attributes (속성):
클래스의 속성을 설명합니다.
각 속성의 이름과 설명을 포함합니다.
Methods (메소드):
클래스의 메소드를 설명합니다.
각 메소드의 이름과 기능을 간략하게 설명합니다.
Returns (반환값):
함수나 메소드의 반환값을 설명합니다.
반환값의 유형과 설명을 포함합니다.
반환값이 없으면 생략할 수 있습니다.
Raises (예외):
함수나 메소드가 발생시킬 수 있는 예외를 설명합니다.
예외의 유형과 설명을 포함합니다.
Examples (예제):
함수나 메소드의 사용 예제를 포함합니다.
코드 블록을 사용하여 예제를 보여줍니다.
Notes (참고):
함수나 메소드에 대한 추가적인 참고 사항을 작성합니다.
필요한 경우에만 포함합니다.
이러한 구성 요소들을 사용하면, Google 스타일의 docstring을 통해 코드의 문서화를 일관성 있게 작성할 수 있습니다.
LangChain은 LLM 애플리케이션을 구축하기 위한 개발 프레임워크로써 다양한 컴포넌트를 제공한다. 프러덕션 애플리케이션 개발시 RAG(Retrieval Augmented Generation)를 기반으로 할 때 LangChain 컴포넌트를 통해 일관된 코드 인터페이스를 유지할 수 있다.
LangChain Components
Prompts
Prompt Templates
Output Parsers: 5+ implementations
Retry/fixing logic
Example Selectors: 5+ implementations
Models
LLM's: 20+ integrations
Chat Models
Text Embedding Models: 10+ integrations
Indexes
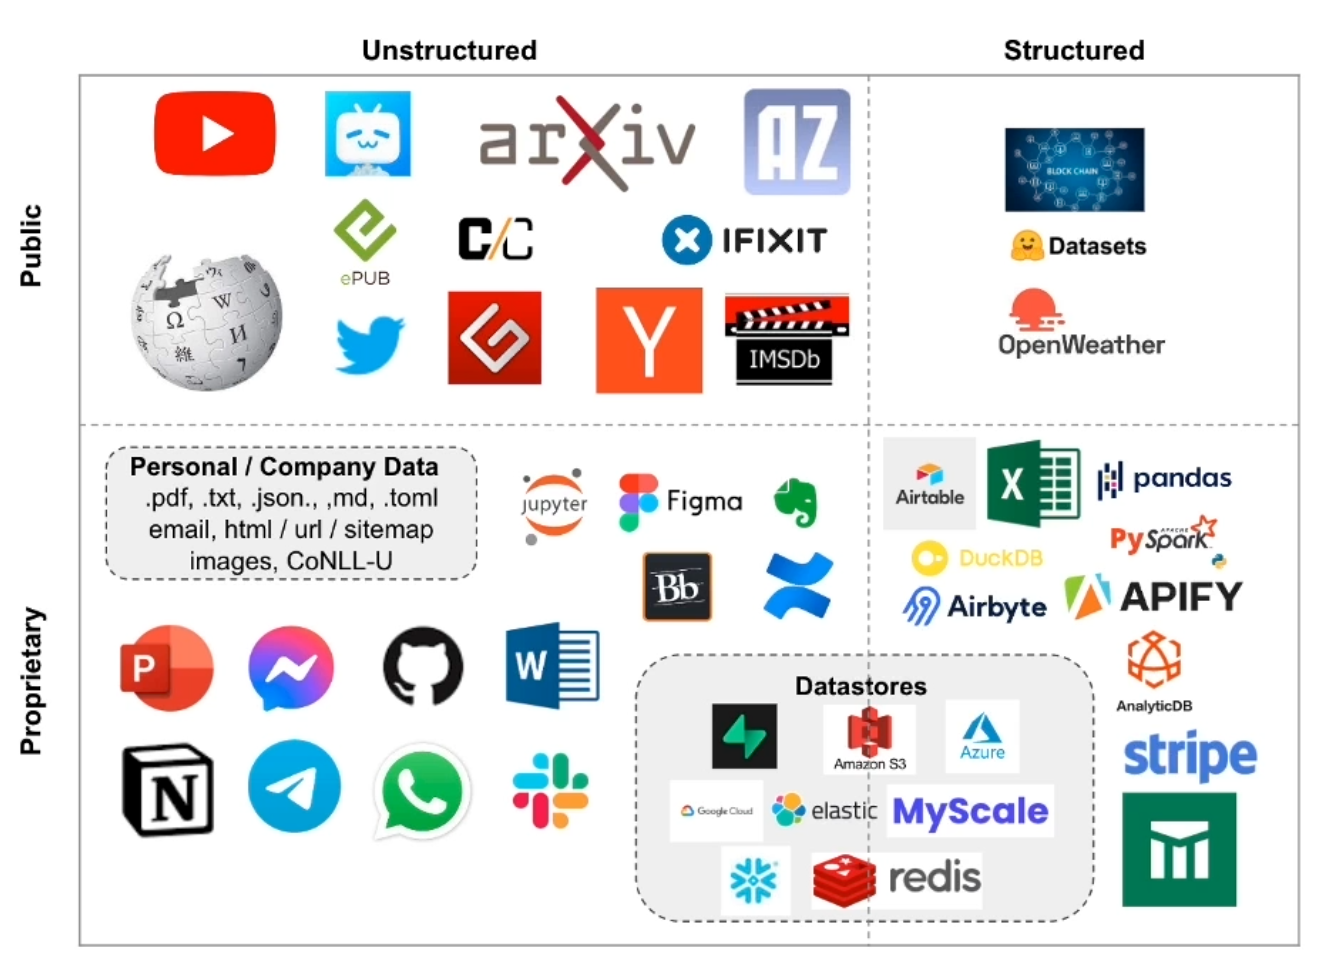
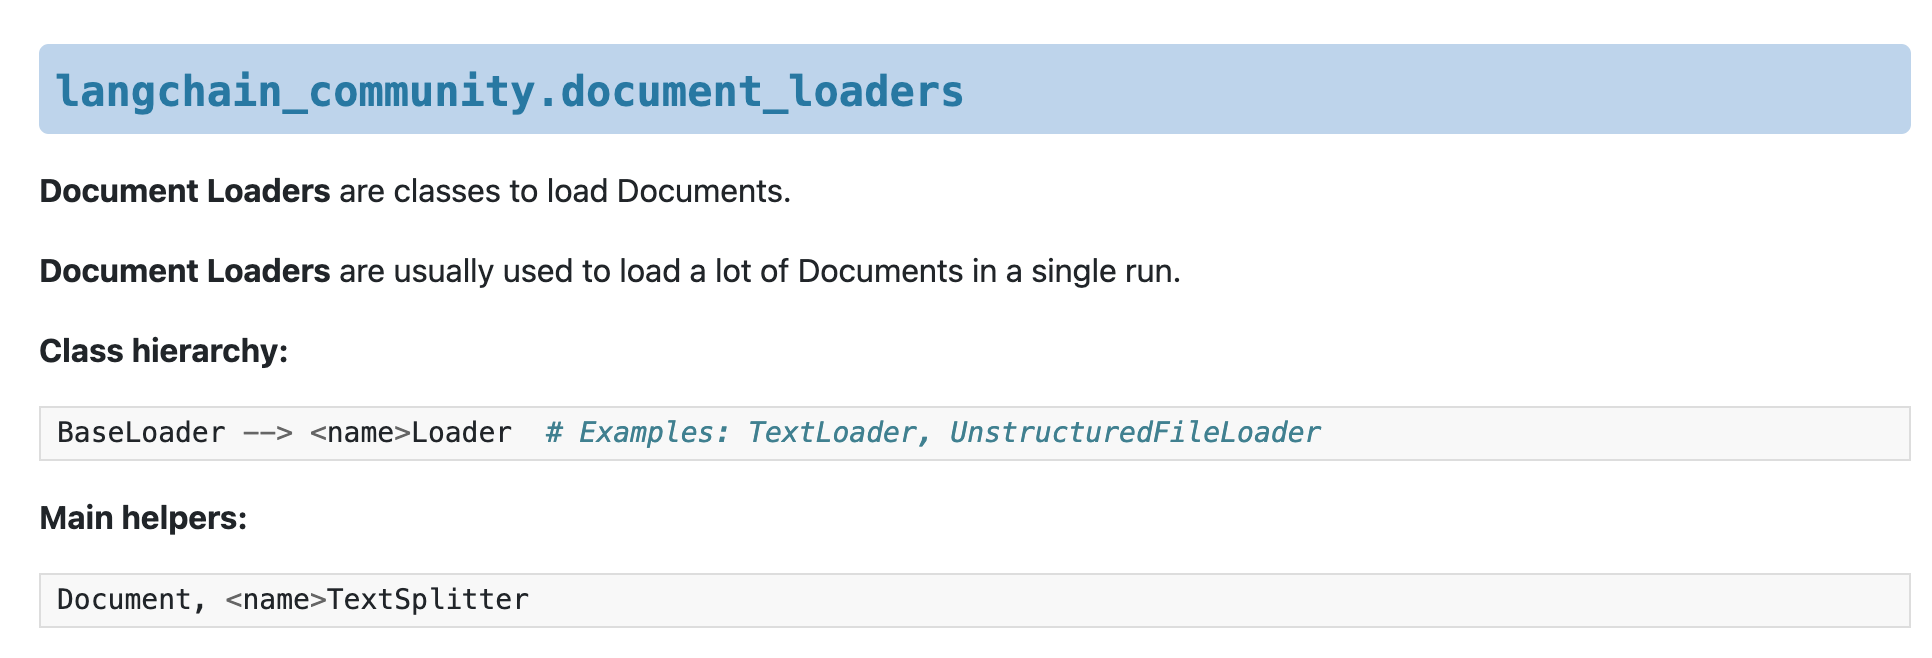
Document Loaders: 50+ implementations
Text Splitters: 10+ implementations
Vector stores: 10+ integrations
Retrievers: 5+ integrations/implementations
Chains
Can be used as building blocks for other chains
More application specific cahins: 20+ different types
Agents
Agent Types: 5+ types
Algorithms for getting LLMs to use tools
Agent Tookkits: 10+ implementations
Agents armed with specific tools for a specific application
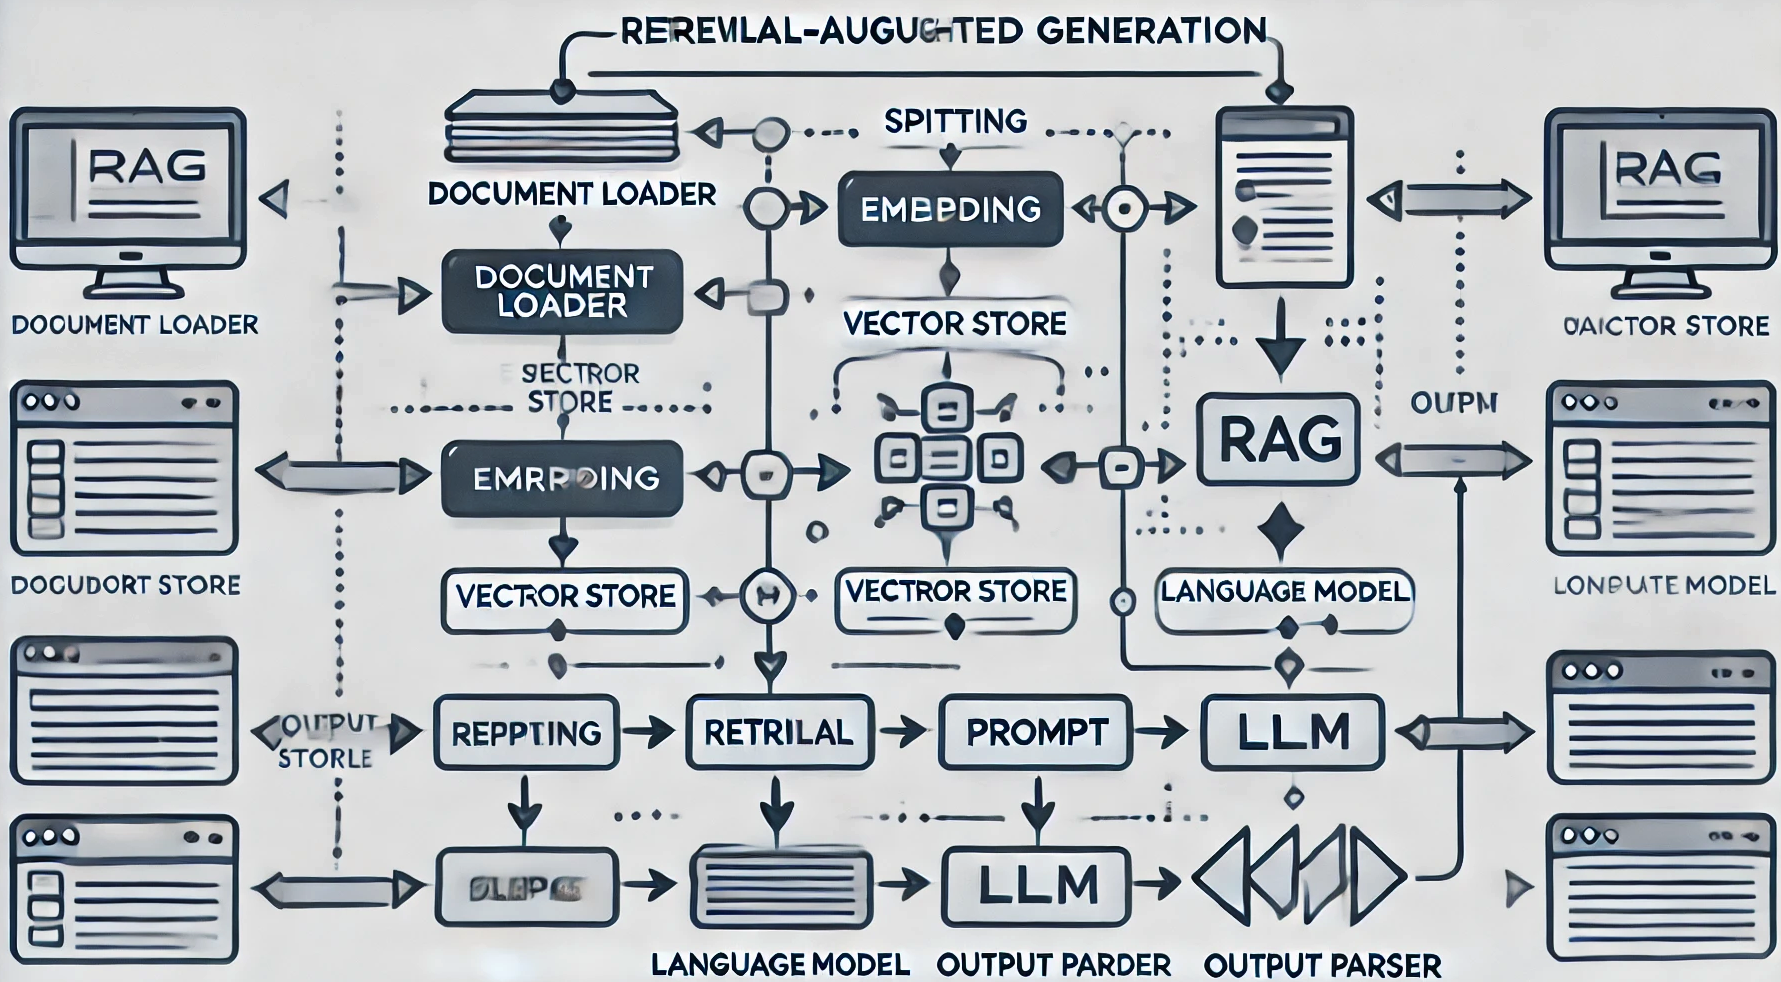
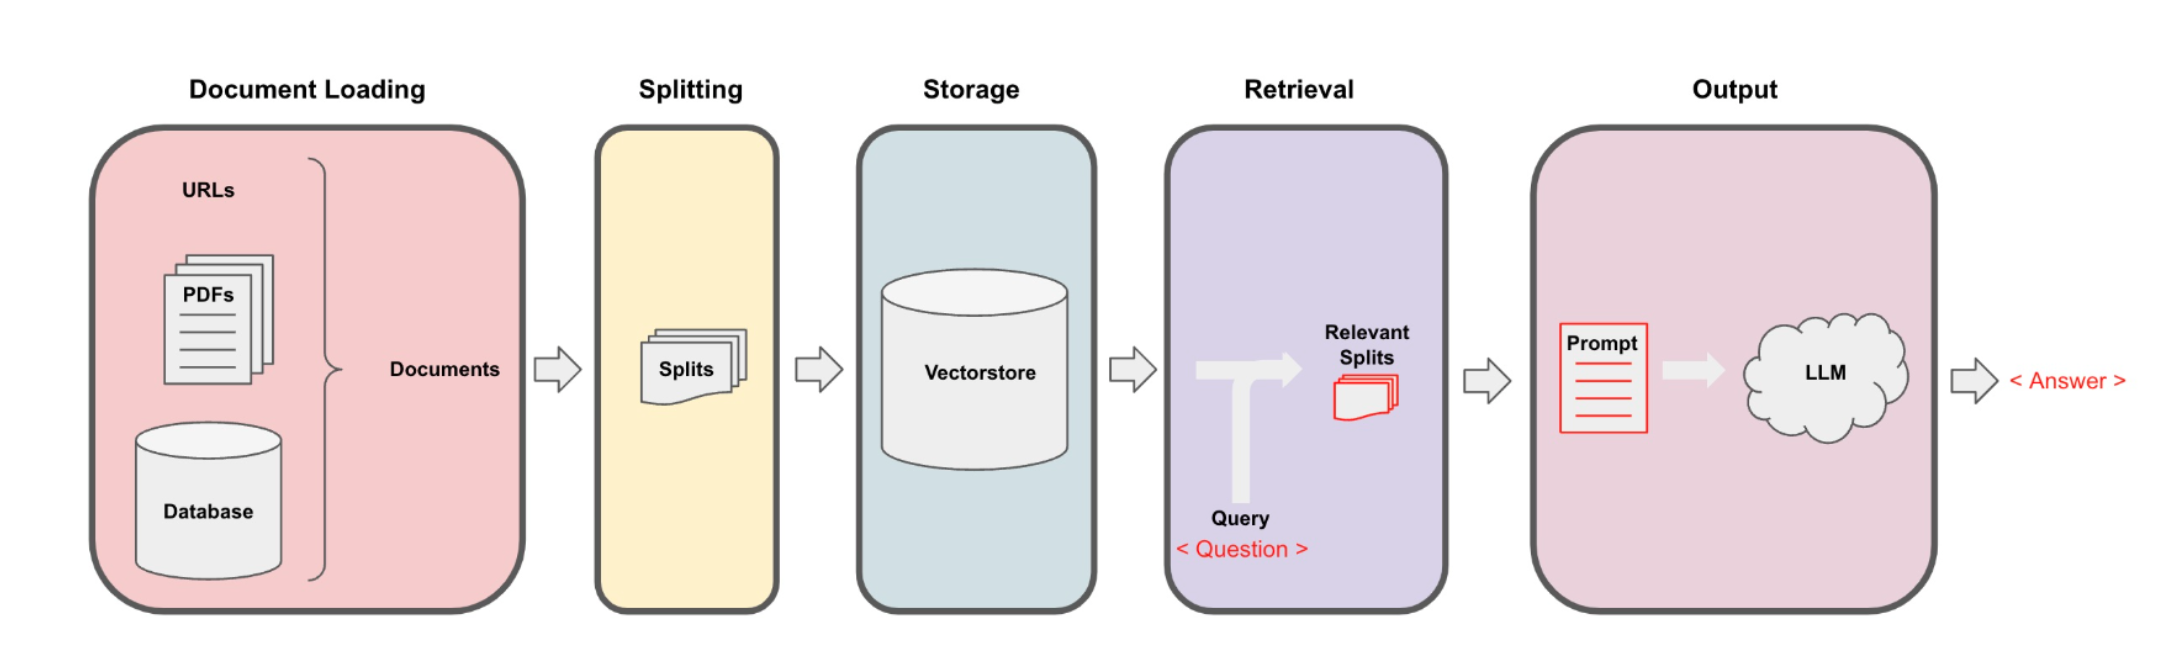
RAG는 크게 2단계로 볼 수 있다. 사전에 프라이빗 정보를 로딩->쪼개기->임베딩벡터->저장하기 단계를 거쳐서 준비를 한다. 이때 LangChain의 Indexes 영역의 컴포넌트를 사용한다. 다음으로 사용자가 질의를 하게되면 프라이빗 정보를 기반으로 증강검색->프롬프트생성->LLM응답->응답처리 등의 과정을 거쳐, 유의미한 응답을 생성한다. 이때 LangChain의 Prompts, Models, Chains, Agents 영역의 컴포넌트를 사용한다.
LLM(Language Modeling Layer)은 자연어 처리(NLP) 작업에서 사용되는 신경망 아키텍처의 한 유형입니다. LLM은 입력된 텍스트를 분석하고 그 의미와 구조를 이해하기 위해 훈련됩니다. 이를 통해 LLM은 주어진 문맥에 기반하여 다음 단어나 구절을 예측하는 것과 같은 작업을 수행할 수 있습니다.
LLM이 텍스트를 분석할 때, 각 단어 또는 구절의 의미를 나타내는 수치적 표현인 임베딩을 생성합니다. 이 임베딩들은 일반적으로 벡터라고 불리는 다차원 공간에서 표현됩니다. 각 차원은 특정 의미나 속성을 나타내며, 예를 들어 감정이나 주제 등이 있습니다.
LLM이 생성하는 임베딩과 벡터는 NLP 작업에 매우 유용합니다. 이들은 단어와 구절 사이의 관계를 분석하고, 유사성을 측정하며, 새로운 문장을 생성하거나 기존 문장을 수정하는 데 사용될 수 있습니다. 또한 LLM은 다양한 언어와 도메인에서 훈련되어 다재다능하고 적응성이 뛰어난 모델을 만들 수 있습니다.
예를 들어, LLM이 'The quick brown fox jumps over the lazy dog'라는 문장에 대해 훈련된 경우, 각 단어에 대한 임베딩과 그 사이의 관계를 생성할 것입니다. 이 정보를 사용하여 LLM은 다음 단어나 구절을 예측하거나, 주어진 텍스트의 감정이나 주제를 분석하거나, 새로운 문장을 생성하는 데 사용할 수 있습니다.
요약하자면, LLM은 NLP 작업에서 사용되는 신경망 아키텍처로, 입력된 텍스트를 분석하고 그 의미와 구조를 이해하기 위해 훈련됩니다. LLM이 생성하는 임베딩과 벡터는 단어와 구절 사이의 관계를 분석하고, 유사성을 측정하며, 새로운 문장을 생성하거나 기존 문장을 수정하는 데 사용될 수 있습니다. 다양한 언어와 도메인에서 훈련된 LLM은 다재다능하고 적응성이 뛰어난 모델을 만들 수 있어 NLP 작업에 매우 유용합니다.
pyproject.toml과 requirements.txt는 Python 프로젝트에서 의존성을 관리하는 데 사용되는 파일이지만, 그 목적과 기능은 다릅니다. 두 파일 간의 주요 차이점을 살펴보겠습니다.
pyproject.toml
pyproject.toml은 Python 프로젝트의 메타데이터 및 의존성을 선언하는 데 사용되는 파일입니다. 이 파일은 PEP 518에 정의되어 있으며, 프로젝트 빌드 시스템과 빌드 의존성을 지정하는 데 사용됩니다. Poetry와 같은 현대적인 패키지 관리 도구는 pyproject.toml을 사용하여 프로젝트의 모든 의존성을 관리합니다.
주요 특징
메타데이터 관리: 프로젝트 이름, 버전, 설명, 저자 등의 메타데이터를 포함합니다.
의존성 관리: 개발 및 런타임 의존성을 모두 포함할 수 있습니다.
빌드 시스템 설정: 빌드 백엔드(예: setuptools, poetry 등)를 지정할 수 있습니다.
Poetry 통합: Poetry는 pyproject.toml 파일을 사용하여 패키지 관리와 의존성 설치를 수행합니다.
예시
[tool.poetry]
name = "my_project"
version = "0.1.0"
description = "A sample project"
authors = ["Your Name <you@example.com>"]

[tool.poetry.dependencies]
python = "^3.8"
requests = "^2.25.1"

[tool.poetry.dev-dependencies]
pytest = "^6.2.3"

[build-system]
requires = ["poetry-core>=1.0.0"]
build-backend = "poetry.core.masonry.api"
requirements.txt
requirements.txt는 전통적인 방법으로 Python 프로젝트의 의존성을 관리하는 파일입니다. 주로 pip를 사용하여 의존성을 설치할 때 사용되며, 각 의존성을 별도의 줄에 작성합니다.
주요 특징
단순성: 각 줄에 하나의 패키지와 선택적인 버전 제한을 작성하여 의존성을 명시합니다.
의존성 설치: pip install -r requirements.txt 명령어를 사용하여 의존성을 설치합니다.
개발 및 런타임 의존성 분리 어려움: 개발 및 런타임 의존성을 명확히 분리하기 어렵습니다.
예시
requests==2.25.1
pytest==6.2.3
비교 및 차이점
특징pyproject.tomlrequirements.txt
목적
프로젝트 메타데이터 및 의존성 관리
의존성 목록 관리
포맷
TOML
단순 텍스트
의존성 종류 분리
개발 및 런타임 의존성 분리 가능
분리하기 어려움
빌드 시스템 통합
빌드 시스템 및 백엔드 지정 가능
해당 없음
사용 도구
Poetry, setuptools 등
pip
기타 설정
빌드 설정, 스크립트 등 다양한 설정 포함 가능
해당 없음
선택 기준
현대적인 프로젝트 관리: Poetry와 같은 도구를 사용하여 의존성을 보다 체계적으로 관리하고 싶다면 pyproject.toml을 사용하는 것이 좋습니다.
전통적인 방법: 간단하게 의존성만 관리하고 싶다면 requirements.txt가 충분할 수 있습니다.
함께 사용하기
Poetry를 사용하면서도 requirements.txt 파일을 생성하여 기존의 워크플로우와 호환성을 유지할 수 있습니다. 다음 명령어를 사용하여 requirements.txt 파일을 생성할 수 있습니다:
Python에서 lambda 키워드는 익명 함수(anonymous function)를 생성하는 데 사용됩니다. lambda 함수를 사용하면 이름 없이도 함수 객체를 생성할 수 있습니다. 일반적으로 lambda 함수는 간단한 기능을 수행하는 짧은 함수가 필요할 때 사용됩니다.
lambda 함수의 구문
lambda 키워드를 사용하여 함수를 정의하는 구문은 다음과 같습니다:
lambda arguments: expression
arguments: 함수에 전달될 인수들입니다.
expression: 함수가 반환할 표현식입니다.
예시
기본 사용 예시
# 일반 함수 정의
def add(x, y):
  return x + y

# lambda 함수 정의
add_lambda = lambda x, y: x + y

# 함수 호출
print(add(2, 3)) # 5
print(add_lambda(2, 3)) # 5
리스트의 각 요소에 함수를 적용하는 예시
# lambda 함수를 사용하여 리스트의 각 요소에 2를 곱함
numbers = [1, 2, 3, 4, 5]
doubled = list(map(lambda x: x * 2, numbers))
print(doubled) # [2, 4, 6, 8, 10]
정렬 시에 키로 사용하는 예시
# lambda 함수를 사용하여 리스트를 정렬
pairs = [(1, 'one'), (2, 'two'), (3, 'three'), (4, 'four')]
# 두 번째 요소(문자열) 기준으로 정렬
pairs.sort(key=lambda pair: pair[1])
print(pairs) # [(4, 'four'), (1, 'one'), (3, 'three'), (2, 'two')]
lambda 함수와 일반 함수 비교
lambda 함수는 익명 함수로, 보통 한 줄로 표현되며, 작은 연산이나 함수 객체가 필요한 곳에서 주로 사용됩니다. 일반 함수는 def 키워드를 사용하여 이름이 있는 함수로 정의되며, 여러 줄로 이루어질 수 있고 복잡한 논리를 포함할 수 있습니다.
예시: lambda 함수와 일반 함수의 비교
# lambda 함수
multiply = lambda x, y: x * y
print(multiply(2, 3)) # 6

# 일반 함수
def multiply_def(x, y):
  return x * y

print(multiply_def(2, 3)) # 6
사용 시 주의사항
간결성: lambda 함수는 단일 표현식만 포함할 수 있으며, 여러 문장을 포함할 수 없습니다. 따라서 복잡한 로직을 처리하기에는 적합하지 않습니다.
가독성: 짧고 간단한 경우에는 lambda 함수가 유용하지만, 너무 복잡한 경우 가독성을 해칠 수 있으므로 일반 함수를 사용하는 것이 좋습니다.
요약
lambda 키워드는 익명 함수를 생성하는 데 사용됩니다.
간단한 함수나 일회성 함수 객체가 필요한 곳에서 유용합니다.
구문은 lambda arguments: expression 형태를 가지며, 단일 표현식만 포함할 수 있습니다.
일반 함수(def 사용)와 비교할 때, 더 간단하고 간결하지만 복잡한 로직에는 적합하지 않습니다.
"LangChain 은 LLM기반 AI 애플리케이션 개발에 있어서의 Spring Framework이다."
LangChain vs Spring Framework, Created by ChatGPT
Java로 웹개발을 한다면 기본 Framework으로 개발자들이 Spring Framework을 사용하듯이 LLM 기반 AI 애플리케이션 개발은 LangChain 프레임워크로 시작하게 될 것이다. 따라서 LLM 기반 AI 애플리케이션을 개발하고 싶다면 기본 LangChain Framework을 사용하게되는 시즌이 시작되었다는 뜻이다.
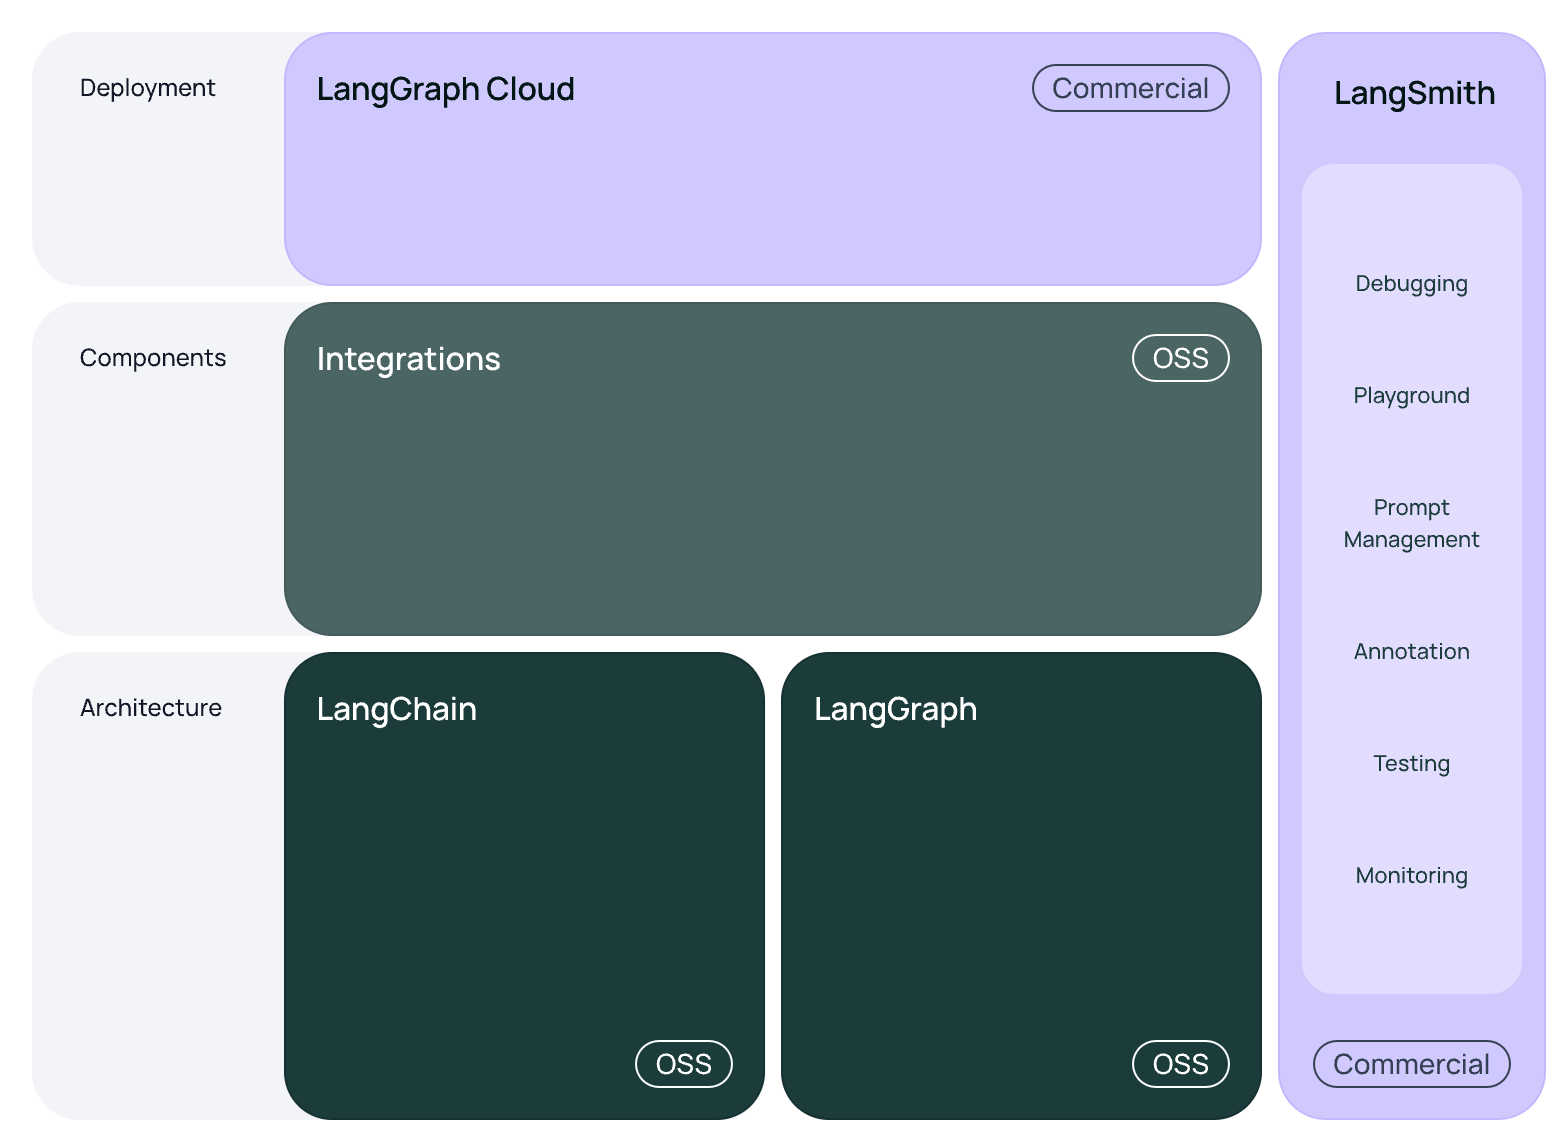
Python vs Javascript(Typescripit)
LangChain, LangGraph, LangSmith등 서비스를 사용하기 위하여 Python 또는 Javascript 중 하나를 선택해서 시작할 수 있다.
- LangGraph Cloud는 아직 Python만 지원한다.
- LangSmith는 상업적 이용시 Commercial 이다.
Javascript를 해보았으니, Python으로 시작해 본다.
ChatGPT 설명
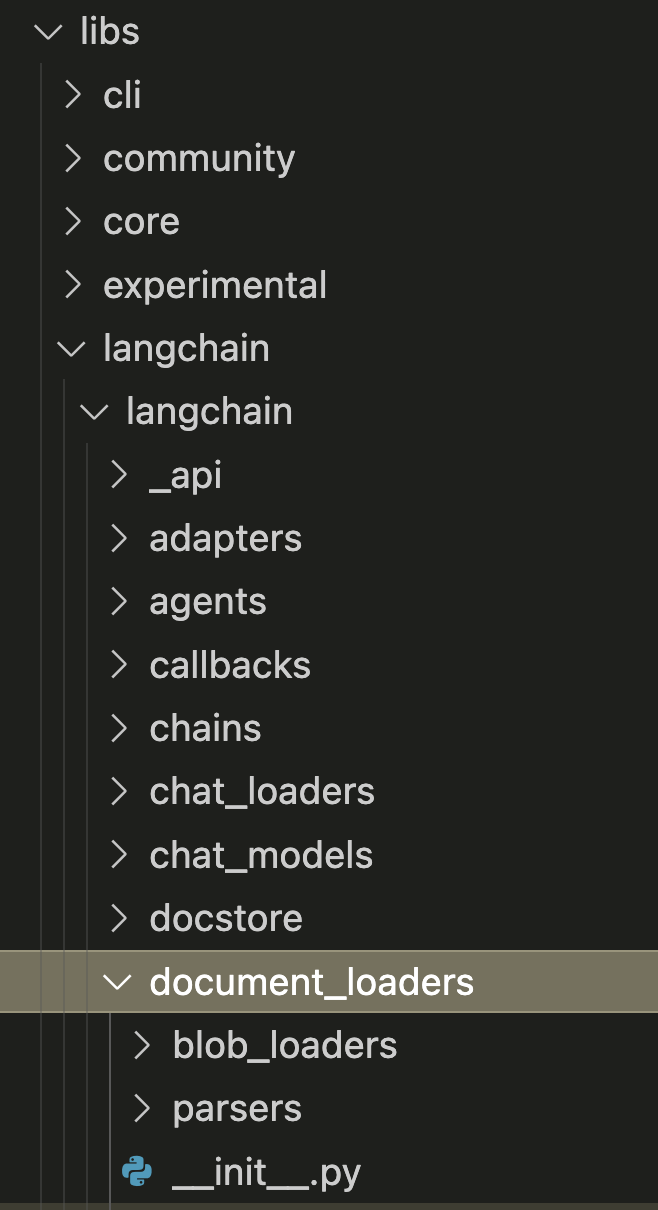
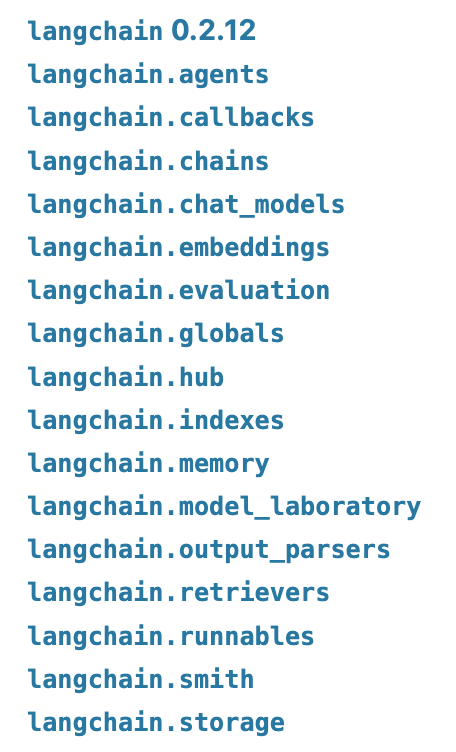
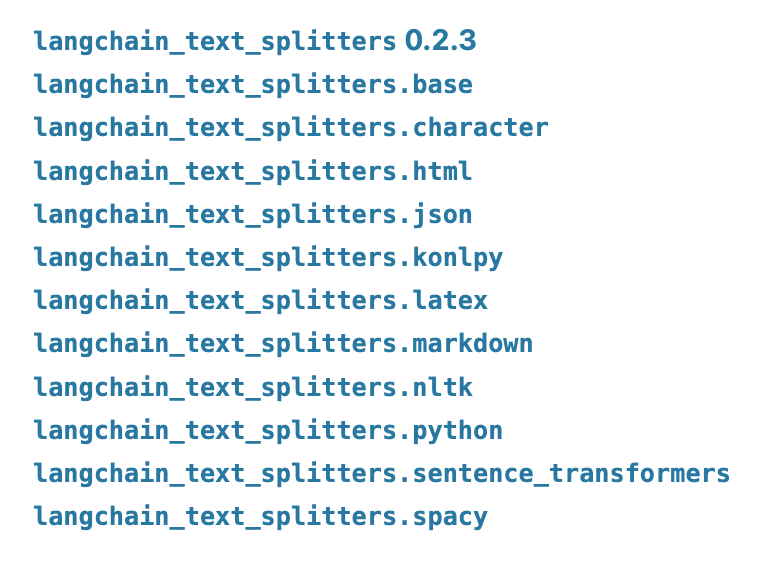
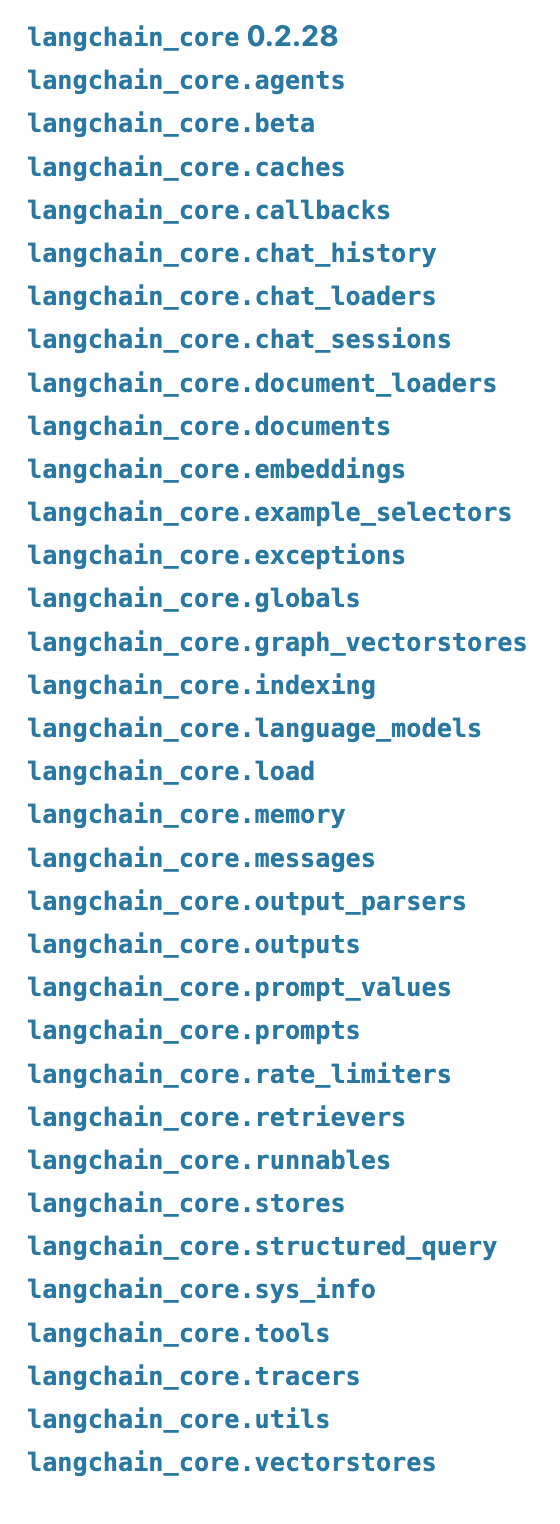
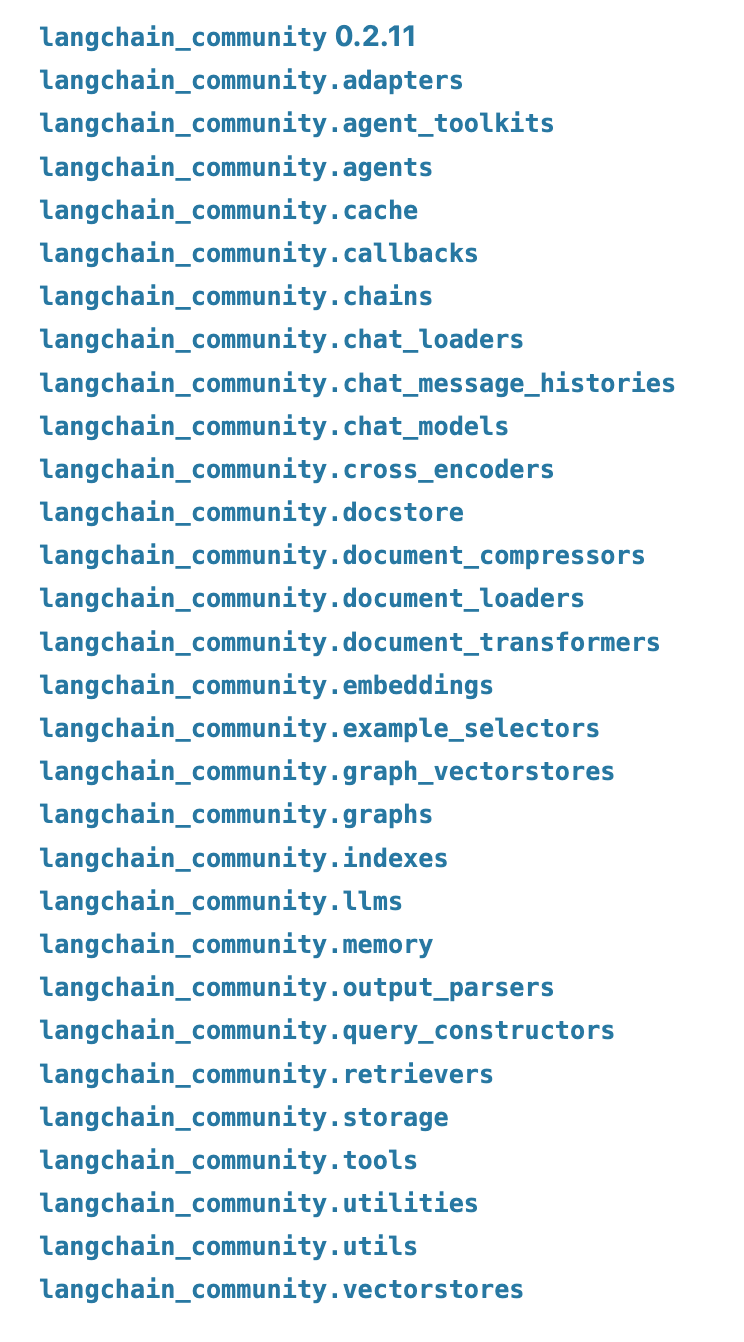
LangChain Package Structure
LangChain은 언어 모델을 사용한 애플리케이션 개발을 위한 프레임워크로, 다양한 패키지와 모듈로 구성되어 있습니다. 아래는 LangChain의 일반적인 패키지 구조입니다:
•LangChain: 최상위 패키지
•Chains: 체인 및 워크플로우 관리
•LLMChain: 대형 언어 모델 체인 클래스
•VectorDBQAChain: 벡터 데이터베이스 기반 QA 체인 클래스
•SQLDBQAChain: SQL 데이터베이스 기반 QA 체인 클래스
•Prompts: 프롬프트 관리 및 생성
•PromptTemplate: 프롬프트 템플릿 클래스
•FewShotPromptTemplate: 몇 샷 학습 프롬프트 템플릿 클래스
•Agents: 에이전트 및 도구 통합
•AgentExecutor: 에이전트 실행기 클래스
•Tool: 도구 클래스
•Memory: 메모리 관리
•BufferMemory: 버퍼 메모리 클래스
•VectorStoreRetrieverMemory: 벡터 저장소 리트리버 메모리 클래스
•LLMs: 대형 언어 모델 통합
•OpenAI: OpenAI 모델 통합 클래스
•Cohere: Cohere 모델 통합 클래스
•Utilities: 유틸리티 도구
•Wikipedia: Wikipedia 통합 유틸리티
•PythonREPL: Python REPL 유틸리티
이 구조는 LangChain의 주요 구성 요소와 각 구성 요소가 제공하는 기능을 잘 나타내고 있습니다. LangChain은 체인 관리, 프롬프트 생성, 에이전트 통합, 메모리 관리, 대형 언어 모델 통합, 그리고 다양한 유틸리티 도구를 통해 언어 모델 기반 애플리케이션 개발을 지원합니다.
LangGraph Package Structure
LangGraph는 언어 모델을 활용한 그래프 기반 애플리케이션을 구축하기 위한 프레임워크입니다. 아래는 LangGraph의 일반적인 패키지 구조입니다
•LangGraph: 최상위 패키지
•Graphs: 그래프 생성 및 관리
•GraphBuilder: 그래프 빌더 클래스
•Node: 그래프의 노드 클래스
•Edge: 그래프의 엣지 클래스
•Algorithms: 그래프 알고리즘
•PathFinding: 경로 찾기 알고리즘 (예: Dijkstra, A*)
•Centrality: 중심성 측정 알고리즘 (예: Betweenness, Closeness)
•Clustering: 그래프 클러스터링 알고리즘
•Visualization: 그래프 시각화 도구
•GraphVisualizer: 그래프 시각화 클래스
•PlotSettings: 시각화 설정 클래스
•Data: 데이터 처리 및 로딩
•DataLoader: 데이터 로딩 클래스
•DataProcessor: 데이터 처리 클래스
•Models: 언어 모델 통합
•ModelInterface: 언어 모델 인터페이스
•LLMIntegration: 대형 언어 모델 통합 클래스 (예: GPT-4, BERT)
•Utilities: 유틸리티 도구
•Logger: 로깅 유틸리티
•ConfigManager: 설정 관리 유틸리티
이 패키지 구조는 LangGraph의 주요 구성 요소와 각 구성 요소가 제공하는 기능을 잘 나타내고 있습니다. LangGraph는 그래프 기반의 데이터 구조를 생성, 관리, 분석 및 시각화하는 데 필요한 다양한 도구를 제공하며, 언어 모델과의 통합을 통해 더욱 강력한 기능을 지원합니다.
---
LangChain과 Spring Framework는 각각의 도메인에서 비슷한 역할을 수행합니다, 단지 다른 맥락에서 사용된다는 차이가 있습니다:
LangChain:
•도메인: 언어 모델 및 자연어 처리.
•목적: 언어 모델(예: GPT-3, GPT-4 등)로 구동되는 애플리케이션을 구축하기 위한 프레임워크를 제공합니다. LangChain은 언어 모델의 통합, 배포 및 오케스트레이션을 간소화하는 것을 목표로 합니다.
•특징:
•체인 관리: 여러 언어 모델과 작업을 관리하고 오케스트레이션하는 데 도움을 줍니다.
•모듈성: 언어 모델 애플리케이션을 구축, 미세 조정 및 배포하는 모듈식 접근 방식을 제공합니다.
•확장성: 기능을 향상시키기 위해 다양한 API 및 외부 도구와 쉽게 통합할 수 있습니다.
•유틸리티 도구: 프롬프트 엔지니어링, 대화 흐름 관리 등을 위한 유틸리티를 제공합니다.
Spring Framework:
•도메인: 엔터프라이즈 자바 애플리케이션.
•목적: 자바 기반의 엔터프라이즈 애플리케이션을 개발하기 위한 포괄적인 프레임워크입니다. Spring은 인프라 지원을 제공하여 애플리케이션 개발을 단순화합니다.
•특징:
•의존성 주입: 객체 생성과 의존성을 유연하고 느슨하게 관리합니다.
•관점 지향 프로그래밍(AOP): 횡단 관심사(예: 로깅, 보안 등)를 분리할 수 있습니다.
•데이터 접근: 데이터베이스 상호작용과 트랜잭션 관리를 위한 템플릿을 제공합니다.
•웹 프레임워크: 웹 애플리케이션, RESTful 서비스 등을 구축하기 위한 모듈을 포함합니다.
•보안: 애플리케이션을 보호하기 위한 강력한 보안 기능을 제공합니다.
유사점:
1.프레임워크 목적: 각 도메인에서 애플리케이션 구축에 구조적인 접근 방식을 제공하여 보일러플레이트 코드를 줄이고 생산성을 높이는 것을 목표로 합니다.
2.모듈성: 모듈성 및 확장성을 강조하여 개발자가 필요에 따라 다양한 구성 요소를 플러그인할 수 있습니다.
3.통합: 다른 도구 및 기술과의 광범위한 통합을 지원하여 원활한 개발 워크플로우를 가능하게 합니다.
4.커뮤니티와 생태계: 강력한 커뮤니티 지원과 풍부한 확장 및 플러그인 생태계를 가지고 있습니다.
차이점:
1.도메인: LangChain은 언어 모델 애플리케이션에 특화되어 있고, Spring은 자바 엔터프라이즈 애플리케이션을 위한 일반 목적의 프레임워크입니다.
2.언어 및 플랫폼: LangChain은 일반적으로 파이썬과 언어 모델 API를 사용하고, Spring은 자바 및 JVM 기반 애플리케이션과 함께 사용됩니다.
3.범위: LangChain은 대형 언어 모델의 사용을 간소화하는 데 중점을 두고 있으며, Spring은 데이터 접근, 보안, 웹 개발 등 엔터프라이즈 애플리케이션 개발의 다양한 측면을 위한 도구를 제공합니다.
요약하면, LangChain과 Spring Framework는 다른 기술적 맥락에서 작동하지만, 각각의 도메인에서 애플리케이션 개발을 단순화하고 구조화하는 공통 목표를 공유합니다.
pipx를 통해 poetry를 설치한다. python 3.12.3 을 사용한다는 메세지가 출력된다.
pipx install poetry

// result message
  installed package poetry 1.8.3, installed using Python 3.12.3
  These apps are now globally available
    - poetry
poetry를 실행한다.
poetry

// result mesage
Poetry (version 1.8.3)
Poetry 다음 Tab으로 명령 목록 보기
oh-my-zsh 설정이 .zshrc 에 있음을 가정한다
// .zshrc 에서 ZSH_CUSTOM 주석 풀고 계정 폴더 밑으로 oh-my-zsh 설정
# Would you like to use another custom folder than $ZSH/custom?
ZSH_CUSTOM=/Users/peter/oh-my-zsh

// 저장후 변경 적용
. .zshrc

// 폴더 생성
mkdir $ZSH_CUSTOM/plugins/poetry
oh-my-zsh 의 plugins 에 poetry 추가
// .zshrc oh-my-zsh의 plugins 에 poetry 추가
plugins=(git poetry)

// .zshrc 변경 적용
. .zshrc
테스트 "peotry in" 까지 입력하고 tab key를 치면 아래와 같이 init, install 등의 poetry 명령 목록이 출력된다.
$ . .zshrc
$ poetry in
init     -- Creates a basic pyproject.toml file in the current directory.
install  -- Installs the project dependencies.
Poetry 통한 프로젝트, 패키지 추가
[1] Poetry 기반 프로젝트 생성
- poetry new [project-name]
poetry new ai-agent
[2] 프로젝트로 이동해서 가상환경을 프로제트내로 설정한다.
poetry config virtualenvs.in-project true
[3] poetry 프로젝트 가상환경으로 변경
poetry shell
[4] ai_agent 패키지 폴더에 __main__.py 추가
- 폴더 지정으로 run 하기 위해 __init__.py 위치에 __main__.py 파일을 추가한다.
- .env 파일 생성후 KEY 값 설정
- 명령
- poetry shell 미수행시 : poetry run python [folder-name] 또는 [file-name]
- poetry shell 수행시 : python [folder-name]
// .env 파일
OPENAI_API_KEY=sh-proj-xsdhfdrerjelrelreahahhahahaahaha

// __main__.py 내역
import os
from dotenv import load_dotenv

load_dotenv()

print(f"[API KEY]\n{os.environ['OPENAI_API_KEY']}")

// 실행
poetry run python ai_agent
[API KEY]
sh-proj-xsdhfdrerjelrelreahahhahahaahaha
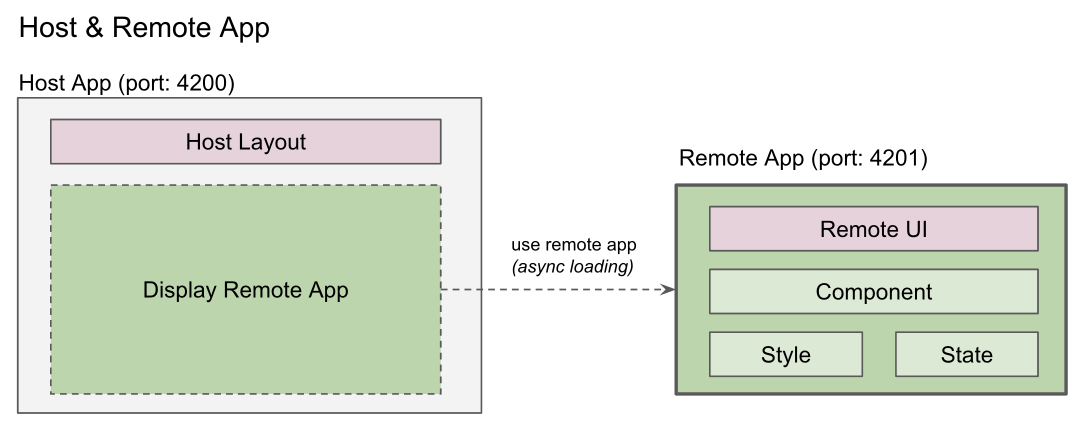
+ Host 앱이 되어서 portal의 exposed module을 async loading하여 사용한다.
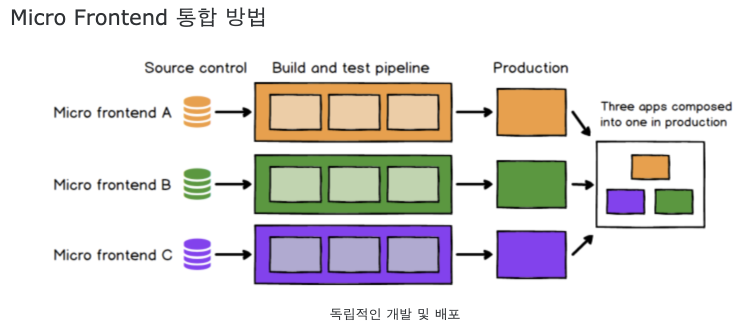
Dashboard App에서 widget을 사용, Portal App 에서 Dashboard App을 사용한다
Portal App 모듈과 Micro App 모듈의 분리
- Micro App은 필요한 모듈을 Portal App (remote app) 으로 부터 로딩하여 사용한다. 따라서 Micro App에서 필요한 모듈을 package.json에 설정하여 npm install 하여 로컬에 설치 후 사용하는 것이 아니라, runtime에 로딩하여 사용할 수 있다.
- Micro App 개발시 참조하는 모듈을 로컬에 설치할 필요없이 개발을 진행할 수 있다.
- 즉, Micro Frontend의 개념을 적용하여 개발을 진행한다.
명령어 예
- host라는 host app이 자동 생성된다
- store 이라는 remote app이 자동 생성된다.
- @nx/react:host 의 명령어에 따라서 module federation 관련한 설정 내역이 자동으로 생성된다.
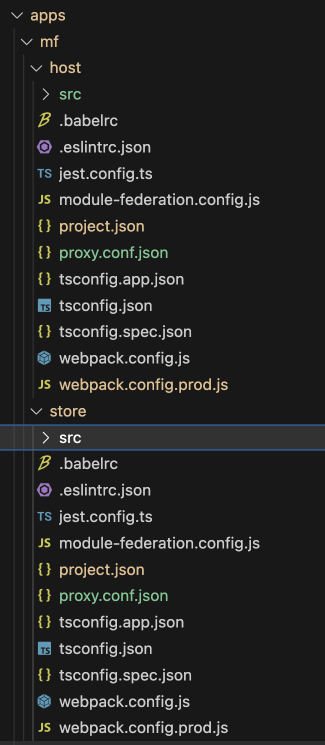
nx g @nx/react:host mf/host --remotes=mf/store
mf폴더 밑으로 host, store app 생성
- host app 생성파일들
+ main.ts 에서 bootstrap.tsx를 import 형식: project.json에서 main도 main.ts 로 설정됨 (기존은 main.tsx 하나만 존재)
+ module-federation.config.js 파일 생성: remote 설정
+ webpack.config.<prod>.js 파일들 생성
+ project.json: serve 의 executor가 @nx/react:module-federation-dev-server 로 변경됨
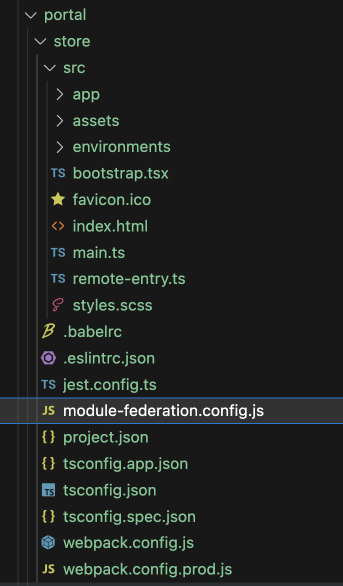
또는 remote app만들 별도로 생성할 수 있다.
npx nx g @nx/react:remote portal/store
- remote app 생성파일들
+ remote-entry.ts
+ main.ts 에서 bootstrap.tsx를 import 형식: project.json에서 main도 main.ts 로 설정됨 (기존은 main.tsx 하나만 존재)
+ module-federation.config.js 파일 생성: exposes 설정
+ webpack.config.<prod>.js 파일들 생성
+ project.json: serve 의 executor가 @nx/react:module-federation-dev-server 로 변경됨
host를 실행하면
+ 관련된 remote도 자동으로 실행된다. (remote는 project.json의 static-server의 port로 자동 실행된다.)
+ 즉, host app과 remote app이 동시에 구동된다.
nx serve mf-host --open
NX 기반 설정파일 이해하기
remote app 설정 파일들
- webpack.config.js
+ withModuleFederation은 node_modules/@nx/react/src/module-federation/with-module-federation.js 위치하고 있고, remote와 shared할 libraries를 자동으로 설정해 준다. 즉, remote빌드시 shared libraries는 external libs로 취급되어 번들파일에 포함되지 않는다.
+ nx 명령을 통해 생성한 remote app에는 webpack.config.js와 webpack.config.prod.js 파일이 자동 생성 및 설정되어 있다.
// 5개의 애플리케이션을 생성하고, SASS, webpack을 선택하여 생성한다.

nx g @nrwl/react:app micro-apps/dashboard
nx g @nrwl/react:app micro-apps/asset
nx g @nrwl/react:app micro-apps/management
nx g @nrwl/react:app micro-apps/system
nx g @nrwl/react:app micro-apps/user
패키지를 생성한다.
// SASS, jest, rollup 을 선택한다.

nx g @nrwl/react:lib web/login/default --publishable --importPath=@gv/web-login-default
새로운 패키지와 애플리케이션이 생성된 폴더에 모든 soucre files 을 copy & paste 한다.
버전업 이후 수정사항
React v17 -> v18 업데이트후 변경점. main.tsx 에서 root 생성 방법이 변경되었다.
// React v17
import * as ReactDOM from 'react-dom';
...
ReactDOM.render(
  <Suspense fallback={<GVSpinner isFull />}>
    <GVMicroApp />
  </Suspense>,
  document.getElementById('root')
);

// React v18
import * as ReactDOM from 'react-dom/client';
...
const root = ReactDOM.createRoot(document.getElementById('root') as HTMLElement);
root.render(
  <Suspense fallback={<GVSpinner isFull />}>
    <GVMicroApp />
  </Suspense>
);
AntD v4 -> v5 로 변경되면서 v5에서 cssinjs 방식을 사용하면서 *.less 방식이 사라졌다. 기본적인 reset.css만을 설정한다.
// styles.scss 에 reset.css 포함
// AntD reset
@import "~antd/dist/reset.css";

// project.json에 styles.scss 포함
      "options": {
        "compiler": "babel",
        ...
        "styles": ["apps/micro-apps/dashboard/src/styles.scss"],
        ...
        "webpackConfig": "apps/micro-apps/dashboard/webpack.config.js"
      },
Webpack의 min-css-extract-plugin을 사용하면서 build warning 나오는 import ordering 메세지 제거하기
// webpack.config.js
module.exports = composePlugins(withNx(), withReact(), (config) => {
  // Update the webpack config as needed here.
  // e.g. `config.plugins.push(new MyPlugin())`

  // .tsx 에서  import 구문 ordering 경고 문구 발생 해결하기
  // https://github.com/facebook/create-react-app/issues/5372
  const instanceOfMiniCssExtractPlugin = config.plugins.find(
    (plugin) => plugin.constructor.name === 'MiniCssExtractPlugin'
  );

  if (instanceOfMiniCssExtractPlugin) {
    instanceOfMiniCssExtractPlugin.options.ignoreOrder = true;
  }

  return config;
});
Nx를 업데이트하면 기존의 workspace.json 파일을 사용하지 않는다. 그리고 webpack v5.* 버전을 사용한다. webpack v5는 Module Federation을 지원하므로 이에 대한 설정을 진행해 본다.
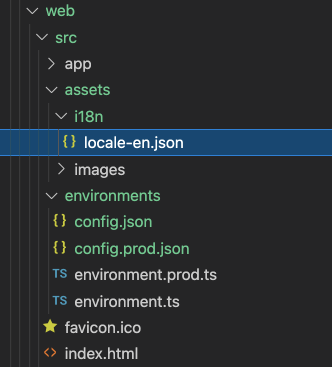
export * from './lib/ajax/http.service';
export * from './lib/i18n/i18n';
다음으로 apps/gateway/web/src/main.tsx 에서 initI18N을 초기화 한다.
import * as ReactDOM from 'react-dom';

import { initI18N } from '@rnm/ui';

import App from './app/app';
import { config } from './environments/environment';

initI18N(config);
ReactDOM.render(<App />, document.getElementById('root'));
개발환경에서 Dashboard Web Dev Server로 연결하기
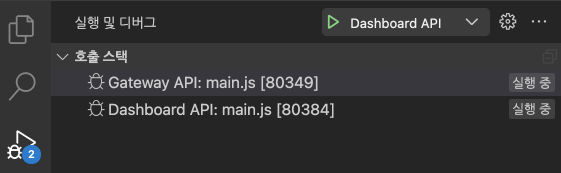
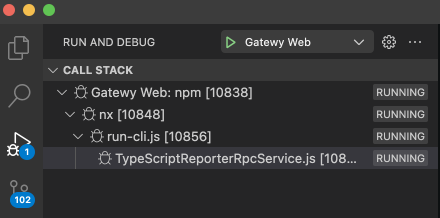
Gateway - Dashboard 로컬 개발시에는 총 4개의 프로세스가 구동되고 상호 연관성을 갖는다.
Gateway API (NodeJS & NestJS), Gateway Frontend (Web Dev Server & React) 로 Gateway하나에 두개의 프로세스가 구동된다.
Dashboard API, Dashboard Frontend 도 두개의 프로세스가 구동된다.
4개 프로세스간의 관계
개발시에 전체 루틴을 처리하고 싶다면 위와 같은 Proxy 설정이 되어야 한다. 환경 설정을 다음 순서로 진행한다.
Step-1) Gateway Web에서 Gateway API로 Proxy
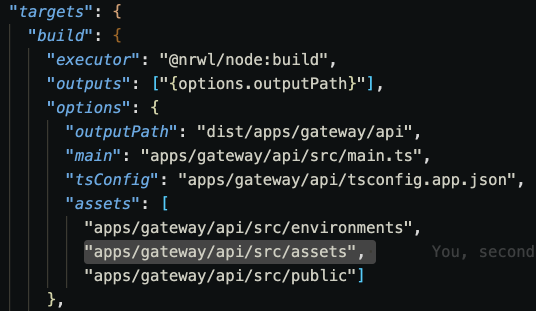
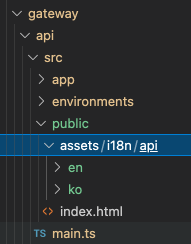
apps/gateway/web/proxy.conf.json 환경은 Dashboard, Configuration, Back-Office 모두를 proxy 한다. 그리고 apps/gateway/web/project.json 안에 proxy.conf.json과 포트 9000 을 설정한다.
Step-2) Gateway API에서 Dashboard Web으로 Proxy
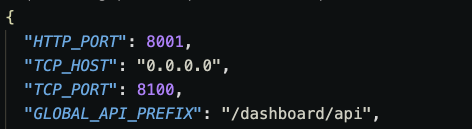
apps/gateway/api/src/environments/config.json 에서 REVERSE_ADDRESS가 기존 Dashboard API 의 8001 이 아니라, Dashboard Web의 9001 로 포트를 변경하면 된다.
Step-3) Dashboard Web 에서 Dashboard API로 proxy
Dashboard API로 proxy 하기위해 apps/dashboard/web/proxy.conf.json 파일을 추가한다. api 호출은 dashboard api의 8001로 proxy 한다.
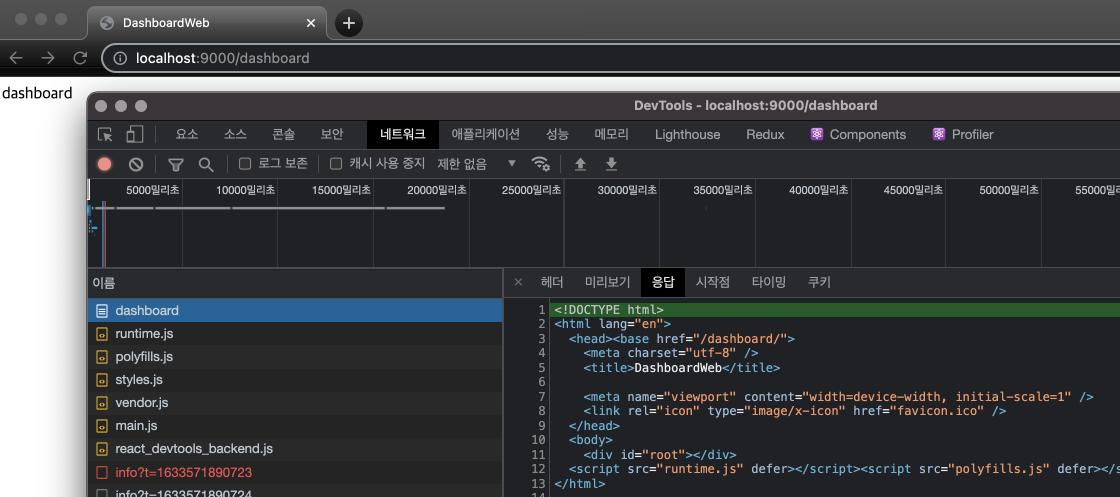
baseHref: "/dashboard/"를 설정한다. "/dashboard"로 하면 안된다.
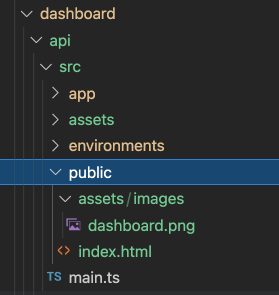
Step-4) Dashboard API 변경사항
apps/dashboard/api/src/public/dashboard 하위 내역을 모드 apps/dashboard/api/src/public으로 옮기고, dashboard 폴더를 삭제한다.
apps/dashboard/api/src/environments/config.json 의 HTTP 포트는 8001 이다.
테스트
먼저 콘솔에서 gateway, dashboard web을 구동한다.
$> nx serve gateway-web
NX  Web Development Server is listening at http://localhost:9000/

$> nx serve dashboard-web
>  NX  Web Development Server is listening at http://localhost:9001/
VSCode에서 gateway, dashboard api를 구동한다.
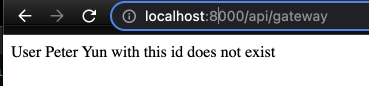
브라우져에서 http://localhost:9000 을 호출하고, 로그인 해서 dashboard web 의 index.html 이 호출되는지 체크한다.
에러처리는 libs/shared/src/lib/filter/global-exception.filter.ts 의 에러 포멧을 따른다.
import { Request, Response } from 'express';
import { ArgumentsHost, Catch, ExceptionFilter, HttpException, HttpStatus, Logger } from '@nestjs/common';

@Catch()
export class GlobalExceptionFilter implements ExceptionFilter {
  catch(exception: any, host: ArgumentsHost) {
    const ctx = host.switchToHttp();
    const response = ctx.getResponse<Response>();
    const request = ctx.getRequest<Request>();
    const message = (exception as any).message;

    Logger.error(message, (exception as any).stack, `${request.method} ${request.url}`);

    const name = exception?.constructor?.name || 'HttpException';
    let status = HttpStatus.INTERNAL_SERVER_ERROR;
    switch (name) {
      case 'HttpException':
        status = (exception as HttpException).getStatus();
        break;
      case 'UnauthorizedException':
        status = HttpStatus.UNAUTHORIZED;
        break;
      case 'ForbiddenException':
        status = HttpStatus.FORBIDDEN;
        break;
      case 'QueryFailedError':  // this is a TypeOrm error
        status = HttpStatus.UNPROCESSABLE_ENTITY;
        break;
      case 'EntityNotFoundError':  // this is another TypeOrm error
        status = HttpStatus.UNPROCESSABLE_ENTITY;
        break;
      case 'CannotCreateEntityIdMapError': // and another
        status = HttpStatus.UNPROCESSABLE_ENTITY;
        break;
      default:
        status = HttpStatus.INTERNAL_SERVER_ERROR;
    }

	// 에러 리턴 포멧
    response.status(status).json(
      {
        statusCode: status,
        error: name,
        message,
        method: request.method,
        path: request.url,
        timestamp: new Date().toISOString()
      }
    );
  }
}
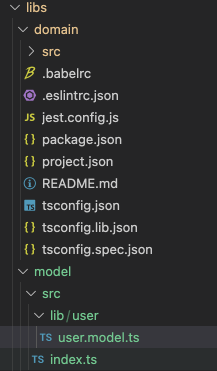
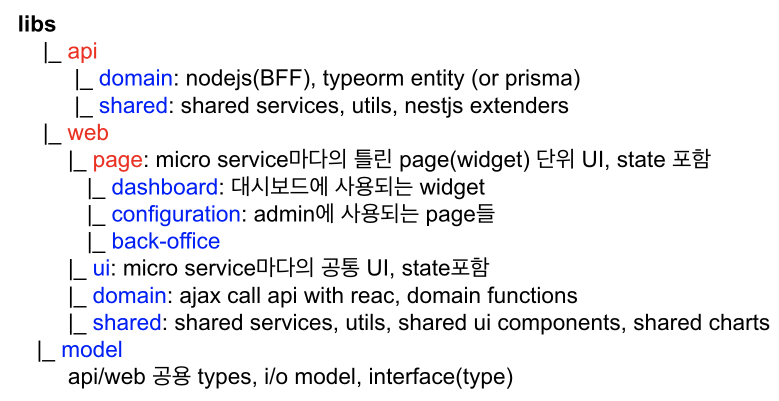
테스트 진행시 UI가 Nest쪽 패키지를 사용하면 번들링 오류가 발생할 수 있다. 따라서 libs 하위의 패키지들은 향후 API용, WEB용 구분하여 사용하고, model 패키지만 공용으로 사용한다. API용, WEB용을 구분한다면 하기와 같이 별도 폴더로 묶어 관리하는게 좋아 보인다.
api, web, model 분리
Nx 기반 library 생성 명령은 다음과 같다.
// api library
$> nx g @nrwl/nest:lib api/shared --publishable --importPath=@rnm/api-shared
$> nx g @nrwl/nest:lib api/domain --publishable --importPath=@rnm/api-domain
// web library
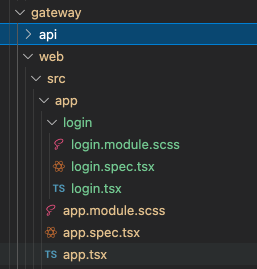
$> nx g @nrwl/react:lib web/shared --publishable --importPath=@gv/web-shared
$> nx g @nrwl/react:lib web/domain --publishable --importPath=@gv/web-domain
$> nx g @nrwl/react:lib web/ui --publishable --importPath=@gv/web-ui
// model library
$> nx g @nrwl/nest:lib model --publishable --importPath=@gv/model
Cookie의 REFRESH_TOKEN이 서버에 저장된 값과 맞으면 해당 user정보를 반환하는 코드를 libs/domain/src/lib/entities/user/user.service.ts 에 추가한다.
// user.service.ts 일부

  async getUserIfRefreshTokenMatches(refreshToken: string, id: number): Promise<User | undefined> {
    const user = await this.findOneById(id);

    const isRefreshTokenMatching = await bcryptCompare(
      refreshToken,
      user.currentHashedRefreshToken as string
    );

    if (isRefreshTokenMatching) {
      return user;
    }
    return;
  }
JWT Refresh Strategy와 Guard 추가
Guard에서 사용할 Refresh Strategy를 libs/domain/src/lib/auth/strategies/jwt-refresh.strategy.ts 파일 생성후 추가한다.
import { Request } from 'express';
import { ExtractJwt, Strategy } from 'passport-jwt';
import { PassportStrategy } from '@nestjs/passport';
import { Injectable } from '@nestjs/common';

import { UserService } from '@rnm/domain';
import { loadConfigJson } from '@rnm/shared';
import { TokenPayload, User } from '@rnm/model';

const config: any = loadConfigJson();

@Injectable()
export class JwtRefreshTokenStrategy extends PassportStrategy(Strategy, 'jwt-refresh-token') {
  constructor(
    private readonly userService: UserService,
  ) {
    super({
      jwtFromRequest: ExtractJwt.fromExtractors([(request: Request) => {
        return request?.cookies?.REFRESH_LOGIN_TOKEN;
      }]),
      secretOrKey: config?.AUTH?.REFRESH_SECRET,
      passReqToCallback: true,
    });
  }

  async validate(request: Request, payload: TokenPayload): Promise<User | undefined> {
    const refreshToken = request.cookies?.REFRESH_LOGIN_TOKEN;
    return this.userService.getUserIfRefreshTokenMatches(refreshToken, payload.id as number);
  }
}
Refresh Guard도 libs/domain/src/lib/auth/guards/jwt-auth-refresh.guard.ts 파일 생성하고 추가한다.
import { Injectable } from '@nestjs/common';
import { AuthGuard } from '@nestjs/passport';

@Injectable()
export class JwtRefreshGuard extends AuthGuard('jwt-refresh-token') { }
파일 추가후에는 항시 libs/domain/src/index.ts 안에 export를 해야 한다.
export * from './lib/constants/core.contant';
export * from './lib/entities/user/user.entity';
export * from './lib/entities/user/user.service';
export * from './lib/entities/entity.module';

export * from './lib/models/request.model';

export * from './lib/auth/auth.service';
export * from './lib/auth/auth.middleware';
export * from './lib/auth/auth.module';
export * from './lib/auth/guards/local-auth.guard';
export * from './lib/auth/guards/jwt-auth.guard';
export * from './lib/auth/guards/jwt-auth-refresh.guard'; // <== 요기

export * from './lib/auth/strategies/local.strategy';
export * from './lib/auth/strategies/jwt.strategy';
export * from './lib/auth/strategies/jwt-refresh.strategy'; // <== 요기

export * from './lib/service/gateway/api/service/gateway-api-app.service';
export * from './lib/service/dashboard/api/service/dashboard-api-app.service';
export * from './lib/configuration/api/service/configuration-api-app.service';
export * from './lib/service/back-office/api/service/backoffice-api-app.service';
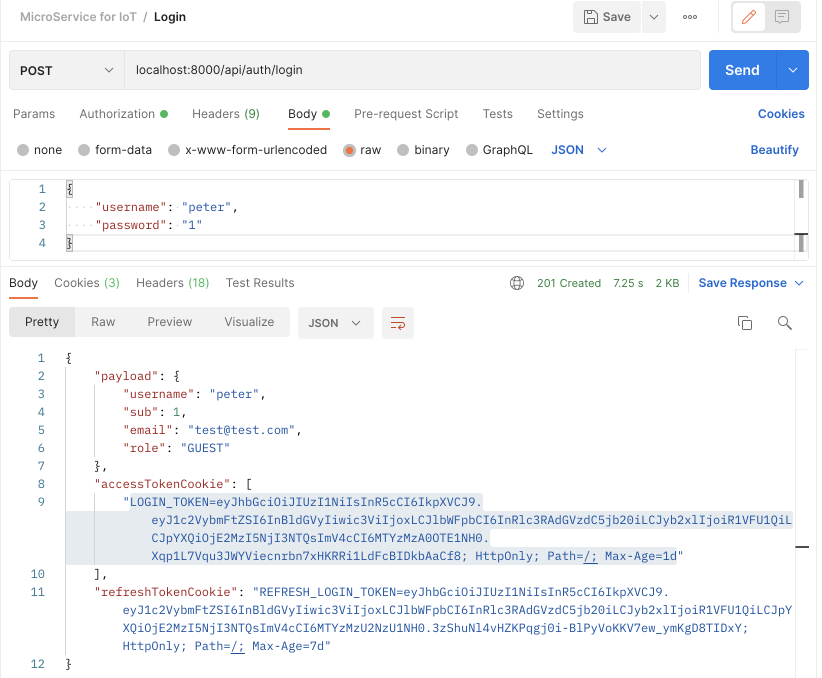
RefreshToken과 AuthToken을 Cookie에 실어 보내기
두가지 Token을 response cookie에 실어 보내기위해 먼저 cookie 생성하는 코드를 libs/domain/src/lib/auth/auth.service.ts 에 추가한다.
import { Injectable } from '@nestjs/common';
import { AuthGuard } from '@nestjs/passport';

@Injectable()
export class LocalAuthGuard extends AuthGuard('local') { }
User 생성하는 apps/gateway/api/src/app/user/user.controller.ts 에도 @UseGuards 를 JWT 토큰 체크하는 Guard로 등록한다. 이를 위하여 libs/domain/src/lib/auth/guards/jwt-auth.guard.ts 파일을 생성한다.
import { ExecutionContext, Injectable, UnauthorizedException } from '@nestjs/common';
import { AuthGuard } from '@nestjs/passport';

@Injectable()
export class JwtAuthGuard extends AuthGuard('jwt') {
  canActivate(context: ExecutionContext) {
    // Add your custom authentication logic here
    // for example, call super.logIn(request) to establish a session.
    return super.canActivate(context);
  }

  handleRequest(err: any, user: any, info: any, context: any, status?: any) {
    // You can throw an exception based on either "info" or "err" arguments
    if (err || !user) {
      throw err || new UnauthorizedException();
    }
    return user;
  }
}
그리고 apps/gateway/api/src/app/user/user.controller.ts 에 @UseGuards를 "JwtAuthGuard"로 등록한다.