블로그 이미지
Peter Note
Web & LLM FullStacker, Application Architecter, KnowHow Dispenser and Bike Rider

Publication

Category

Recent Post

2013. 9. 7. 17:32 Languages/JavaScript

Publish/Subscribe 를 위한 Observer 패턴을 알아보자. JavaScript은 Web의 Virtual Machine이다. JavaScript는 웹앱이다. 


개념

  - Observable

     Client에 observers를 붙였다 띄었다 하는 동작을 가진 추상 클래스 또는 인터페이스  (Publisher)

    ConcreteObservable

     오브젝트의 상태정보를 가지고 있다가 상태가 변경되면 등록된 Observers 에게 변경 정보를 알려준다 

    Observer

     정보를 알려줄 Operation을 정의한 추상 클래스 또는 인테페이스 (Subscriber)


  - 어떤 오브젝트가 오브젝트 목록을 관리하다가 어떤 상태의 변화가 감지되면 해당 오브젝트 목록들에 변경값을 Notify한다 

  - 상태 정보 변경에 관심을 갖는 오브젝트를 Observer Object라 하고 Observer Object를 register/remove 한다 

  - GoF의 정의 

"One or more observers are interested in the state of a subject and register their interest with the subject by attaching themselves. When something changes in our subject that the observer may be interested in, a notify message is sent which calls the update method in each observer. When the observer is no longer interested in the subject's state, they can simply detach themselves."


구현 

  - Observer Pattern 구현을 위해 필요한 컴포넌트 

    > Subject : observers 목록을 제어(register/remove)한다 

    > Observer : Subject로부터 상태변화를 받을 오브젝트 인터페이스를 제공한다 

    > ConcreteSubject : 상태 변경을 observers 에게 notify를 수행한다 

    > ConcreteObserver : ConcreteSubject에 Observer 인터페이스를 생성하여 등록한다 

// Object 목록 관리 Constructor Function

function ObserverList(){

this.observerList = []; } ObserverList.prototype.Add = function( obj ){ return this.observerList.push( obj ); }; ObserverList.prototype.Empty = function(){ this.observerList = []; }; ObserverList.prototype.Count = function(){ return this.observerList.length; }; ObserverList.prototype.Get = function( index ){ if( index > -1 && index < this.observerList.length ){ return this.observerList[ index ]; } }; ObserverList.prototype.Insert = function( obj, index ){ var pointer = -1; if( index === 0 ){ this.observerList.unshift( obj ); pointer = index; }else if( index === this.observerList.length ){ this.observerList.push( obj ); pointer = index; } return pointer; }; ObserverList.prototype.IndexOf = function( obj, startIndex ){ var i = startIndex, pointer = -1; while( i < this.observerList.length ){ if( this.observerList[i] === obj ){ pointer = i; } i++; } return pointer; }; ObserverList.prototype.RemoveAt = function( index ){ if( index === 0 ){ this.observerList.shift(); }else if( index === this.observerList.length -1 ){ this.observerList.pop(); } }; // Extend an object with an extension

function extend( extension, obj ){ for ( var key in extension ){ obj[key] = extension[key]; } }


  - Subject 구현, Observer에는 Update메소드를 구현하면 된다

// 1. Subject Constructor Function을 정의한다

// (Constructor Pattern의 prototype 방식 사용)

function Subject(){ this.observers = new ObserverList(); } Subject.prototype.AddObserver = function( observer ){ this.observers.Add( observer ); }; Subject.prototype.RemoveObserver = function( observer ){ this.observers.RemoveAt( this.observers.IndexOf( observer, 0 ) ); };

// Observer가 상태 정보를 받는다 
Subject.prototype.Notify = function( context ){
  var observerCount = this.observers.Count();
  for(var i=0; i < observerCount; i++){
    this.observers.Get(i).Update( context );

};


// 2. Observer 구현 

// The Observer
function Observer(){
  this.Update = function(){
    // ...
  };
}


  - ConcreteSubject, ConcreteObserver

// HTML

1) button을 클릭하면 observable checkbox를 페이지에 추가

2) checkbox가 subject로 동작한다. check가 되면 모든 checkbox에 상태변경을 알려준다(notify) 

3) 새로운 checkbox를 container에 추가한다 

<button id="addNewObserver">Add New Observer checkbox</button>
<input id="mainCheckbox" type="checkbox"/>
<div id="observersContainer"></div>

// Script 

// References to our DOM elements var controlCheckbox = document.getElementById( "mainCheckbox" ), addBtn = document.getElementById( "addNewObserver" ), container = document.getElementById( "observersContainer" ); // 3. Concrete Subject

// Subject의 notify 메소드를 호출하는 구문이 존재 // Extend the controlling checkbox with the Subject class extend( new Subject(), controlCheckbox ); // Clicking the checkbox will trigger notifications to its observers controlCheckbox["onclick"] = new Function( "controlCheckbox.Notify(controlCheckbox.checked)" ); addBtn["onclick"] = AddNewObserver;

// 4. Concrete Observer function AddNewObserver(){ // Create a new checkbox to be added var check = document.createElement( "input" ); check.type = "checkbox"; // Extend the checkbox with the Observer class extend( new Observer(), check ); // Override with custom update behaviour check.Update = function( value ){ this.checked = value; }; // Add the new observer to our list of observers // for our main subject controlCheckbox.AddObserver( check ); // Append the item to the container container.appendChild( check ); }


Publish/Subscribe

  - Publish/Subscriber와 유사하다. Observer나 Pub/Sub 사용이유는 틀린 계층간의 결합시 Loose Coupling으로 관계설정에 유용한다 

var pubsub = {};

(function(q) {

    var topics = {},
        subUid = -1;

    // Publish or broadcast events of interest
    // with a specific topic name and arguments
    // such as the data to pass along
    q.publish = function( topic, args ) {

        if ( !topics[topic] ) {
            return false;
        }

        var subscribers = topics[topic],
            len = subscribers ? subscribers.length : 0;

        while (len--) {
            subscribers[len].func( topic, args );
        }

        return this;
    };

    // Subscribe to events of interest
    // with a specific topic name and a
    // callback function, to be executed
    // when the topic/event is observed
    q.subscribe = function( topic, func ) {

        if (!topics[topic]) {
            topics[topic] = [];
        }

        var token = ( ++subUid ).toString();
        topics[topic].push({
            token: token,
            func: func
        });
        return token;
    };

    // Unsubscribe from a specific
    // topic, based on a tokenized reference
    // to the subscription
    q.unsubscribe = function( token ) {
        for ( var m in topics ) {
            if ( topics[m] ) {
                for ( var i = 0, j = topics[m].length; i < j; i++ ) {
                    if ( topics[m][i].token === token) {
                        topics[m].splice( i, 1 );
                        return token;
                    }
                }
            }
        }
        return this;
    }; 

}( pubsub ));


<참조>

  - 원문 : Observer Pattern

  - OODesign : Observer Pattern

  - PubSubJS for JavaScript

  - RadioJS for Pub/Sub

posted by Peter Note
2013. 9. 7. 17:11 Languages/JavaScript

클래스의 인스턴스를 오직 하나만 생성하는 Singleton Pattern을 알아보자. 기술은 향기와 같다. 막아도 냄새를 맡을 수 있는 것이다. 옳바른 향기를 피워보자. 


개념

  - Java에서의 싱글톤 정의 패턴 

    1) 자신을 private 멤버변수로 선언

    2) private 생성자 정의

    3) public static synchronized 형태 getInstance() 메소드 정의

    4) 자신의 변수가 null인지 아닌지 체크 

class Singleton

{

    private static Singleton instance; // 1) 

    private Singleton() // 2) 

    {

        ...

    }


    public static synchronized Singleton getInstance() // 3)

    {

        if (instance == null) // 4) 

            instance = new Singleton();

        return instance;

    }

    ...

    public void doSomething()

    {

        ... 

    }

}


  - Global Scope에 격리되고 내부 변수를 공유한다

    > Constructor Function을 정의한다 

    > Closure 객체안에서 Constructor Function을 한번만 new하는 로직을 넣고 Closure객체를 return한다 

var mySingleton = (function () {

// Instance stores a reference to the Singleton var instance; function Init() { // define Constructor Function // Singleton // Private methods and variables function privateMethod(){ console.log( "I am private" ); } var privateVariable = "Im also private"; var privateRandomNumber = Math.random(); return { // Public methods and variables publicMethod: function () { console.log( "The public can see me!" ); }, publicProperty: "I am also public", getRandomNumber: function() { return privateRandomNumber; } }; }; return { // return the Closure Object // Get the Singleton instance if one exists // or create one if it doesn't getInstance: function () {

// 생성이 안되었으면 최초에 한번만 init 한다 if ( !instance ) { instance = Init(); } return instance; } }; })();


// 잘 못된 예제 var myBadSingleton = (function () { // Instance stores a reference to the Singleton var instance; function init() { // Singleton var privateRandomNumber = Math.random(); return { getRandomNumber: function() { return privateRandomNumber; } }; }; return { // Always create a new Singleton instance getInstance: function () {

instance = init(); return instance; } }; })(); var singleA = mySingleton.getInstance(); var singleB = mySingleton.getInstance(); console.log( singleA.getRandomNumber() === singleB.getRandomNumber() ); // true var badSingleA = myBadSingleton.getInstance(); var badSingleB = myBadSingleton.getInstance(); console.log( badSingleA.getRandomNumber() !== badSingleB.getRandomNumber() ); // true


<참조>

  - 원문 : Singleton Pattern

  - OODesign : Singleton Pattern

 - 널리 Singleton을 사용해 보자

posted by Peter Note
2013. 9. 7. 16:53 Languages/JavaScript

SNS의 정신은 감동, 배려, 책임이다. 기술이 아니다, 자바스크립트를 행복하게 사용하려면 모듈단위의 개발이 되어야 한다. 모듈 패턴을 알아보자.


종류

  - 견고한 애플리케이션을 개발하기 위하여 모듈단위 개발이 필요하다 

  - 모듈을 구현하기 위한 방법

    > The Module pattern

    > Object literal notation

    > AMD modules

    > CommonJS modules

    > ECMAScript Harmony modules


Object Literals

  - curly braces {} 를 사용한다 

  - new 키워드가 필요없다 

  - 오브젝트에 프로퍼티의 동적 추가가 가능하다. 예) myObjectLiteral.sencondKey = value; 

var myObjectLiteral = {

  variableKey: variableValue,

  functionKey: function() {...},

  someObject: {...}

}


Module Pattern

  - class처럼 private, public를 캡슐화 하여 정의하는 방법이다 

  - 별도 name space 사용으로 global scope의 오염을 방지한다 

  - ClosureIIFE (Immediately Invoked Function Expression) 을 사용한다 

var testModule = (function() {

  var counter = 0;

  return {  // Closure

    incrementCounter: function() {

      return counter++;

    },

    resetCounter: function() {

      console.log('counter is', counter);

      counter = 0;

    }

  };

})(); // IIFE


testModule.incrementCounter();

testModule.resetCounter();

// output : counter is 1

  - 예제에서 counter는 global scope에서 숨겨져이다. 즉, private variable같다, counter 접근은 두개의 method로만 가능하다. 물론 function도 private 으로 정의가능하다 

var myNamespace = (function () {

  var myPrivateVar, myPrivateMethod;

  // A private counter variable
  myPrivateVar = 0;

  // A private function which logs any arguments
  myPrivateMethod = function( foo ) {
      console.log( foo );
  };

  return {

    // A public variable
    myPublicVar: "foo",

    // A public function utilizing privates
    myPublicFunction: function( bar ) {

      // Increment our private counter
      myPrivateVar++;

      // Call our private method using bar
      myPrivateMethod( bar );

    }
  };
 

})();


Module Pattern 변형 

  - Import mixins : global scope의 변수를 module에 import 하는 방법

    jQuery 와 Underscore 객체를 익명함수의 파라미터로 받아서 import 한다

// Global module
var myModule = (function ( jQ, _ ) {
  
    function privateMethod1(){
        jQ(".container").html("test");
    }

    function privateMethod2(){
      console.log( _.min([10, 5, 100, 2, 1000]) );
    }
    
    return{
        publicMethod: function(){
            privateMethod1();                
        }            
    };
   
// Pull in jQuery and Underscore
}( jQuery, _ ));
 

myModule.publicMethod();  


  - Export : global module 만들기 

    var module = {} 객체를 만들어서 return 하여 export 한다 

// Global module
var myModule = (function () {

    // Module object 
  var module = {},
    privateVariable = "Hello World";
  
  function privateMethod() {
    // ...
  }

  module.publicProperty = "Foobar";
  module.publicMethod = function () {
    console.log( privateVariable );
  };
  
  return module;
 

}());


<참조>

  - 원문 : 모듈패턴

posted by Peter Note
2013. 9. 7. 16:07 Languages/JavaScript

구글러 오스마니님의 JavaScript Design Pattern 글에서 패턴을 요약해 본다. 생성자 패턴에 대해 알아보자 


개념

  - 자바스크립트는 모든것이 오브젝트이다 

  - Object constructor가 지정한 타입의 오브젝트를 생성하는데 사용한다 


Object Creation

  - 오브젝트를 만드는 3가지 기본 방법 

    비어있는 오브젝트를 만들어 리턴하는 것이다 

var newObject = {};


var newObject = Object.create( null );


var newObject = new Object();


  - 오브젝트에 Key, Value 할당하는 4가지 방법

// 1. Dot syntax

newObject.someKey = "hi dowon";

var key = newObject.someKey;


// 2. Square bracket syntax

newObject["someKey"] = "hi youngsik";

var key = newObject["someKey"];


// ECMAScript 5 olny

// 3. Object.defineProperty

Object.defineProperty( newObject, "someKey", {

  value: "hi dowon",

  writable: true,

  enumerable: true,

  configurable: true

});


var defineProp = function( obj, key, value ) {

  config.value = value;

  Object.defineProperty( obj, key, config);

};


var person = Object.create( null );

defineProp( person, "car", "Seoul");

defineProp( person, "house", "apt");


// 4. Object.defineProperties

// set properties

Object.defineProperties( newObject, {

   "someKey": {

     value: "hi dowon",

     writable: true

   }, 

   "anotherKey": {

      value: "youngsik",

      writable: false

    }

});


Basic Constructors

  - Constructor Function에 new 키워들 사용하여 신규 오브젝트를 생성한다

  - Constructor Function안의 this는 새로 생성된 오브젝트의 레퍼런스이다 

// define constructor function

function Car(model, price) {

  this.model = model;

  this.price = price;


  this.toString = function() {

    return this.model + ', ' + this.price;

  }

}


// new로 생성하면 Car.prototype을 통하여 신규 오브젝트를 만들어 주소를 넘겨주면 hd가 주소 레퍼런스를 가진다

var hd = new Car('santafe', 1000);


// 찍어보자

Car {model: "santafe", price: 1000, toString: function}


  - Function은 prototype 프로퍼티를 가지고 있다. prototype은 객체를 레퍼런스를 하는데 별도로 지정하지 않으면 자신의 property 객체를 레퍼런스 한다. 여기서 Car.property 는 Car.property 객체를 레퍼런스 한다  

function Car(model, price) {

  this.model = model;

  this.price = price;

}


Car.prototype.toString = function() {

  return this.model + ', ' + this.price;

}


console.log(hd.toString());

kia, 5000


  Car Constructor Function은 {this.model: <value>, this.price: <value>, prototype: Car.prototype}  가 되고, Car.prototype 객체는 {constructor: Car, toString: function() {...}} 이다. Car Constructor Function의 prototype 프로퍼티는 Car.prototype 객체를 레퍼런싱하고, Car.prototype객체의 constructor 프로퍼티를 통하여 Car Constructor Function을 레퍼런싱하여 상호 참조한다. prototype와 constructor 프로퍼티는 writable이다. 이를 이용해 JavaScript의 Prototypal Inheritance 방식을 사용할 수 있다.


<참조>

  - 오스마니 생성자패턴

  - JavaScript Prototype

posted by Peter Note
2013. 9. 7. 12:56 Git, GitHub/GitHub

깃헙에 아이디를 가지고 있다면 http://<id>.github.io 형식의 정적 홈페이지를 만들어 퍼블리싱 할 수 있다. AngularJS와 Bootstrap을 가지고 린(Lean)하게 자신의 홈페이지를 만들어 보자. 자신의 홈페이지를 한두시간만에 만들 수 있다. AngularJS와 Bootstrap을 사용하기 때문에 정적 홈페이지를 SPA(Single Page Application) 타입으로 클라이언트(브라우져)에서 서버의 도움(통신)없이 애플리케이션처럼 구동 될 수 있도록 만들 수 있다.  예) 쥔장 홈페이지 : http://ysyun.github.io/


1. 깃헙 계정 및 레파지토리

  - https://github.io/ 에서 계정을 만든다 

  - <id>.github.io 레파지토리를 만든다. 예) 계정이 ysyun 이라면 레파지토리는 ysyun.github.io (저장소 이미 만들었음)

     * 주의 : <id>.github.com 이 아니라 <id>.github.io 이다. 


  - 로컬 PC에서 git clone 한다 

$ git clone https://github.io/<ID>/<ID>.github.io.git

예)

$ git clone https://github.io/ysyun/ysyun.github.io.git


2. AngularJS와 Bootstrap 템플릿 사용하기

  - AngujarJS+Bootstrap Seed를 git clone 한다 

$ git clone https://github.io/lbehnke/angularjs-bootstrap-seed.git

$ cd angularjs-bootstrap-seed/app 


//app 디렉토리에 있는 모든 파일을 <ID>.github.io 디렉토리에 copy한다

$ copy *  <id.github.io 디렉토리>


  - index.html 에서 보여주고 싶은 메뉴를 수정한다. 반드시 메인 페이지는 index.html이고 root 에 위치해야한다

    간단한 자기소개와 그동안 만들었던 제품에 대한 포트폴리오를 넣었다 

<!-- Navigation -->

    <div class="navbar navbar-inverse navbar-fixed-top">

        <div class="navbar-inner">

            <div class="container">

                <a class="btn btn-navbar" data-toggle="collapse" data-target=".nav-collapse">

                    <span class="icon-bar"></span>

                    <span class="icon-bar"></span>

                    <span class="icon-bar"></span>

                </a>

                <a class="brand" href="#/intro">Yun Young Sik</a>

                <div class="nav-collapse collapse">

                    <ul class="nav">

                        <li class="active"><a href="#/intro">Intro</a></li>

                        <li class="dropdown">

                            <a href="#" class="dropdown-toggle" data-toggle="dropdown">Portfolio <b class="caret"></b></a>

                            <ul class="dropdown-menu">

                                <li><a href="#/smartdashboard">Smart Dashboard</a></li>

                                <li><a href="#/edashboard">Pharos e-Dashboard</a></li>

                                <li><a href="#/pharosjava">Pharos Java</a></li>

                            </ul>

                        </li>

                        <!-- <li><a href="#/contact">Contact</a></li> -->


                    </ul>

                </div><!--/.nav-collapse -->

            </div>

        </div>

    </div>


  - app.js 에서 routing정보를 수정한다. AngularJS의 routing 정보이다 

angular.module('myApp', ['myApp.filters', 'myApp.services', 'myApp.directives']).

  config(['$routeProvider', function($routeProvider) {

    $routeProvider.when('/intro', {templateUrl: 'partials/intro.html', controller: GenericViewCtrl});

    $routeProvider.when('/smartdashboard', {templateUrl: 'partials/smartdashboard.html', controller: GenericViewCtrl});

    $routeProvider.when('/edashboard', {templateUrl: 'partials/edashboard.html', controller: GenericViewCtrl});

    $routeProvider.when('/pharosjava', {templateUrl: 'partials/pharosjava.html', controller: GenericViewCtrl});

    $routeProvider.when('/project_b', {templateUrl: 'partials/project_b.html', controller: GenericViewCtrl});

    $routeProvider.when('/contact', {templateUrl: 'partials/contact.html', controller: ContactViewCtrl});

    $routeProvider.when('/imprint', {templateUrl: 'partials/imprint.html', controller: GenericViewCtrl});

    $routeProvider.otherwise({redirectTo: '/intro'});

  }]);


3. GitHub Push

  - git push를 통하여 <id>.github.io 레파지토리에 올린다 

$ git push

Counting objects: 10, done.

Delta compression using up to 4 threads.

Compressing objects: 100% (6/6), done.

Writing objects: 100% (6/6), 680 bytes | 0 bytes/s, done.

Total 6 (delta 4), reused 0 (delta 0)

To https://github.io/ysyun/ysyun.github.io.git

   328f41e..ca12f7e  master -> master


  - push하고 5~10분후에 http://<ID>.github.io 을 호출한다 (웹퍼블리싱에 약간의 시간이 소요된다)


두시간 정도만 투자해 보자. 여러분의 멋진 github 홈페이지를 가질 수 있다 


<참조>

  - http://ID.github.io 홈페이지 만들기 

  - github-pages

posted by Peter Note
2013. 9. 4. 14:05 AngularJS/Start MEAN Stack

Mobile 서비스 개발을 위하여 JavaScript 기반의 기술 스택을 선택하여 사용하다 보니 1년사이에 MongoDB, Express.js, Angular.js, Node.js를 공부하고 솔루션에 적용하게 되었다. 그간 해당 기술들을 추상화한 프레임워크들을 사용하여 개발을 진행해 왔다. 그러나 가끔 풀리지 않는 문제에 대한 근원적인 해결책을 찾는데는 다시 처음부터 추상화 내역에 대한 이해가 바탕이 되지 않으면 풀리지 않았다. 


즉, 기본 스택을 추상화한 스택사용시에는 추상화 영역에 대한 사용경험과 전반적인 이해가 없이는 오히려 시간공수만 더 늘어나는 격이 된다. 예로 Express와 MongoDB를 좀 더 수월하게 사용키위하여 Trains, Sails Framework들을 사용해 보았고 나름의 장점은 있으나 왠지 남의 옷을 입은듯한 느낌이랄까? 문제 발생시 빠른 대응이 어려웠다 (개인적으론 Trains Framework의 Node.js단의 IoC 방식을 좋아한다)


따라서 소규모 팀으로 개발하면서 하나의 가치를 빠른 시간안에 전달하고자 한다면 기본 Stack기반으로 진행하면서 필요한 시점에 스스로 추상화 모듈을 만들어 사용하는 방법이 좋지 않을까 생각한다. (Don't Invent Wheel 이니 초기엔 쓸만한 것을 GitHub에서 찾아 응용하고 없으면 개발하자) 그런 의미에서 mean.io 에서 기본 Stack에 충실하면서 현재 사용되는 최신 개발 기술들 - Jade, Bootstrap, Mongoose, Bower, Grunt 같은 - 도 함께 접목되어 적당히 어려운 상태이므로 개발시 집중(Flow)을 가능케 하는 구조를 가지고 있다. (너무 어려우면 흥미를 읽고, 너무 쉬우면 긴장감이 떨어진다. 적당히 어려우면 흥미와 긴장감을 주어 개발시 집중을 가능케 한다) 


1. 설치

  - 홈페이지에서 zip 파일 다운로드 

  - 프로젝트로 이동해서 

$ cd mean


// 사전에 node.js 설치 

// Node, npm 설치 shell

$ npm install .


// 사전에 mongodb 설치하고 start

$ grunt


2. 접속 

  - http://localhost:3000/

    + Sign Up 할 수 있다

    + 테스트 글을 CRUD 할 수 있다 


  - MongoDB 

> show collections

articles

sessions

system.indexes

users


해당 스택을 통해 SPA(Single Page Application) 개발에 대한 Lean(신속한) 스타트업을 시도하자.


<참조>

  - mean.io

posted by Peter Note
2013. 8. 30. 17:24 Languages/JavaScript
자바스크립트 개발시 피해야하는 중요한 3가지 사용패턴에 대해서 알아보자 


1. Object 상속에 의한 오염

  - Object의 prototype을 통하여 확장을 하지마라

  - 예를 보자 

    두번째 Object.prototype.e 를 확장하면 모든 오브젝트에 e="E"가 불필요하게 반영된다. 즉 모든 오브젝트에 상속된다 

var obj = {a: "A", b: "B", c: "C", d: "D"};
for (var key in obj) {
   alert(key +': '+obj[key]); //displays "a: A", "b: B", "c: C", "d: D"
}
 
// Anti-Pattern
Object.prototype.e = "E";
for (var key in obj) {
   alert(key +': '+obj[key]); //displays "a: A", "b: B", "c: C", "d: D", "e: E"
}
 
var obj2 = {a2: "A2", b2: "B2", c2: "C2", d2: "D2"};
for (var key in obj2) {
   alert(key +': '+obj2[key]); //displays "a2: A2", "b2: B2", "2c: C2", "d2: D2", "e: E"

}

  - 상속의 방법

function Person(name, sex) { 

  Person.prototype.populationCount++; 
  Person.prototype.getName=function(){ return name }; 
  Person.prototype.getSex=function(){ return sex }; 
  Person.prototype.setSex=function(newSex){ sex = newSex; }; 
  Person.prototype.die=function(){ Person.prototype.populationCount -- ; };
}
Person.prototype.populationCount=0;
 
var rob = new Person('Rob','male');
var jeanie = new Person('Jeanie','female');
alert(rob.populationCount);  // displays 2
 
//the following creates a new public property for rob and sets it to 12
rob.populationCount+=10;
alert(rob.populationCount); //displays 12
alert(jeanie.populationCount); //still displays 2
 
Child.prototype = Object.create(Person.prototype);
Child.prototype.constructor = function Child(name, sex, age) {
    //call the parent constructor
    Person(name, sex);
    Child.prototype.getAge = function() { return age; };
}
var child = new Child('Ralph', 'male', 3);
 
alert(child.getName()); //displays "Ralph"
alert(child.getAge());  //displays 3


2. Global Namespace에 의한 오염

  - 보통 var를 사용하지 않고 x=2 처럼 하면 window.x=2가 되어 전역영역을 오염시킨다. 따라서 변수선언시 반드시 var 를 사용한다 

  - Group 변수를 통해서 오염을 방지하자 

   var Finance = {};

Finance.INTEREST_RATE = 2.5;
Finance.calcAnnualizedInterest(startVal, endVal) {
  //...
}

  - 또는 ECMAScrpt 5 "use strict"를 script 맨위체 포함시킨다. 또는 function 안에 놓고 제한된 scope에서 strict mode를 사용할 수도 있다

  function strictFunc(){

  "use strict";
  // code ...
}

  - 예를 보자 

    i 의 결과값으로 5가 나온다. Global Namespace를 오염시키는 function - foo, bar -, variable - i - 같은 것은 절대 사용하지 말자 

function foo() { return 1; }

function bar() { for (i=0; i<5; i++) {} }


i = foo();

bar();


3. True, False에 대한 부적절한 사용에 의한 오염 

  - 자바스크립트에서 zero (0), empty string (""), null, undefined, NaN 은 모둔 false 값이다 

  - 비교문이나 루프문에서 조건 사용시 축약한다  

// Anti-Pattern

if (testString != undefined && testString != '') {

  //do something

  }


// 변경 : 위 조건절과 동일 

if (!testString) {

  //do something
}

  - ===, ==! 를 항상 사용한다 

// 주의

   var zero = 0;

if (zero === false) {
  // doesn't execute because zero is 0, not false
}


<참조>

  - 원문 : Three JavaScript Anti-Patterns and How to avoid them

  - Another Anti-Patterns 

  - Anti-Patterns를 피하고 성능을 향상시키는 방법들 : Slide 및 동영상

posted by Peter Note
2013. 8. 23. 10:40 Lean Agile Culture/Lean Startup
페이스북의 글이 너무 좋아서 그냥 막 펐습니다. 

윤석찬
 · 2,243명이 좋아합니다.
2시간 전 · 
  • 정부에서 창조 경제의 일환으로 IT 기반 지식을 통한 융합 인재를 양성하겠다고 초등생 부터 프로그래밍 교육 개설에 열의를 가지고 있죠? 아마 얼마전 나온 Cod dot org의 아래 동영상이 큰 영향을 준것 같습니다.
    http://www.youtube.com/watch?v=lHZxmcP-CHI

    최근에는 일부 대학들도 교양 필수 과목으로 프로그래밍 교육을 하려는 움직임을 보였고, 그 중에 한 대학이 저에게 문의를 해와서 제가 드린 소견을 잠시 소개하고자합니다.

    사실 프로그래밍이 별로 필요없는 대부분 분야 교수님은 반발이 심하다고 합니다. 프로그래밍이 아니라 전공별 요구되는 전산 관련 활용(예: SPSS나 그래픽 SW 활용)을 배워야지 전공 구분 없이 모든 학생들에게 프로그래밍을 배우는 것은 무리가 있다다는 것이죠. 

    예를 들어, 생명과학부 학생중에 생물정보학을 전공하는 학생도 있지만, 순수 연구만 하는 학생들이 더 많은데, 그런 학생들조차 프로그래밍을 배워야 한다는 것은 많은 학생들에게 고통을 주는 것이라는 것입니다. 

    이런 인식은 프로그래밍 교육이 가지고 있는 사고적 변화와 문제 해결 능력 배양 같은 근본적인 목적 보다는 "SW 도구 활용"이나 "언어 교육"같은 실용적인 측면에서만 바라보기 때문에 생기는 오해인 것 같습니다. 따라서, 교양 과목 답게 "사고와 활용"이라는 양측면이 강조된 두 가지 교육 과목을 한번 제안해 봅니다. 

    1. 전산적 사고 (Computational Thinking)
    우선 "전산적 사고(Computational Thinking)"라는 수업을 개설하시길 권해 드립니다. 컴퓨터로 이해하는 각종 알고리즘과 문제 해결 절차 방법론을 배우고, 향후에 어떤 수준의 프로그램을 짜더라도 그쪽을 이해할 수 있는 보편적 능력을 갖는게 중요하기 때문입니다.

    프로그래밍 언어 교육 보다 선행되어야 할 수업 내용으로 미국 초중고에서 CS(전산과학) 입문용 과목까지 광범히 하게 진행되고 있습니다. 아래에는 커리큘럼과 교육용 예제를 자세하게 참고할 수 있습니다. 
    http://www.google.com/edu/computational-thinking/
    http://scratched.media.mit.edu/resources/computational-thinking
    http://www.iste.org/learn/computational-thinking
    http://www.cs.cmu.edu/~CompThink/index.html

    국내에서는 포항공대 황승원 교수님이 2007년에 교양 교과목으로 한번 개설하신 바 있습니다.
    http://www.postech.edu/~swhwang/ct.html
    (FAQ 참조: http://webcache.googleusercontent.com/search?q=cache%3AaFohHRkYWGQJ%3Awww.postech.ac.kr%2F%7Eswhwang%2Fctfaq.hwp )

    전산 사고 훈련을 하다보면 필수적으로 컴퓨터 언어의 구조에 대해 이해하게 되고, 숙제를 위해서 간단한 언어 하나씩은 배울 수 있게 됩니다. 언어는 도구라서 특정하지 말고, 과외 학습으로 문제 풀이를 위한 방법으로 자연스럽게 익히도록 해 주는게 좋겠습니다.

    2. 크리에이티브 엔지니어링(Creative Engineering)
    두번째 교과목은 뭔가를 만들어서 세상에 이바지 해보자는 목적이면 좋을 것 같습니다. 이를 위해서는 아주 쉽게 뭔가를 만들어 볼수 있는 서버 인프라, 프론트, 백엔드, API를 모두 조금씩 활용할 수 있는 가벼운 방법을 사용해 보는게 좋겠습니다.

    추천할 만한 커리큘럼으로 현재 스탠포드대에서 코세라에 개설한 Startup Engineering와 제가 제주대에서 강의했던 클래스를 잘 섞으면 잘 나올 것 같습니다.
    https://www.coursera.org/course/startup
    http://code.google.com/p/web-engineering-class/

    무엇 보다 중요한 것은 자기 전공과 관련된 간단한 아이디어를 직접 구현하는 프로젝트를 병행하게 하는 것일 것 같습니다. 예를 들어, 복지 전공인 경우 자기 지역의 복지시설을 지도에 매핑하는 서비스를 만들어 본다던지, 어문학 전공자라면 간단한 사전 서비스를 만들어 본다던지, 특정 해외 문화에 대한 정보를 제공하는 모바일 페이지라던지요.

    그냥 HTML로 문서를 만드는 게 아니라 간단한 기능을 추가하게 하고, 코드를 github에 공개하고 이를 직접 아마존 웹서비스 같은데 올려 실제 동작하게 하는 것을 해보는 것만으로도 큰 성취감을 얻을 수 있을 것 같네요.

    그 외에 비 전공자로서 더 배우고 싶은 학생들을 위해 심화 트랙을 하나 기본 전산학과나 컴퓨터 광학과에 두어 비전산 전공자를 위한 가벼운 커리큘럼을 운영하시도록 하는게 좋을 듯 합니다. 

    대부분 전산 교육은 MS 오피스나 포토샵 같은 "소프트웨어 도구 활용법"이거나, C/PHP/Java 같은 "프로그래밍 언어 습득"에 한정되는 경우가 많습니다. 전산적 사고를 배우고, 이를 기반으로 자신이 관심이 있는 문제를 해결하는 실용적인 프로그래밍 기술을 가르쳐 준다면, 더 많은 인재들이 IT를 활용한 창조적인 아이디어에 도전할 수 있을 것입니다.


posted by Peter Note
2013. 8. 22. 17:52 Dev Environment/Sublime Text

Sublime Text 2 에서 3 으로 업그레이드를 해보자.


1. 설치 

  - 다운로드 받아서 설치한다


2. Package Control 설정 

  - 수작업으로 해야 한다 (Mac 기준)

  - Git이 필요하다 

  - 우선 Packages로 이동하고 git clone을 통하여 "Package Control"을 다운로드 받는다

// 하기 디렉토리로 이동 

/Library/Application Support/Sublime Text 3/Packages


$ git clone https://github.com/wbond/sublime_package_control.git "Package Control"

Cloning into 'Package Control'...

remote: Counting objects: 2524, done.

remote: Compressing objects: 100% (1005/1005), done.

remote: Total 2524 (delta 1654), reused 2369 (delta 1506)

Receiving objects: 100% (2524/2524), 823.53 KiB | 56.00 KiB/s, done.

Resolving deltas: 100% (1654/1654), done.

  - 터미널에서 sublime text 3 바로 수행할 수 있도록 심볼릭 링크 설정 

// 하기 디렉토리로 이동

/bin


$ sudo ln -s /Applications/Sublime\ Text.app/Contents/SharedSupport/bin/subl subl

$ ls 

lrwxr-xr-x   1 root  wheel       62  8 22 17:42 subl -> /Applications/Sublime Text.app/Contents/SharedSupport/bin/subl


3. 인기 패키지 설치 

  - 많이 사용하는 것들을 Package Control Installer를 이용하여 설치한다 : 인기 10 Top Package

  - 단축키 : command + shift + p  => install 타입핑하면 "Package Control : install package" 문구를 선택함 


<참조>

  - Package Control 설치하기 

posted by Peter Note
2013. 8. 22. 15:36 AngularJS/Concept

AngularJS의 서비스 종류는 여러가지가 있습니다. Factory만 알았다면 Costant, Value, Provider 그리고 서비스의 확장 방법등에 대해 알아보자. "AngularJS Service is an Application Brain"


1. 개념

  - 서비스는 여러 종류가 있다

  - 항시 Singleton 이다. 즉, 하나의 Instance만 존재한다 


2. Constant

  - 공통으로 사용하는 환경값을 지정할 때 상수를 지정한다 

  - 사용자 정의 Directive에서 환경값을 가져다 쓰고 싶을 때 유용하다

// script 

app = angular.module("app", []);


app.controller('MainCtrl', function($scope, fooConfig) {

  $scope.fooConfig = fooConfig;

});


app.constant('fooConfig', {

  config1: true,

  config2: "Default config2"

});


// html

<!DOCTYPE html>

<html ng-app="app">

<head>

<script src="https://ajax.googleapis.com/ajax/libs/angularjs/1.0.7/angular.min.js"></script>

<meta charset=utf-8 />

<title>JS Bin</title>

</head>

  <body ng-controller="MainCtrl">

    config1: {{fooConfig.config1}}

    <br />

    config2: {{fooConfig.config2}}

  </body>

</html>


3. Value

  - Value Service는 Constant Service와 유사하지만 최초 한번은 변경을 할 수 있다. Factory 서비스의 작은 동생뻘이다 

  - Directive에서 사용하기 유용하다 

  - Value를 가지고 계산할 수는 없다 

// script 

app = angular.module("app", []);


app.controller('MainCtrl', function($scope, fooConfig) {

  $scope.fooConfig = fooConfig;

  // 최초 한번의 변경이 가능

  angular.extend(fooConfig, {config3: "I have been extended"}); 

});


app.value('fooConfig', {

  config1: true,

  config2: "Default config2 but it can changes"

});


// html 

<!DOCTYPE html>

<html ng-app="app">

<head>

<script src="https://ajax.googleapis.com/ajax/libs/angularjs/1.0.7/angular.min.js"></script>

<meta charset=utf-8 />

<title>JS Bin</title>

</head>

  <body ng-controller="MainCtrl">

    config1: {{fooConfig.config1}}

    <br />

    config2: {{fooConfig.config2}}

    <br />

    config3: {{fooConfig.config3}}

  </body>

</html>


4. Factory

  - 가장 일반적으로 사용하는 서비스 종류이다 

  - 팩토리는 어떤 형태의 데이터타입이라도 리턴할 수 있다. 리턴된 오브젝트를 가지고 작업을 한다 

  - 단, 리턴된 오브젝트의 값을 변경하면 해당 팩토리의 인스턴스를 사용하는 모든 곳에 변경값이 반영된다 

  - Revealing Module Pattern 식으로 작성을 한다 

// script 

app = angular.module("app", []);

app.controller('MainCtrl', function($scope, foo) {

  $scope.foo = foo;

});


// revealing module pattern 방식의 팩토리 서비스

app.factory('foo', function() {

  var thisIsPrivate = "Private";

  function getPrivate() {

    return thisIsPrivate;

  }

  return {

    variable: "This is public",

    getPrivate: getPrivate

  };

});


// html

<!DOCTYPE html>

<html ng-app="app">

<head>

<script src="https://ajax.googleapis.com/ajax/libs/angularjs/1.0.7/angular.min.js"></script>

<meta charset=utf-8 />

<title>JS Bin</title>

</head>

  <body ng-controller="MainCtrl">

    public variable: {{foo.variable}}

    <br />

    private variable (through getter): {{foo.getPrivate()}}

  </body>

</html>


5. Service 

  - "service" service는 Factory service와 유사사지만 생성자명칭(== 서비스명칭)을 넘기면 자동으로 new를 통하여 생성된다 

    즉, Factory 처럼 오브젝트의 리턴이 필요없다 

  - 하기 예는 완전히 동일하다. 주의 할 것은 factory안에서 또는 service사용시 new을 여러번 하여도 반드시 한번만 인스턴스화 한다

    즉, Singleton 패턴으로 객체 하나만이 생성된다 

// script 

app = angular.module("app", []);


// Service를 통해서 생성 

app.controller('MainCtrl', function($scope, foo) {

  $scope.foo = foo;

});


app.service('foo', function() {

  var thisIsPrivate = "Private";

  this.variable = "This is public";

  this.getPrivate = function() {

    return thisIsPrivate;

  };

});


// Factory를 통해서 생성 : MainCtrl 에서 foo 파라미터 값과 하위 로직을 foo2로 바꿔도 동일 결과 

app.controller('MainCtrl', function($scope, foo2) {

  $scope.foo = foo2;

});


app.factory('foo2', function() {

  return new Foobar();

});


function Foobar() {

  var thisIsPrivate = "Private";

  this.variable = "This is public";

  this.getPrivate = function() {

    return thisIsPrivate;

  };

}


// 또는 펑션을 넘길 수도 있다 : : MainCtrl 에서 foo 파라미터 값과 하위 로직을 foo3로 바꿔도 동일 결과 

app.controller('MainCtrl', function($scope, foo3) {

  $scope.foo = foo3;

});


app.service('foo3', Foobar);


// html 

<!DOCTYPE html>

<html ng-app="app">

<head>

<script src="https://ajax.googleapis.com/ajax/libs/angularjs/1.0.7/angular.min.js"></script>

<meta charset=utf-8 />

<title>JS Bin</title>

</head>

  <body ng-controller="MainCtrl">

    public variable: {{foo.variable}}

    <br />

    private variable (through getter): {{foo.getPrivate()}}

  </body>

</html>


6. Provider

  - Provider는 factory의 큰형님 뻘이다 

  - $get fuction을 가지고 있어야 한다. 만일 Provider 명칭이 foo이고 controller에 inject될 때 실제는 $get function의 결과값이 inject되는 것이다. 왜 factory로 사용하면 간편한데 굳이 이렇게 할까?

  - 이유인즉슨, config function을 통해서 provide에 대한 환경설정을 할 수 있기 때문이다 

  - 예를 보자 

    1) thisIsPrivate 변수가 $get 펑션 밖에 위치한다 

    2) 따라서 setPrivate 메소드를 통하여 thisIsPrivate 변수값을 변경할 수 있다 

    3) 이런게 하는 이유는 우리가 필요로 하는 다양한 환경값을 바꾸어서 환경설정을 하고 싶기 때문이다

    4) Provider명칭이 'foo' 이므로 app.config 에서 'fooProvider' 명을 준다 

// script 

app = angular.module("app", []);

app.controller('MainCtrl', function($scope, foo) {

  $scope.foo = foo;

});


app.provider('foo', function() {

  var thisIsPrivate = "Private";

  return {

    setPrivate: function(newVal) {

      thisIsPrivate = newVal; 

    },


    $get: function() {

      function getPrivate() {

        return thisIsPrivate;

      }


      return {

        variable: "This is public",

        getPrivate: getPrivate

      };

    } 

  };

});


app.config(function(fooProvider) {

  fooProvider.setPrivate('New value from config');

});


// html 

<!DOCTYPE html>

<html ng-app="app">

<head>

<script src="https://ajax.googleapis.com/ajax/libs/angularjs/1.0.7/angular.min.js"></script>

<meta charset=utf-8 />

<title>JS Bin</title>

</head>

  <body ng-controller="MainCtrl">

    public variable: {{foo.variable}}

    <br />

    private variable (through getter): {{foo.getPrivate()}}

  </body>

</html>


7. Decorator (보너스1)

  - 기존 서비스에 새로운 펑션을 넣고 싶을 경우 사용한다

  - 예를 보자 

    1) $provide는 모든 서비스들을 내부적으로 생성할 때 사용한다 

    2) $provide.decorator 를 통해서 서비스를 확장할 수 있다. 

        첫번째 인자는 서비스 명칭, 두번째는 콜백으로 서비스 인스턴스인 $delegate을 받는다 

    3) $delegate에 greet 라는 메소드를 확장 정의 한다 

    4) 만일 3rd party 라이브러리 사용시 확장하고 싶을 경우 decorator를 사용한다 

// script 

app = angular.module("app", []);


app.controller('MainCtrl', function($scope, foo) {

  $scope.foo = foo;

});


app.factory('foo', function() {

  var thisIsPrivate = "Private";

  function getPrivate() {

    return thisIsPrivate;

  }

  return {

    variable: "This is public",

    getPrivate: getPrivate

  };

});


app.config(function($provide) {

  $provide.decorator('foo', function($delegate) {

    $delegate.greet = function() {

      return "Hello, I am a new function of 'foo'";

    };


    return $delegate;

  });

});


// html 

<!DOCTYPE html>

<html ng-app="app">

<head>

<script src="https://ajax.googleapis.com/ajax/libs/angularjs/1.0.7/angular.min.js"></script>

<meta charset=utf-8 />

<title>JS Bin</title>

</head>

  <body ng-controller="MainCtrl">

    public variable: {{foo.variable}}

    <br />

    private variable (through getter): {{foo.getPrivate()}}

    <br />

    greet: {{foo.greet()}}

  </body>

</html>


8. 새로운 인스턴스 생성하기 (보너스2)

  - 팩토리 메소드를 두어서 호출시 마다 무언가 새로 생성하고 싶을 경우 사용한다 

  - 예를 보자 

    1) Function 1급 class인 Person을 만든다 

    2) MainCtrl, SecondCtrl 각각 getById(1) 을 호출하지만 서로 다른 인스턴스가 전달되었다

    3) "Update It" 버튼을 클릭하면 두번째 열만 "Dave - Canada" 로 바뀜을 확인 할 수 있다 

// script 

app = angular.module('app', []);

app.controller('MainCtrl', function($scope, personService) {

  $scope.aPerson = Person.getById(1);

});

app.controller('SecondCtrl', function($scope, personService) {

  $scope.aPerson = Person.getById(1);

  $scope.updateIt = function() {

    $scope.aPerson.update();

  };

});


// Our class

function Person( json ) {

  angular.extend(this, json);

}


Person.prototype = {

  update: function() {

    // Update it (With real code :P)

    this.name = "Dave";

    this.country = "Canada";

  }

};


Person.getById = function( id ) {

  // Do something to fetch a Person by the id

  return new Person({

    name: "Jesus",

    country: "Spain"

  });

};


// Our factory

app.factory('personService', function() {

  return {

    getById: Person.getById

  };

});


// html

<!DOCTYPE html>

<html ng-app="app">

<head>

<script src="https://ajax.googleapis.com/ajax/libs/angularjs/1.0.7/angular.min.js"></script>

<meta charset=utf-8 />

<title>JS Bin</title>

</head>

  <body>

    <p ng-controller="MainCtrl">{{aPerson.name}} - {{aPerson.country}}</p>

    <div ng-controller="SecondCtrl">

      {{aPerson.name}} - {{aPerson.country}}

      <button ng-click="updateIt()">Update it</button>

    </div>

  </body>

</html>

  - 위의 script 코드를 CoffeeScript로 하면 class 표현을 쉽게 할 수 있다 

app.controller 'MainCtrl', ($scope, personService) -> $scope.aPerson = personService.getById(1) app.controller 'SecondCtrl', ($scope, personService) -> $scope.aPerson = personService.getById(2) $scope.updateIt = () -> $scope.aPerson.update() class Person constructor: (json) -> angular.extend @, json update: () -> @name = "Dave" @country = "Canada" @getById: (id) -> new Person name: "Jesus" country: "Spain" app.factory 'personService', () -> { getById: Person.getById 

}


<참조>

  - 원문 : Understanding Service Types

  - 가장 잘 설명된 글 : http://stackoverflow.com/questions/15666048/angular-js-service-vs-provider-vs-factory (강추)

  - 관련글 : GDG Korea WebTech 고재도님 링크

  - AngularJS Creating Service 매뉴얼

  - 이미지 : AngularJS Large Scale Architecture

  - JavaScript에서 객체를 만드는 3가지 방법

  - $provider를 통한 생성

posted by Peter Note
2013. 8. 21. 18:14 AngularJS/Concept

AngularJS를 사용할 때 가장 햇갈리는 부분이면서 중급으로 가기위하여 반드시 알고 넘어가야 하는 부분이 Scope 오브젝트에서 제공하는 $watch, $apply, $digest 메소드이다. 이들에 대해서 알아보자 


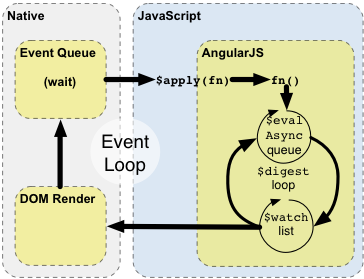
1. Event-Loop와 Angular Way

  - 브라우져는 사용자의 동작에 반응(이벤트)하기 위하여 이벤트 루프를 돌며 이벤트에 반응한다

  - Angular는 "angular context"라는 것을 만들어서 이벤트 루프를 확장한다 


2. $watch 목록

  - UI와 무언가를 바인딩하게 되면 반드시 $watch list(목록)에 $watch를 넣는다 

  - $watch는 모델(model)에 변경이 있는지를 항시 감시하는 역할을 한다

  - user와 pass에 대한 model 변경을 감시하기 위하여 두개의 $watch가 만들어져서 $watch list에 첨부된다 

User: <input type="text" ng-model="user" /> 

Password: <input type="password" ng-model="pass" />

  - $scope에 모델을 두개 만들고, html에서 한개의 model만 사용할 경우는 $watch가 한개만 만들어져서 $watch list에 첨부된다 

// script 

app.controller('MainCtrl', function($scope) { $scope.foo = "Foo"; $scope.world = "World"; });


// html

Hello, {{world}}

  - 배열일 경우 객체의 멤버를 각각 {{}}로 사용했으므로, name 1개, age 1개의 $watch가 만들어 진다. 예로 people 배열이 10개면 

    10 (배열) * 2 (name, age) + 1 (ng-repeat자체) = 총 21개의 $watch가 만들어져서 $watch list에 첨부된다 

// script

app.controller('MainCtrl', function($scope) { $scope.people = [...]; });


// html

<ul>

<li ng-repeat="person in people"> {{person.name}} - {{person.age}} </li> </ul>

  - Directives 만들 때도 바인딩이 있으면 당연히 $watch가 생성된다. 그럼 언제일까? template이 로딩될때 즉, linking 절차일때 필요한 $watcher가 생성된다 


3. $digest loop 

  - 브라우져가 "angular context"에 의하여 관리되어 질 수 있는 이벤트를 받게 될 때, $digest loop 가 작동되어 진다 

  - $digest loop은 두개의 작은 루프로 만들어진다. 하나는 $evalAsync queue를 처리하고, 다른 하나는 $watch list를 처리한다 

  - 처리되어지는 것은 무엇일까? 

    $digest는 $watch list를 루핑돌면서 model 변경을 체크하고, $watch에 등록된 listener handler를 수행한다

  - 이때 dirty-checking이 이루어지는데, 하나가 변경되면 모든 $watch를 루핑돌고 다시 체크해 보고 변화가 없을 때가지 루핑을 돈다

    그러나 무한 루프를 방지하기 위하여 기본적으로 최대 10번의 루핑을 돈다.  

    그리고 나서 $digest loop가 끝났을 때 DOM을 업데이트 한다. (즉, 변경감지시 즉시 DOM 반영이 아닌 Loop끝났을 때 반영함) 

  - 예를 보자. 

    1) $watch를 하나 가진다. ng-click의 경우는 클릭하면 펑션이 수행되므로 변화가 발생하지 않기 때문에 {{ name}}에 대해 1개만 생성

    2) 버튼을 클릭한다

    3) 브라우져는 "angular context"로 들어가서 처리될 이벤트를 받는다 

    4) $digest loop 가 수행되고, 변경을 체크하기 위하여 $watch에게 문의를 한다 

    5) $watch는 $scope.name에 변경이 있으면 변경을 보고한다. 그러면 다시 한번 $digest loop가 강제 수행된다

    6) $digest loop 돌면서 더 이상 변경된 것이 없다

    7) 브라우져는 통제권을 돌려받고 $scope.name 변경값을 반영하기 위하여 DOM을 업데이트 한다 


    여기서 중요한 것은 "angular context" 안으로 들어간 모든 이벤트는 $digest loop를 수행한다 는 것이다. 

    즉, 예로 input에 write하는 매번, 모든 $watch를 돌면서 변경을 체크하는 루프가 수행되는 것이다 

// script

app.controller('MainCtrl', function() { $scope.name = "Foo"; $scope.changeFoo = function() { $scope.name = "Bar"; } });


// html

{{ name }} <button ng-click="changeFoo()">Change the name</button>


4. $apply를 통하여 angular context로 들어가기 

  - 이벤트가 발생할 때 $apply를 호출하게 되면, 이벤트는 "angular context"로 들어가게 된다 

  - 그런데 $apply를 호출하지 않으면 "angular context" 밖에서 이벤트는 수행하게 된다 

  - 기존 ng-click 같은 이미 만들어져 있는 Directive들은 이벤트를 $apply 안에 랩핑한다. 

     또는 ng-model="foo"가 있다면 'f'를 입력하면 $apply("foo='f';")식으로 랩핑하여 호출한다  


5. Angular는 우리를 위해 자동으로 $apply를 호출해 주지 않는다 

  - jQuery의 예를 보면 jQuery 플러그인에서 이벤트에 대해 $apply가 호출되지 않기 때문에 발생한 이벤트는 "angular context"로 못들어가게 되므로 "$digest loop"도 수행되지 않게 된다. 결국 DOM의 변경이 발생하지 않는다 

  - 예를 보자 : <clickable> 앨리먼트를 클릭할 때마다 foo, bar 값이 1씩 증가하는 Directive이다 

     1) 클릭을 해보면 1씩 증가를 할까?  증가 하지 않는다 

     2) click 이벤트는 공통 이벤트이고 $apply로 감싸(랩핑)지지 않았기 때문이다 

     3) 결국 "angular context"에 못들어가니 "$digest loop"가 수행되지 않으니 $watch도 수행되지 않기 때문에 DOM 변경은 없다. 

         단, Click을 하게 되면 값은 1씩 증가한다. 즉 $scope값 변경이 DOM에 반영되지 않는다

app = angular.module('app', []); app.controller('MainCtrl', function($scope) { $scope.foo = 0; $scope.bar = 0; $scope.hello = "Hello"; $scope.setHello = function() { $scope.hello = "World"; }; });

app.directive('clickable', function() { return { restrict: "E", scope: { foo: '=', bar: '=' }, template: '<ul style="background-color: lightblue"><li>{{foo}}</li><li>{{bar}}</li></ul>', link: function(scope, element, attrs) { element.bind('click', function() { scope.foo++; scope.bar++; }); } } });

  - 예제 : http://jsbin.com/opimat/2/edit 를 보자 


    1) <clickable> 파란색 영역을 2번 클릭하면 숫자값의 변경에 대해서 DOM에 반영되지 않는다. 즉, 화면은 그대로 0 이다

    2) <button>의 ng-click을 하게되면 setHello()가 호출되고 자동으로 $apply에 감싸서 수행된다

    3) 이벤트가 "angular context"로 들어가면 "$digest loop"가 수행되면서 모든 "$watch list"를 돌면서 변경을 체크한다

    4) 변경된 값이 있다면 DOM을 업데이트 하므로 <clickable>의 foo, bar값이 현재 2번 클릭하여 2이므로 DOM으로 2로 변경한다 

<script src="https://ajax.googleapis.com/ajax/libs/angularjs/1.0.7/angular.min.js"></script>

<meta charset=utf-8 />

<title>Directive example</title>

</head>

<body ng-controller="MainCtrl">

  <clickable foo="foo" bar="bar"></clickable>

  <hr />


  {{ hello }} <button ng-click="setHello()">Change hello</button>

</body>

</html>


  - 이벤트를 "angular context"로 들어가서 처리하게 해주는 방법-1

    이벤트 안에서 $apply()를 호출한다 

    $apply는 $scope(또는 Directive link의 scope)의 메소드이다. 따라서 $apply를 호출하여 "$digest loop"를 강제로 수행시킨다. 

element.bind('click', function() { scope.foo++; scope.bar++; scope.$apply(); 

});


  - 이벤트를 "angular context"로 들어가서 처리하게 해주는 방법-2

    여기서는 단순 값의 증가이지만 내부적으로 서버요청하다 에러가 발생하면 "방법-1"에서는 "angular context"가 전혀 에러를 알 수 없다

    방법-2처럼 감싸서(Wrapped) 사용해야 에러가 발생하면 "angular context"가 알 수 있도록 대응을 할 수 있다 

element.bind('click', function() { scope.$apply(function() { scope.foo++; scope.bar++; }); 

})


  - jQuery 플로그인을 사용하면 $apply 호출을 통해 "$digest loop"가 수행시켜 DOM 업데이트를 할 수 있다 


6. 우리 것은 $watch를 사용하자 

  - 우리의 모든 바인딩은 DOM 업데이트를 위하여 각각 $watch를 생성한다는 것을 알고 있다. 

     우리가 직접 $watch를 만들고 싶다면 어떨까?

  - 예를 보자

    1) $watch 첫번째 인자는 String, function이 가능하다. 여러개 모델 감시는 ; 로 구분한다 

    2) 두번째 인자는 첫번째 인자의 값이 변경되면 수행될 Handler 이다 

    3) 여기서는 <input>의 값을 변경할 때마다 updated 값이 1씩증가하여 {{updated}}에 값이 반영된다. 즉, DOM이 업데이트 된다

    4) View에서 값이 변경되어 Controller가 수행될 때 $watch를 발견하게 되고 바로 $watch가 수행된다.

// script 

app.controller('MainCtrl', function($scope) { $scope.name = "Angular"; $scope.updated = -1; $scope.$watch('name', function() { $scope.updated++; }); });


// html

<body ng-controller="MainCtrl">

<input ng-model="name" /> Name updated: {{updated}} times. </body>

    5) Controller가 수행되면서 $watch가 무조건 수행되는 것을 막기 위한 방법으로 두번째 인자 펑션의 파라미터 값으로 new, old 값을 받아 비교한다. 즉 최초에는 수행되지 않게 된다

$scope.$watch('name', function(newValue, oldValue) { if (newValue === oldValue) { return; } // AKA first run $scope.updated++

});

   6) 만일 값변경을 체크하는 것이 Object일 경우는 $watch의 3번째 인자값으로 true를 준다. 즉, Object의 비교를 수행도록 한다

app.controller('MainCtrl', function($scope) {

$scope.user = { name: "Fox" }; $scope.updated = 0; $scope.$watch('user', function(newValue, oldValue) { if (newValue === oldValue) { return; } $scope.updated++; }, true); });


주의할 점은 한 페이지에 $digest loop를 돌면서 체크하는 $watch가 2000~3000개 정도 생성되는 경우라면 성능상에 이슈가 있겠지만, 일반적인 경우 dirty-checking 하는 $digest loop은 상당히 빠르다


<참조>

  - 원문 : Watch how the apply runs a digest

  - 불필요한 $watch 제거하여 성능향상 시키기

  - AngularJS Concept 중에서

# Runtime 

The diagram and the example below describe how Angular interacts with the browser's event loop. 


일반적인 세상)

1. The browser's event-loop waits for an event to arrive. An event is a user interaction, timer event, or network event (response from a server). 

2. The event's callback gets executed. This enters the JavaScript context. The callback can modify the DOM structure. 

3. Once the callback executes, the browser leaves the JavaScript context and re-renders the view based on DOM changes. 


앵귤러 세상)

Angular modifies the normal JavaScript flow by providing its own event processing loop. This splits the JavaScript into classical and Angular execution context. Only operations which are applied in Angular execution context will benefit from Angular data-binding, exception handling, property watching, etc... You can also use $apply() to enter Angular execution context from JavaScript. Keep in mind that in most places (controllers, services) $apply has already been called for you by the directive which is handling the event. An explicit call to $apply is needed only when implementing custom event callbacks, or when working with third-party library callbacks. 


1. Enter Angular execution context by calling scope.$apply(stimulusFn). Where stimulusFn is the work you wish to do in Angular execution context. 

2. Angular executes the stimulusFn(), which typically modifies application state. 

3. Angular enters the $digest loop. The loop is made up of two smaller loops which process $evalAsync queue and the $watch list. The $digest loop keeps iterating until the model stabilizes, which means that the $evalAsync queue is empty and the $watch list does not detect any changes. 

4. The $evalAsync queue is used to schedule work which needs to occur outside of current stack frame, but before the browser's view render. This is usually done with setTimeout(0), but the setTimeout(0) approach suffers from slowness and may cause view flickering since the browser renders the view after each event. 

5. The $watch list is a set of expressions which may have changed since last iteration. If a change is detected then the $watch function is called which typically updates the DOM with the new value. 

6. Once the Angular $digest loop finishes the execution leaves the Angular and JavaScript context. This is followed by the browser re-rendering the DOM to reflect any changes. H


예)

ere is the explanation of how the Hello world example achieves the data-binding effect when the user enters text into the text field. 

1. During the compilation phase: 

    1. the ng-model and input directive set up a keydown listener on the <input> control. 

    2. the {{name}}interpolation sets up a $watch to be notified of name changes. 

2. During the runtime phase: 

    1. Pressing an 'X' key causes the browser to emit a keydown event on the input control. 

    2. The input directive captures the change to the input's value and calls $apply("name = 'X';") to update the application model inside the Angular execution context. 

    3. Angular applies the name = 'X'; to the model. 

    4. The $digest loop begins 

    5. The $watch list detects a change on the name property and notifies the {{name}} interpolation, which in turn updates the DOM. 

    6. Angular exits the execution context, which in turn exits the keydown event and with it the JavaScript execution context. 

    7. The browser re-renders the view with update text.


posted by Peter Note
2013. 8. 21. 11:41 AngularJS/Concept

AngularJS에 대해 어떻게 생각하시나요? 그냥 webpage를 만드는 Front-end 단의 JavaScript Framework 정도로 생각하시나요? AngularJS는 클라이언트의 브라우져에서 SPA(Single Page Application)를 구현하기 위한 프레임워크입니다. Webpage를 만드는 것이 아니라 SPA의 A처럼 애플리케이션을 만드는 프레임워크라는 것이지죠. Adobe의 Flex 프레임워크와 대비하여 생각해도 되지 않을까 합니다. AngularJS로 개발한다면 새로운 관점에서 바라보아야 합니다. Angular Way의 길에 들어오세요


1. 페이지를 디자인 하지 말고 DOM(Document Object Model) 조작을 통해 페이지를 변경하라 

  - "나는 몇개의 DOM 조각을 가지고 있다 이것을 가지고 뭔가 동작하는 것을 만들고 싶다"라는 생각에서 AngularJS는 출발한다 

  - 완성하고 싶은 것이 있으면 애플리케이션 아키텍쳐 디자인을 한 다음 마지막에 화면 디자인을 한다 


2. AngularJS 와 함께 jQuery 에 대해서 말하지 마라 

  - AngularJS를 사용하면 jQuery 를 바탕으로 개발하는 것은 배제하길 바란다. Angular Way를 가라~~

  - jQuery 플러그인을 AngularJS에서 사용하기 위해 $apply를 남발하여 코드를 꼬아 놓지 말자. jQuery 플러그인 대부분은 약간의 코드조각으로 AngularJS에서 재작성되어 질 수 있다 (Directive로 만들어서 사용하기)


3. 아키텍쳐라는 단어를 항상 생각하라

  - SPA (Sinlge Page Application)는 application 이다. webpage가 아니다. 서버사이드 개발과 똑같이 생각하라

  - 따라서 모듈화 하고 확장성 있고 테스트 가능하게 개발해야 한다 


3-1. 화면은 공식적으로 표현되는 것 

  - jQuery 경우를 보자 

<ul class="main-menu">
    <li class="active">
        <a href="#/home">Home</a>
    </li>
    <li>
        <a href="#/menu1">Menu 1</a>
        <ul>
            <li><a href="#/sm1">Submenu 1</a></li>
            <li><a href="#/sm2">Submenu 2</a></li>
            <li><a href="#/sm3">Submenu 3</a></li>
        </ul>
    </li>
    <li>
        <a href="#/home">Menu 2</a>
    </li> 

</ul>


// JavaScript 

$('.main-menu').dropdownMenu();

  - 위의 경우를 단순한 AngularJS의 Directive로 표현한다. 이렇게 하면 jQuery처럼 HTML과 Javascript를 분리할 필요가 없고 해당 <ul> HTML 태그가 dropdown-menu임을 바로 알 수 있다.  

<ul class="main-menu" dropdown-menu>
    ... 

</ul>

  - 애플리케이션 개발시 반은 jQuery 반은 AngularJS 스타일로 - half jQuery, half AngularJS - 절대로 절대로 개발하지 말라

  - 디자인을 하지 말고, Markup을 해라. 즉, 아키텍쳐링을 하고 그 다음에 디자인을 하라. 


3-2. Data Binding

  - DOM을 조작(첨부,삭제)하는데 있어서 Two Way Binding을 적극적으로 사용하라 

  - jQuery 의 경우를 보자 : append하고 delete 하는 조작들을 넣어야 한다. 

$.ajax({
  url: '/myEndpoint.json',
  success: function ( data, status ) {
    $('ul#log').append('<li>Data Received!</li>');
  

});

<ul class="messages" id="log"</ul>

  - AngularJS 를 보자 : $scope를 통하여 controller와 view 간의 데이터가 삭제 되거나 첨부되는 것을 보다 쉽고 깔끔하게 처리해 준다

// controller 코드
$http( '/myEndpoint.json' ).then( function ( response ) {
    $scope.log.push( { msg: 'Data Received!' } ); 

});


// html 코드 

<div class="messages">
    <div class="alert" ng-repeat="entry in log">
        {{ entry.msg }}
    </div> 

</div>


3-3. 모델객체와 화면과 분리되어 있다

  - $scope를 통하여 view와 controller간 모델역할을 수행한다 

  - 이 방법은 view와 완전 독립적이어서 separation of concern을 유지하고 테스트 가능하게 만들준다


3-4. 관심의 분리 (SoC, separation of concern)

  - 아키텍쳐링을 하여 개발하면 관심 영역별로 분리하여 유지할 수 있다

  - 화면(view)은 공식적인 표현되는 것이고, 모델(model)은 데이터를 대표하며, 업무를 수행하는 서비스를 갖게된다 

  - 이것은 3-5에서 이야기하는 DI와도 연관이 있다 


3-5. 의존성 주입 (DI, Dependency Injection)

  - 코드안의 하드코딩된 부분을 제거하고 의존관계에 있는 모듈을 다양한 방법으로 전달해 준다

  - AngularJS에서는 펑션의 파라미터로 넘겨준다. 이를 통해 테스트시에 서버를 직접 호출할 필요없이 필요한 목서비스(mock service)를 전달하여 테스트를 할 수도 있다 


4. 항시 TDD 하라 

  - Test Driven Development 를 수행하라

  - jQuery로 테스트 할 때는 항시 테스트 화면을 만들어 해야 제대로 된 테스트 수행이 가능해진다. 그러나 AngularJS는 그렇지 않다

  - 내부에 사용되는 기능을 모듈로 분리해 개발하고 DOM조작에 대해서 테스트하고 애플리케이션과 통합할 수가 있기 때문이다 

  - 그것은 관심의 분리(SoC) 방식으로 개발하기 때문에 TDD가 AngularJS에서 가능한 것이다 

  - 예를 보자 

// HTML : when-active라는 AngularJS Directive(지시자)

<a href="/hello" when-active>Hello</a>

// Test Script : Karma를 보자. DOM을 조작하여 화면을 이동시킨 후 true, false인지 체크한다 

it( 'should add "active" when the route changes', inject(function() {
    var elm = $compile( '<a href="/hello" when-active>Hello</a>' )( $scope );

    $location.path('/not-matching');
    expect( elm.hasClass('active') ).toBeFalsey();

    $location.path( '/hello' );
    expect( elm.hasClass('active') ).toBeTruthy();
}));


// Script : 정상적으로 라우팅이 되면 active class 첨부, 아니면 삭제 

.directive( 'whenActive', function ( $location ) {
    return {
        scope: true,
        link: function ( scope, element, attrs ) {
            scope.$on( '$routeChangeSuccess', function () {
                if ( $location.path() == element.attr( 'href' ) ) {
                    element.addClass( 'active' );
                }
                else {
                    element.removeClass( 'active' );
                }
            });
        }
    };
});


5. Directive(지시자)는 패키징된 jQuery가 아니다 

  - Directive안에서 DOM 조작을 하라. 하지만 jQuery 스타일은 배제하라 

  - Directive는 template을 가지고 있는 widget과 유사하다. 이를 통해 SoC를 보여주고 있고, 테스트를 가능하게 한다 

  - jQuery 스타일의 버튼토글 코딩을 보자 : AngularJS Directive안에 아래와 같이 jQuery 스타일의 DOM 조작을 수행하지 말라

.directive( 'myDirective', function () {
    return {
        template: '<a class="btn">Toggle me!</a>',
        link: function ( scope, element, attrs ) {
            var on = false;

            $(element).click( function () {
                if ( on ) {
                    $(element).removeClass( 'active' );
                }
                else {
                    $(element).addClass( 'active' );
                }

                on = !on;
            });
        }
    }; 

});

  - Angular Way 방식의 버튼코글 : ng-show, ng-class, ng-binding 과 같은 Directive를 통해 DOM 조작을 수행하라  

.directive( 'myDirective', function () {
    return {
        scope: true,
        template: '<a class="btn" ng-class="{active: on}" ng-click="toggle()">Toggle me!</a>',
        link: function ( scope, element, attrs ) {
            scope.on = false;
            scope.toggle = function () {
                scope.on = !$scope.on;
            };
        }
    }; });

  - Directive는 jQuery같은 펑션의 집합이 아니다. Directive는 HTML의 확장이다. 이는 HTML안에 우리가 수행하고 싶은 무언가를 넣고 싶은데 못 할 경우에 Directive를 만들어야 하는 것이다. 그래서 HTML의 일부로서 사용하는 것이다. 


Angular Way에서 jQuery 방식을 사용하지 말고 포함조차 시키지 말아라. 


- View  === AngularJS의 Directive가 포함된 HTML이다 

- Model === $scope를 통하여 Controller에서 Two way binding을 자동 수행한다 

- View와 Controller를 통하여 표현과 행위를 분리한다 (SoC)

- AngularJS 애플리케이션 접근법

   Step 1) Model을 먼저 생각하고 Service를 만든다

   Step 2) Model이 표현될 View에 대해 생각해 보고 template을 만들고, 필요하면 자동 모델 바인딩되는 Directive도 만든다.

   Step 3) 각 View 를 Controller에 연결한다 (ng-view and routing, ng-controller)


<참조>

  - 원문 : Think in AngularJS

  - AngularJS의 상속에 대한 이해 (그림포함)

posted by Peter Note
2013. 8. 20. 17:32 AngularJS/Prototyping

iCheck 플러그인은 HTML input의 type이 Checkbox나 Radio 의 모양을 UX 입장에서 직관적으로 만들어 준다. AngularJS하에서 이런 JQuery Plugin을 사용하려면 Directive(지시자) 화하여 사용해야 하는데 어떻게 만드는지 알아보자 


1. Directive 만드는 형식 

  - 사용하려는 HTML 안에서 

<div directiveName ></div>

<script type="text/javascript" src="pluginName.js"></script>


  - AngularJS Directive(지시자) 만들기

    + pluginActivationFunction은 플러그인의 호출하는 펑션이다. 

    + scope.$eval 은 플러그인의 환경값을 넣어주면 된다 

App.directive('directiveName', function() {

    return {

        restrict: 'A',

        link: function(scope, element, attrs) {

            $(element).'pluginActivationFunction'(scope.$eval(attrs.directiveName));

        }

    };

}); 


2. iCheck Directive 만들기 

  - ng-app 모듈에 Directive를 만든다 

    + Radio 박스 선택에 따른 부가화면을 show하거나 hidden 하는 처리를 한다  

    + Attribute로 ngIcheck 지시자를 만들었다. (HTML에서는 ng-icheck 로 사용된다)

    + ifChecked의 iCheck 이벤트를 받았다. iCheck의 Radio를 사용하면서 AngularJS의 Radio 이벤트를 받을 수 없게 되었기 때문이다 

    + Radio의 attribute로 value="file" or "direct" 라는 두개의 Radio 선택 옵션을 주었다. 

    + AngularJS Context안에서 $scope의 값 변경을 인식하기 위하여 $scope.$apply()를 iCheck.on listener의 핸들러 펑션에 호출함.

    + $(element).iCheck(<환경값>); 의 plugin 초기화 펑션을 호출해 주었다 

.directive('ngIcheck', function() {

   return {

       restrict: 'A',

       controller: function($scope, $element) { 

        $element.on('ifChecked', function(event){

 if(event.target.value === 'file') {

  $scope.isFile = true;

  $scope.isDirect = false;

  $scope.$apply();

 } else if(event.target.value === 'direct') {

  $scope.isDirect = true;

  $scope.isFile = false;

  $scope.$apply();

 } else {

  $scope.isFile = false;

  $scope.isDirect = false;

  $scope.$apply();

 }

});

       },

       link: function(scope, element, attrs) {

           $(element).iCheck({

        checkboxClass: 'icheckbox_square-blue', 

        radioClass: 'iradio_square-blue', 

        increaseArea: '20%' 

       });

       }

   };

});


// 중요)

// iCheck를 AngularJS의 Directive로 하지 않고 사용하려면 HTML하단에 해당 script를 넣어준다

// 이렇게 하면 Radio 버튼의 이벤트가 AngularJS Context안에서 작동하지 않기 때문에 AngularJS의 기능을 사용할 수 없다 

// 결국 이렇게 사용하지 않기 위해선 JQuery Plugin을 AngularJS Directive로 만들어 AngularJS Context에서 돌아가게 해주는 것이다

<script>

$(document).ready(function(){

  $('input').iCheck({

    checkboxClass: 'icheckbox_square-blue',

    radioClass: 'iradio_square-blue',

    increaseArea: '20%'

  });

});

</script>


  - HTML에서 사용하기 

    + <input type="radio" name="iCheck" .../> : 여기까지는 iCheck에서 사용함 

    + <input ... value="file" ng-icheck> : AngularJS에서 사용. ng-icheck Attribute를 만다면 AngularJS가 컴파일하고 link하고 이벤트 반응에 대하여 controller에서 처리한다 

    + Radio의 선택에 따라서 ng-show="isFile", ng-show="isDirect"에 따라서 해당 div가 show, hidden 되어 진다 

  <table id="maForm" class="table table-striped table-bordered">

      <thead>

        <tr>

          <th width="25%"><i class="icon-check-sign icon-small"></i> Options</th>

          <th width="75%" class="not-for-mobile"><i class="icon-edit icon-small"></i> Insert Data</th>

        </tr>

      </thead>

      <tbody>

        <tr>

          <td>

            <label>Select Input Method</label> <br>

            <table class="table table-condensed">

              <tr class="active">

                  <td><input type="radio" name="iCheck" value="file" ng-icheck /></td>

                  <td>Upload File</td>

              </tr>

              <tr class="active">

                  <td><input type="radio" name="iCheck" value="direct" ng-icheck /></td>

                  <td>Input Direct</td>

              </tr>

            </table>

          </td>

          <td>

          <!-- input direct data -->

          <div ng-show="isDirect">

  <textarea ng-model="ma.direct" class="form-control" rows="12"></textarea>

  </div>

  <!-- upload file such as .csv -->

  <div ng-show="isFile">

                  <input id="fileupload" ng-model="ma.file" type="file" name="files[]" multiple>

  </div>

          </td>

        </tr>

        <tr>

      <td colspan="2">

  <i class="icon-bar-chart icon-small"></i> Moving Average Chart<br>

  <img src="http://www.placehold.it/880x300/EFEFEF/AAAAAA&amp;text=no+image">

      </td>

        </tr>

      </tbody>

    </table>


  - 결과 : 선택하는 옵션 박스가 iCheck 플러그인을 통하여 좀 더 직관적으로 나오게 되었다

    + 단순한 Radio 옵션


    + 변경된 iCheck Radio 옵션


<참조> 

  - Correct way to integrate JQuery Plugins in AngularJS 

  - How to convert a jQuery plugin to AngularJS Directive : 유튜브 동영상

  - Directive의 $watch 와 $apply 완벽 이해 : $apply, $digest, $watch 에 대한 상세 설명

  - Thinking in AngularJS : Angular Way 

  - SlideJS Plugins을 Directive로 만드는 유사한 예제

'AngularJS > Prototyping' 카테고리의 다른 글

[AngularJS] Twitter Search 만들기  (0) 2013.04.05
[AngularJS] Todo 목록 만들기  (0) 2013.04.05
[AngularJS] Hello World 만들기  (0) 2013.04.04
posted by Peter Note
2013. 8. 14. 14:32 NodeJS/Modules

Node.js 프로젝트에서 사용된 자신의 모듈을 공유하고 싶다면 NPM Regsitry를 이용하면 된다. Publis Registry에 등록하고 사용하는 방법에 대해 알아보자 


1. NPM Registry

  - NPM Registry는 누구나 Node.js에서 사용할 수 있는 모듈을 일정한 양식만 갖춘다면 등록할 수 있고,  

    npm 명령을 통하여 Module Registry 에서 필요한 모듈을 설치할 수 있다

  - 홈페이지 : https://npmjs.org/

  - 홈페이지에서 계정을 미리 생성해 놓자 : 자신이 등록한 모듈 목록을 볼 수 있다


2. 배포전 준비하기 

  - .npmignore 파일 : npm 저장소에 배포하지 않을 것들에 대해 열거한다. 해당 파일이 없을 경우 .gitignore를 사용한다 

// .gitignore 내역 

.DS_Store

.git*

node_modules/

  - 모듈이 이미 GitHub에 등록되고 npm init을 통하여 package.json 파일 내역이 정확히 장성되었음을 가정한다 (참조)

// package.json 내역 

// 주의)

// npm init으로 해당 파일 생성시 engines 내역은 포함되지 않는 관계로 사용하는 Node.js 버전을 명시하여 준다 

// name : 값은 대문자와 띄워쓰기 없이 소문자로 이어서 작성한다 

// version : semantic versioning을 사용한다 major.minor.patch

// main : 프로그램 진입점

// test : 테스트 프로그램 수행 스크립트 명령 (npm test)

{

  "name": "mobiconstatistics",

  "version": "0.0.1",

  "description": "include statistics function such as the moving average",

  "main": "./lib/mobiconStatistics.js",

  "engines": { "node": ">= 0.10.0" }, 

  "dependencies": {

    "underscore": "~1.5.1"

  },

  "devDependencies": { 

    "mocha": "latest",

    "should": "~1.2.2"

  },

  "scripts": {

    "test": "mocha test/*.js"

  },

  "repository": {

    "type": "git",

    "url": "https://github.com/ysyun/mobiconStatistics.git"

  },

  "keywords": [

    "mobicon",

    "statistics",

    "movingAverage"

  ],

  "author": "yun youngsik",

  "license": "MIT",

  "bugs": {

    "url": "https://github.com/ysyun/mobiconStatistics/issues"

  }

}


3. 배포하기 

  - https://www.npmjs.org/ 사이트에 가입을 한다.

  - 모듈 디렉토리로 이동하고 사용자를 추가합니다 : npm adduser 

  - 가입했던 username과 password등을 입력하면 된다.

Users/development/node-modules/mobiconStatistics> npm adduser

Username: (ysyun)

Password: 

Email: 

  - 모듈 배포전 npm install이 잘 되는지 테스트 합니다 

    test 폴더를 하나 만들어서 기존에 만든 모듈을 install 해봅니다. test 폴더에 node_modules/mobiconstatistics 모듈을 설치되면 성공!

/Users/development/node-modules/mobiconStatistics> mkdir ../mobiconStatistics-installTest

/Users/development/node-modules/mobiconStatistics> cd ../mobiconStatistics-installTest

/Users/development/node-modules/mobiconStatistics-installTest> npm install ../mobiconStatistics

npm http GET https://registry.npmjs.org/underscore

npm http 304 https://registry.npmjs.org/underscore

mobiconstatistics@0.0.1 node_modules/mobiconstatistics

└── underscore@1.5.1


/Users//development/node-modules/mobiconStatistics-installTest/node_modules/mobiconstatistics> ls

-rw-r--r--  1   staff  1096  8 13 17:09 LICENSE

drwxr-xr-x  3   staff   102  8 13 17:31 test

drwxr-xr-x  3   staff   102  8 13 17:41 lib

-rw-r--r--  1   staff    49  8 14 11:26 .travis.yml

-rw-r--r--  1   staff   904  8 14 11:34 README.md

-rw-r--r--  1   staff  1881  8 14 14:19 package.json

drwxr-xr-x  3   staff   102  8 14 14:19 node_modules

  - 모듈을 배포합니다 : npm publish

Users//development/node-modules/mobiconStatistics> npm publish                          

npm http PUT https://registry.npmjs.org/mobiconstatistics

npm http 201 https://registry.npmjs.org/mobiconstatistics

npm http GET https://registry.npmjs.org/mobiconstatistics

npm http 200 https://registry.npmjs.org/mobiconstatistics

npm http PUT https://registry.npmjs.org/mobiconstatistics/-/mobiconstatistics-0.0.1.tgz/-rev/1-b8e34dc09489f8c4c9ece305d250264a

npm http 201 https://registry.npmjs.org/mobiconstatistics/-/mobiconstatistics-0.0.1.tgz/-rev/1-b8e34dc09489f8c4c9ece305d250264a

npm http PUT https://registry.npmjs.org/mobiconstatistics/0.0.1/-tag/latest

npm http 201 https://registry.npmjs.org/mobiconstatistics/0.0.1/-tag/latest

+ mobiconstatistics@0.0.1

  - 모듈이 잘 배포되었는지 확인합니다 : http://npmjs.org/package/<모듈명>

    예) https://npmjs.org/package/mobiconstatistics


4. 모듈 사용하기 

  - 이제 npm registry로 자신의 모듈이 배포되었으므로 프로젝트에 첨부하여 사용할 수 있게 되었습니다. 

// mobiconstatistics 모듈 추가하기 

/Users/development/smart-solutions/SmartStatistics> npm install mobiconstatistics --save

npm http GET https://registry.npmjs.org/mobiconstatistics

npm http 200 https://registry.npmjs.org/mobiconstatistics

mobiconstatistics@0.0.1 node_modules/mobiconstatistics


// 프로젝트의 package.json에 mobiconstatistics 모듈 추가

/Users/development/smart-solutions/SmartStatistics> cat package.json

{

  "name": "smartstatistics",

  "version": "0.0.0",

  "dependencies": {

    "sails": "0.8.9",

    "express": "~3.2.6",

    "ejs": "~0.8.4",

    "underscore": "~1.5.1",

    "mobiconstatistics": "0.0.1"

  },

  - 트위터에서 npm registry에 배포된 모듈중 괜찮은 것들을 정리하여 트윗을 해준다 : @nodenpm


<참조>

  - Node.js 소개 in opentutorial

  - npm 이란? 

  - Node Module NPM Registry 등록하기

  - npm developer 가이드

posted by Peter Note
2013. 8. 14. 09:16 CI/Jenkins, Travis

로컬 프로그램을 GitHub에 push하고 테스트 프로그램을 작성하였다면 이제 자동화 통합 빌드 툴인 Travis와 연동하고, 빌드의 결과를 GitHub에 표시하는 방법에 대해서 알아본다 


1. 사전 준비사항

  - 소스의 root에 .travis.yml 파일을 생성하고 환경값을 작성한다 

  - Node.js에 대하여 환경값을 작성해 본다 

// .travis.yml 내역 

language: node_js

node_js:

  - "0.11"

  - "0.10"

  - "0.8"

  - GitHub에 설정된 모습 : GitHub .travis.yml 참조


  - Travis의 default test 명령은 "npm test" 이므로 package.json파일안에 test 명령 script를 작성한다

    (package.json은 "npm init" 명령으로 만든다)

// package.json 내역 

{

  "name": "mobiconStatistics",

  "version": "0.0.1",

  "description": "include statistics function such as the moving average",

  "main": "./lib/mobiconStatistics.js",

  "dependencies": {

    "underscore": "~1.5.1"

  },

  "devDependencies": { 

    "mocha": "latest",

    "should": "~1.2.2"

  },

  "scripts": {

    "test": "mocha test/*.js"

  },

  "repository": {

    "type": "git",

    "url": "https://github.com/ysyun/mobiconStatistics.git"

  },

  "keywords": [

    "mobicon",

    "statistics",

    "movingAverage"

  ],

  "author": "yun youngsik",

  "license": "MIT",

  "bugs": {

    "url": "https://github.com/ysyun/mobiconStatistics/issues"

  }

}


2. GitHub 저장소 환경 설정

  - 저장소에 .travis.yml 파일이 존재한다면 이제 해당 저장소를 접근하기 위한 환경을 설정한다 

  - GitHub의 저장소의 우측 밑에 보면 설정 아이콘을 클릭한다 


  - 다음 화면 좌측 메뉴에서 "Service Hooks"을 선택한다 


  - Service Hooks 화면밑으로 내려오면 "Travis"가 존재하고 선택한다


  - Travis를 선택하면 우측으로 입력과 선택 폼이 나오는데 "Active"를 체크하고 "Update Settings"를 클릭한다 


  - GitHub에서의 설정작업은 이제 끝났다. Travis 설정 참조 문구 내역

Travis CI is a distributed build platform for the open source community.

By enabling this hook, Travis CI will listen to push and pull request events to trigger new builds, member and public events to keep track of repository visibility and issue comment events to allow users to talk to @travisbot.

Install Notes

We recommend using the Travis profile page at http://travis-ci.org/profile to manage your hooks.

  1. Create an account at http://travis-ci.org (you can sign in with GitHub)
  2. Enter your credentials
    • The token which you can find on the Travis profile page
    • optional: Enter the username who the Travis token belongs to (defaults to the repository owner)
    • optional: Enter the host of your Travis installation (defaults tohttp://notify.travis-ci.org), the protocol-prefix is optional and defaults to "http://".
  3. Make sure the "Active" checkbox is ticked, and click "Update Settings".
  4. Click on the "Travis" service name and then click the "Test Hook" link.
  5. You should receive an email from Travis once the build has completed

For more details about Travis, go to http://about.travis-ci.org/docs/


3. Travis CI 환경 설정 

  - https://travis-ci.org/ 로 와서 자신의 GitHub 계정으로 로그인을 한다 

  - https://travis-ci.org/profile 로 들어오면 자신의 계정에 Create, Fork한 저장소 목록을 볼 수 있다 


 - 저장소 목록의 우측을 보면 "ON/OFF" 스위치가 있다. Travis CI를 원하는 저장소를 "ON" 시킨다 


 - https://travis-ci.org/ 로 다시 들어가면 자신의 계정에 대해 설정해 놓은 저장소의 빌드 결과가 출력된다


  - Travis CI 설정작업이 끝났다. 이제 GitHub 저장소로 변경내역을 Push할 때 마다 .travis.yml에 설정한 Node.js 버전별로 자동으로 빌드가 이루어진다

  - Travis CI에서 빌드 진행 내역을 확인하는 방법 : "Build Matrix" -> Job 선택

    "npm test" 가 수행되어 테스트 코드가 정상수행된 것을 볼 수 있다 


4. GitHub 저장소에 Travis 빌드 아이콘 설정

  - GitHub 저장소에 자신의 변경내역을 push하고 Travis의 빌드 결과(성공/실패)를 아이콘으로 표현해 보자 

  - https://travis-ci.org/ 에서 저장소를 선택하면 우측 결과 화면 위쪽에 톱니바퀴 설정 아이콘이 나온다. "Status Images"를 선택한다


  - "Status Images"를 선택하고 Markdown의 내역을 복사한다 


  - Markdown 복사 내역은 GitHub 저장소의 README.md 파일에 넣기 위함이다. GitHub 저장소로 이동하여 README.md파일을 Edit 하고 commit 한다 


  - 최종 화면이 다음과 같이 나오면 성공! 다음부터 저장소에 push한 애플리케이션의 Test코드가 실패하면 빨간 아이콘이 나올 것이다  


<참조>

  - Travis Build Configuration & CI Environment

  - Travis Node.js Configuration

  - Mobicon Statistics in Travis : 이동평균을 구하는 모듈을 만들어 보았다. 테스트는 Mocha + should.js 기반

'CI > Jenkins, Travis' 카테고리의 다른 글

[Jenkins] 설치후 Security 설정하기  (0) 2013.01.07
[Jenkins] Jenkins와 Gradle 그리고 JavaScript  (0) 2012.12.26
posted by Peter Note
2013. 8. 12. 17:39 Dev Environment/Docker

가상머신 관리도구인 Vagrant를 통하여 Node.js + MongoDB 개발환경을 구축해 본다.


1. 설치 

  - VirtualBox 다운로드 및 설치

  - Vagrant 다운로드 및 설치

  - Vagrant 환경 설정

    + 프로젝트 디렉토리를 하나 만든다. 또는 기존 Project가 있으면 디렉토리로 이동한다. VirtualBox에 원하는 이미지를 다운로드하여 설치한다. 이미지는 Vagrant에서 패키징한 Box를 다운로드할 수 있는 별도 사이트 제공한다 

    + Box는 기본설정과 OS가 설치된 VM 템플릿 이미지이다 

// 형식 : vagrant box add [title] [download-url] 

$ vagrant box add centos64 http://developer.nrel.gov/downloads/vagrant-boxes/CentOS-6.4-x86_64-v20130427.box

Downloading or copying the box...

    + 프로젝트를 초기화 한다

vagrant init centos64


// 결과 : 환경설정 파일 1개 생성됨 

Vagrantfile 


2. 가상머신 기동

  - Vagrant 통해 가상머신 기동하기 

// 기동

$ vagrant up

Bringing machine 'default' up with 'virtualbox' provider...

[default] Importing base box 'centos64'...

[default] Matching MAC address for NAT networking...

[default] Setting the name of the VM...

[default] Clearing any previously set forwarded ports...

[default] Creating shared folders metadata...

[default] Clearing any previously set network interfaces...

[default] Preparing network interfaces based on configuration...

[default] Forwarding ports...

[default] -- 22 => 2222 (adapter 1)

[default] Booting VM...

[default] Waiting for VM to boot. This can take a few minutes.

[default] VM booted and ready for use!

[default] Mounting shared folders...

[default] -- /vagrant


// VirtualBox VM이 자동으로 수행된 것을 볼 수 있다 

// VM 들어가기 : 같은 디렉토리면 ssh를 n개까지 open 가능 

// ssh를 통하여 별도의 VM 으로 들어갈 수가 있는 것이다. 

// 단, vagrant init [title] 된 Vagrantfile 파일이 같은 디렉토리에 있어야 함

$ vagrant ssh

Welcome to your Vagrant-built virtual machine.

[vagrant@localhost ~]$ 


// 정지

$ vagrant halt


3. Node.js & MongoDB, etc 개발환경 구축하기 

  - 제일 먼저 yum update 수행, 프로젝트 파일과 관계없는 운영 미들웨어 및 데이터베이스 설정이다. 

  - CentOS 64bit Node.js 설치하기 

    + 컴파일해서 설치함

  - CentOS 64bit MongoDB 설치하기 

  - CentOS 64bit Git 설치하기

  - Yeoman work flow 환경도 설치

    + yeoman, grunt, bower 설치 : sudo npm install -g yo grunt-cli bower

    + yeoman generator 설치 : sudo npm install -g generator-webapp

  - Sails.js Framework 기반 개발을 위하여 설치

    + sudo npm install -g sails@0.8.9

    + 버전 지정안하면 최신 버전인 0.9.5 설치됨


4. 애플리케이션 활용하기 

  - 개발환경을 구축하고 자신의 로컬머신에 있는 프로젝트 파일을 VM에도 설치해야 하는가?

    재배포 필요없이 로컬에 있는 파일을 VM에 sync folder 기능을 이용하여 Share 할 수 있다 

  - 프로젝트 파일 공유 : Vagrantfile 내역 (참조)

// 형식 

config.vm.synced_folder "[내 로컬머신의 디렉토리 절대경로]", "[VM에 로딩할 절대경로와 가상디렉토리명 지정]"


// 설정 예

config.vm.synced_folder "/Users/development/smart-solutions/SmartStatistics", "/home/vagrant/SmartStatistics"


// VM reloading 및 결과 

/Users/development/smart-solutions/SmartStatistics> vagrant reload

[default] Attempting graceful shutdown of VM...

[default] Setting the name of the VM...

.. 중략 ..

[default] Mounting shared folders...

[default] -- /vagrant

[default] -- /home/vagrant/SmartStatistics


/Users/development/smart-solutions/SmartStatistics> vagrant ssh

Last login: Mon Aug 12 08:09:35 2013 from 10.0.2.2

Welcome to your Vagrant-built virtual machine.

[vagrant@localhost ~]$ sudo iptables -F

[vagrant@localhost ~]$ cd SmartStatistics/

[vagrant@localhost SmartStatistics]$ pwd

/home/vagrant/SmartStatistics

  - 로컬과 VM의 파일을 서로 Share하였고 서버를 뛰우면 VM에서도 동일 Port로 뜰 것이다. 예) Sails는 default 1337 port를 사용한다 

     VM은 1337 port 를 사용하고 로컬 머신은 1338 port를 사용해서 port forwarding을 한다. 

     즉, 로컬 머신의 브라우져에서 http://localhost:1338 호출하면 VM의 1337 port를 통하여 서비스가 이루어진다(Port Forwarding)

  - 포트 충돌 해결 : Vagrantfile 내역 (참조)

// 형식 

config.vm.network :forwarded_port, guest: [VM에서 사용할 port번호], host: [내 로컬머신에서 사용할 port 번호]


// 설정 예 

config.vm.network :forwarded_port, guest: 1337, host: 1338


// VM reloading 및 결과

/Users/development/smart-solutions/SmartStatistics> vagrant reload

[default] Attempting graceful shutdown of VM...

[default] Setting the name of the VM...

[default] Forwarding ports...

.. 중략 ..

[default] -- 22 => 2222 (adapter 1)

[default] -- 1337 => 1338 (adapter 1)

[default] Booting VM...

[default] Mounting shared folders...

[default] -- /vagrant

[default] -- /home/vagrant/SmartStatistics


- vagrant VM

[vagrant@localhost SmartStatistics]$ netstat -na | grep 1337

tcp        0      0 0.0.0.0:1337                0.0.0.0:*                   LISTEN


- local my machine

/Users/development/smart-solutions/SmartStatistics> netstat -na|grep 1338

tcp4       0      0  *.1338                 *.*                    LISTEN

  - 테스트 수행 : port forwarding이 안될 경우 "sudo iptables -F" 를 통하여 강제 재설정을 해준다. 그리고 다시 curl 수행하여 체크 

// curl 이용하여 호출을 했는데 결과값이 나오지 않으면 iptables 에 대한 설정을 해준다 

/Users/development/smart-solutions/SmartStatistics> curl -v http://localhost:1338/

* About to connect() to localhost port 1338 (#0)

*   Trying ::1...

* Connection refused

*   Trying 127.0.0.1...

* connected

* Connected to localhost (127.0.0.1) port 1338 (#0)


// vagrant ssh (port forwarding이 안될 경우)

// 하기 명령을 .bash_profile 에 넣어서 자동화 한다 

/Users/development/smart-solutions/SmartStatistics> vagrant ssh

Last login: Mon Aug 12 08:09:35 2013 from 10.0.2.2

Welcome to your Vagrant-built virtual machine.

[vagrant@localhost ~]$ sudo iptables -F

  - 로컬 머신의 브라우져에서 호출 : "http://localhost:1338"


5. Package 만들기 

  - 기존에 쓰던 VM 이미지를 Vagrant의 Box로 만들어서 개발환경을 미리 패키징할 수 있다  

// 형식 : vagrant package --base <target> --output <output>.box


6. Provisioning 하기


  - Vagrant up 수행시 최초 실행되는 매크로 관리 도구인 Chef를 사용한다

  - Chef Solo Provisioning 을 하면 Chef Server가 필요없이 사용할 수 있다 

  - Opscode Cookbooks 에서 원하는 receipe 를 내려받아서 설정해 놓으면 자동 실행된다 


<참조>

  - Vagrant 설치 및 기동

  - SKPlanet의 Vagrant 설치 및 자료

  - Vagrant, Chef 살펴보기 

  - Chef Server 설치하기 튜토리얼

  - KTH의 Chef 블로깅


posted by Peter Note
2013. 8. 7. 16:46 Languages/R

Smart Dashboard는 Data Visualization을 표방하고 있다. 실시간 표현을 근간으로 하고 있으며, 통계 데이터에 대한 분석 또한 필요한데, 이때 필요한 것이 통계적 지식과 방법론이다. 요즘 BigData에 대한 Visualization 언어로 R이 새롭게 인식되고 있는데 이에대해 알아보자 


1. R의 이해

  - 넌 뭐니?

R 프로그래밍 언어(줄여서 R)는 통계 계산과 그래픽을 위한 프로그래밍 언어이자 소프트웨어 환경이다

  - 뉴질랜드 오클랜드 대학교 통계학 교수 로스 이하카와 로버트 잰틀맨 두분이 개발 했단다 (S 언어를 기반함)

  - mac, window, linux, unix 플랫폼에서 이용가능하다 

  - Data Mining 관점의 R


  - 빅데이터 관점의 R


2. 배우는 방법

  - 전희원님이 이야기하는 R기반의 데이터 시각화 (PDF)

  - 방통대 정보 통계학과 코스웨어 (동영상)

  - R 기초적인 사용법 (PDF)

  - R을 이용한 데이터 실무 (PDF 다운로드 가능) : 한글 문서이다. 그냥 이걸로 지루하더라도 직접 해보자 

  - 데이터 시각화를 위한 R 소개 자료 : CIO 매거진에 20선이 소개되었다 

    + 통계 분석 R의 이해 : 한글

    + 통계용 R 첫걸음 : 영문

    + 단계적 R 안내서 : 영문

  - R 로 어떤 차트를 그릴 수 있을까?

    + R 차트 선택기


    + R을 위한 Plot system : ggplot2 소개

    + rCharts.io : 다양한 JavaScript Chart를 이용하여 시각화 


  - 체계적으로 일하면서 배우려면 방통대 정보 통계학과 추천


3. 설치

  - http://www.rstudio.com/ 에서 다운로드 받아 설치한다


4. 내가 하고 싶은 것들

  - jStat

    + JavaScript로 만들어졌음 like matlab or R 

    + jQuery와 Flot 차트 의존

  - glMatrix : JavaScript Matrix and Vector library

  - Statistical Computation in JavaScript

    + JavaScript & HTML5를 통하여 다양한 통계자료를 모바일로 손쉽게 볼 수 있게 해줌 

    + 재미난 시뮬레이션, 흥미로운 분석

    + 데이터를 좀더 Graphical 하게 표현하기 (TED강연 - 정말 재미있다. 강추) 


<참조>

  - R 위키 정의

  - R Project Organization

  - The Omega Project for Statistical Computing : 다양한 언어로의 R

  - Quick-R API Examples Index

  - 방통대 정보 통계학과 대학수학, 통계, R 코스웨어

  - NexR에 근무하는 R 전문가 전희원님 자료

  - 전희원님 블로그 : 관련 기사

posted by Peter Note
2013. 8. 7. 14:17 HTML5, CSS3/CSS

Bootstrap을 사용하는 것이 너무 식상하다면 새로나온 CSS Framework인 GroundWorkCSS를 사용해 보자. Bootstrap이 도시적 간편함이 묻어 있다면 GroundWorkCSS는 인간미 있는 편안한 전원생활을 즐기는 느낌이랄까? 


1. 설정

  - 홈페이지 상단 우측 "Templates" 옆에 다운로드 아이콘 클릭 (GitHub Repository)

  - 중요파일

    + css/groundwork.css

    + js/groundwork.all.js

  - 옵션파일

    + css/groundwork-ie.css (IE Compatibility)

    + js/libs/html5shiv.min.js (IE Compatibility)

    + css/font-awesome-ie7.min.css (IE Compatibility)

    + js/plugins/jquery.cycle2.js (Required for Cycle2)

  - 설정

// HTML head 안에 

<link type="text/css" rel="stylesheet" href="/css/groundwork.css">

<!--[if IE]><link type="text/css" rel="stylesheet" href="/css/groundwork-ie.css"><![endif]-->

<!--[if lt IE 9]><script type="text/javascript" src="/js/libs/html5shiv.min.js"></script><![endif]-->

<!--[if IE 7]><link type="text/css" rel="stylesheet" href="/css/font-awesome-ie7.min.css"><![endif]-->


// HTML 최하단에 

<script type="text/javascript" src="/js/plugins/jquery.cycle2.js"></script>

<script type="text/javascript" src="/js/groundwork.all.js"></script>

  - jquery.cycle2.js 는 뭐지? 이미지 슬라이드 기능이다


2. 기능

  - Bootstrap에서 제공하는 font typography, button, tab, menu, grid, etc등은 기본 제공한다

  - RWD (Responsive Web Design) 를 지원한다

  - 웹화면을 위한 Template Layout도 제공한다 

  - 단 Bootstrap의 Javascript로 첨부한 기능을 전부 만족하진 못하지만 jQuery Plugins 통해서 보충하면 될듯함 

  - 제공하는 Components


<참조>

  - 홈페이지 : http://groundwork.sidereel.com/

  - 저장소 : https://github.com/groundworkcss/groundwork

  - 다양한 CSS Framework 들 비교 : 개인적으로 Metro UI도 좋다


posted by Peter Note
2013. 8. 6. 19:34 Data Visualization/D3.js

D3.js 는 데이터 시각화 프레임워크로 잘 알려져 있고, 자바스크립트로 개발을 한다. HTML5의 SVG(Scalable Vector Graphic) 을 통하여 다양한 화면 해상도에서도 깨짐없는 Visualizing이 가능하다. D3.js를 익히기 위한 과정을 정리해 본다. 


개념 익히기 


   - 일반적인 사항에 대하여 알자

    + D3 는 웹표준기술을 이용해 데이터를 비쥬얼라이징할 수 있는 라이브러리다. 

    + D3.js 창시자인 엠보스톡의 워크샵을 통해 개념을 잡자

    + mbostock의 작업내역 감상하기


  - 기본적인 접근 방법에 대한 생각

  - 중요한 6가지 개념에 대해서 설명한다

    + Selectors : 기초이해Selection의 동작원리

    + Data & Joins(Enter, Update, Exit) : Thinking with Joins, Update/Enter/Exit에 대한 이해, 코드로 이해하기, 다시 기본부터 이해하기

    + Scales

    + Axis

    + Shapes

    + Layouts 


초급 학습하기 


  - http://www.dashingd3js.com/ 

    + 직접 실습한 내용 [1], [2], [3], [4]

    + D3.js 의 중요성 -> D3.js 안에 구현된 SVG API사용 -> Scale -> Axis 만들기

  - http://misoproject.com/d3-chart/tutorials/quickstart 

    + 순서대로 차트 만들어 나가기 

  - http://christopheviau.com/d3_tutorial/

    + Try D3 now -> 페이지 위쪽에 있는 도형모양을 클릭해 보라

    + 따라하며 기초개념 잡기   

  - http://www.youtube.com/user/d3Vienno 

    + 동영상 강좌를 따라한다

    + dashingd3js.com 과 유사한 과정이지만 좀 더 재미난 것들을 다룬다

    + 따라서 dashingd3js.com 을 다 본후 따라해 본다 


중급 학습하기 


  - D3.js 한글화 문서

    + 한글화 API

  - http://www.recursion.org/d3-for-mere-mortals/

    + d3 차트 만드는 기술 & 디버깅  

  - http://www.d3noob.org/

    + d3 차트 만들기 Tip & Tricks

  - D3로 구현된 다양한 Chart와 Visualization 사이트

  - Dimensional Charting Framework

    + Chart간의 interactive 표현에 능함


  - http://nvd3.org/ 에서 D3.js 를 가지고 만들어진 차트를 살펴보자

    + 실시간 코딩으로 차트 만들어 보기


고급 학습하기 


  - D3 Tip & Tricks 실습하기 : 구글링하면 PDF자료 얻을 수 있다 (d3 tips and tricks pdf)

  - D3.js 위키의 튜토리얼을 참조하자.

  - D3.js를 이용해 자신만의 차트 컴포넌트를 만든다면 다음의 가이드를 따른다. 

    + Resuability Chart를 만들기 개념 :  Repeatable, Modifiable, Configurable, Extensible 

    + 오픈소스 차트를 연구하자 : xCharts, C3.js


  - Functional Reactive Programming(FRP)와 D3.js의 관계도 살펴보면 어떨까?

    + Bacon.js와 D3.js 사용예


  - 어차피 서버에서 데이터를 받아서 화면 처리를 해야 하므로 웹앱프레임워크와 연동해 보자

    + AngularJS & D3.js 연동 예, 다른 연동 예 

    + D3.js를 Angular Directive로 만들어 놓는 OSS

  - Socket.IO를 통하여 System Realtime Monitoring 하기  (샘플소스)

  - Node.js + Express + Socket.io + D3.js 구성하기  (소스)


 ** 중급, 고급은 포스팅이나 소스를 통하여 스스로 익히는게 답!


<참조>

  - D3 강좌

  - Stanford 대학교 Visualization Group

    + Visualization에 대한 논문을 볼 수 있다. 내가 해보고 싶은 연구분야

posted by Peter Note
2013. 8. 6. 19:19 Data Visualization/D3.js

D3.js 의 Text 출력 방법 및 Axis 컴포넌트에 대해 실습해 본다 


1. SVG Text Element

  - 글자는 font, position, writing direction, attribute(rendering)을 정해야 함 

  - 정의 (참조)

<text x="20" y="20" font-family="sans-serif" font-size="20px" fill="red">Hello!</text>

  - 차트에 Text Label을 붙여보자 

<!DOCTYPE html>

<html>

  <head>

  <script type="text/javascript" src="d3.min.js"></script>

  </head>

  <body>

  <svg width="200" height="200">

 <g>

   <circle cx="20" cy="20" r="20" fill="red" />

   <circle cx="70" cy="70" r="20" fill="purple" />

 </g> 

 <text x="20" y="20" font-family="sans-serif" font-size="20px" fill="green">YoungSik!</text>

</svg>

  </body>

</html>

 글자가 나옴 


  - 다르게 표현 

//Circle Data Set

var circleData = [

  { "cx": 20, "cy": 20, "radius": 20, "color" : "green" }, 

  { "cx": 70, "cy": 70, "radius": 20, "color" : "purple" }];


//Create the SVG Viewport

var svgContainer = d3.select("body").append("svg")

                                     .attr("width",200)

                                     .attr("height",200);


//Add circles to the svgContainer : virutal element 만들기 

var circles = svgContainer.selectAll("circle")

                           .data(circleData)

                           .enter()

                           .append("circle");


//Add the circle attributes : data binding to element

var circleAttributes = circles

                       .attr("cx", function (d) { return d.cx; })

                       .attr("cy", function (d) { return d.cy; })

                       .attr("r", function (d) { return d.radius; })

                       .style("fill", function (d) { return d.color; });


//Add the SVG Text Element to the svgContainer : virtual element 만들기 

var text = svgContainer.selectAll("text")

                        .data(circleData)

                        .enter()

                        .append("text");


//Add SVG Text Element Attributes 텍스트 : data binding to element

var textLabels = text

                 .attr("x", function(d) { return d.cx; })

                 .attr("y", function(d) { return d.cy; })

                 .text( function (d) { return "( " + d.cx + ", " + d.cy +" )"; })

                 .attr("font-family", "sans-serif")

                 .attr("font-size", "20px")

                 .attr("fill", "red"); 

  좌표값이 찍혀 나온다 


2. D3.js Axis Component

  - Axis component는 horizontal-axis 와 vertical-axis를 쉽게 추가하도록 하는 것임 

  - x-axis, y-axis

  - 축 생성

var xAxis = d3.svg.axis();

  - axis는 scale과 관련이 있다 : xAxis는 function 값이 출력된다 

var axisScale = d3.scale.linear()

                 .domain([0,100])

                 .range([0,100]);


var xAxis = d3.svg.axis()

                  .scale(axisScale);


typeof(xAxis);

// function

  - axis가 function이므로 call 하는 것이다 

//Create the SVG Viewport

var svgContainer = d3.select("body").append("svg")

                                     .attr("width", 400)

                                     .attr("height", 100);


//Create the Scale we will use for the Axis

var axisScale = d3.scale.linear()

                         .domain([0, 100])

                         .range([0, 400]);


//Create the Axis

var xAxis = d3.svg.axis()

                   .scale(axisScale);


//Create an SVG group Element for the Axis elements and call the xAxis function

var xAxisGroup = svgContainer.append("g")

                              .call(xAxis);

  group tag와 그안으로 line과 text element가 포함되었다 (참조)

  + axis element는 group 안에서 생성된다 

  + 주어진 scale과 range를 기준으로 오른쪽으로 tick mark 스페이스가 생긴다 

  + 각 SVG element의 Axis Function은 SVG Transformation을 갖는다

  + 각 SVG element의 Axis Function은 line 과 text로 구성된다 

  + 마지막은 SVG Path가 SVG Viewport를 넘어가서 글자가 린다 


* 좀 더 심화학습을 하고 싶다면? 참조

posted by Peter Note